 Explorer
30 posts
Explorer
30 posts
When you finally get your Adobe Connect Virtual Classroom perfected and set up exactly the way you want it in order to engage and cultivate those student barbarians who need your awesome wisdom to function in the civilized world, it is prudent to save it as a template and then create or recreate the Virtual Classroom (or rooms) for regular live interactive use from that original pristine template.
This gives you the ability to reset the Virtual Classroom back to the original Virtual Classroom configuration you initially created in your customized template. And it stores your favorite perfected room configuration in a safe place where only you may edit it.
The menu dialog offered in the Meeting or Virtual Classroom Layouts drop-down may seem confusing. It reads “Reset to default”. This does not mean reset to the default Meeting templates provided with a fresh installation of Adobe Connect, but rather to your default template – the customized one from which you created the Virtual Classroom. In this workflow we have our opportunity to maintain the initial room configuration even after multiple classes during which your teaching assistants have moved and deleted pods, content, layouts, etc., and reduced the room to a chaotic state of nature (of course you would never trash a Virtual Classroom yourself).
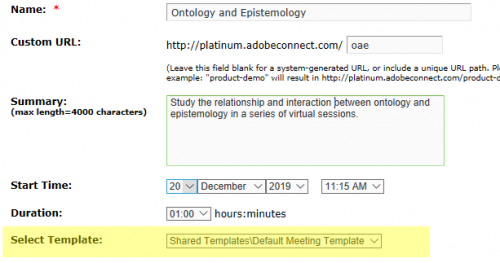
The first step, if not already done, is to make that room you love starting from the default templates provided by Adobe. Skip this step if you already have a Virtual Classroom set up and ready to it move to a template:
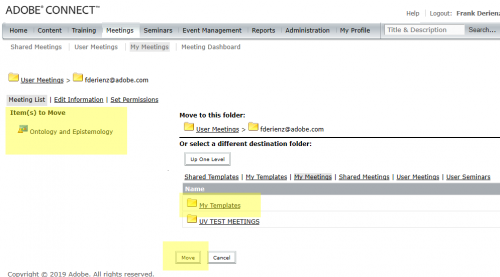
Next move the Meeting to the templates folder using the Move button in Adobe Connect Central:
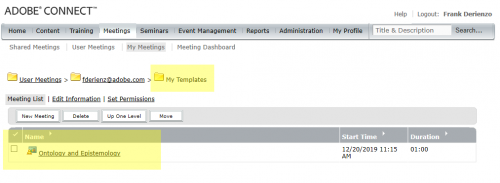
Next create a new Virtual Classroom from that template you just created; choose New Virtual Classroom and select your new template and the new room will be identical with the template:

Inside the Virtual Classroom or Meeting room, after running your session, choose Layouts >Reset layouts:

Then click ‘Reset’ in the pop up:

You room is now back to your customized state of perfection and ready to be trashed all over again.
Note: If you use the Adobe Experience Manager Events module in Adobe Connect to wrap your Seminars and classes, you may also reset those separate Event templates as well; the technique for that task is outlined here: https://www.connectusers.com/tutorials/2013/08/resetting_default_event_templates_in_adobe_connect/index.php
When you finally get your Adobe Connect Virtual Classroom perfected and set up exactly the way you want it in order to engage and cultivate those student barbarians who need your awesome wisdom to function in the civilized world, it is prudent to save it as a template and then create or recreate the Virtual Classroom (or rooms) for regular live interactive use from that original pristine template.
This gives you the ability to reset the Virtual Classroom back to the original Virtual Classroom configuration you initially created in your customized template. And it stores your favorite perfected room configuration in a safe place where only you may edit it.
The menu dialog offered in the Meeting or Virtual Classroom Layouts drop-down may seem confusing. It reads “Reset to default”. This does not mean reset to the default Meeting templates provided with a fresh installation of Adobe Connect, but rather to your default template – the customized one from which you created the Virtual Classroom. In this workflow we have our opportunity to maintain the initial room configuration even after multiple classes during which your teaching assistants have moved and deleted pods, content, layouts, etc., and reduced the room to a chaotic state of nature (of course you would never trash a Virtual Classroom yourself).
The first step, if not already done, is to make that room you love starting from the default templates provided by Adobe. Skip this step if you already have a Virtual Classroom set up and ready to it move to a template:
Next move the Meeting to the templates folder using the Move button in Adobe Connect Central:
Next create a new Virtual Classroom from that template you just created; choose New Virtual Classroom and select your new template and the new room will be identical with the template:
Inside the Virtual Classroom or Meeting room, after running your session, choose Layouts >Reset layouts:
Then click ‘Reset’ in the pop up:
You room is now back to your customized state of perfection and ready to be trashed all over again.
Note: If you use the Adobe Experience Manager Events module in Adobe Connect to wrap your Seminars and classes, you may also reset those separate Event templates as well; the technique for that task is outlined here: https://www.connectusers.com/tutorials/2013/08/resetting_default_event_templates_in_adobe_connect/index.php


You must be logged in to post a comment.
- Most Recent
- Most Relevant
