What are parameters in Shared actions ? How do you use them? What is the difference between Compulsory and Candidate parameters. Blog is NOT about creating Shared actions, meant to be able to use parameters when you are provided with shared actions. like in an interaction.
Intro
This term is used in two rather different workflows:
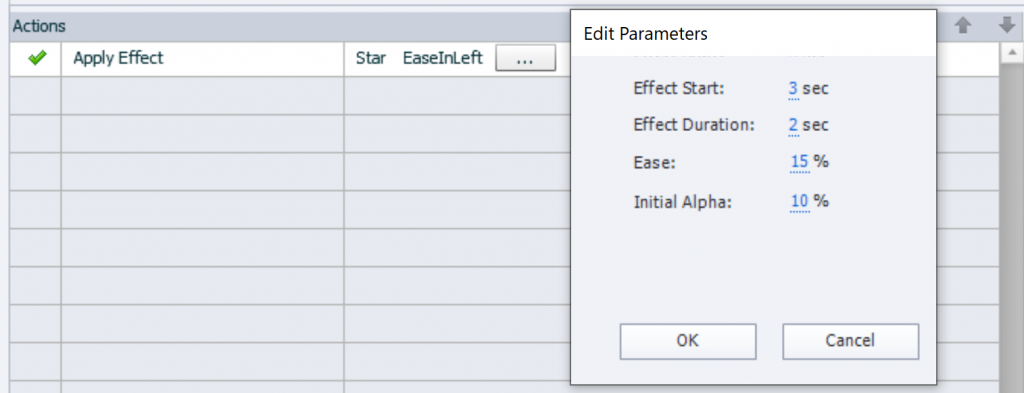
- When defining Effects, you can set up some parameters. For all effects both the start and the duration are parameters, but for some effects more parameters can be changed. You will not find the term ‘parameter’ in the Timing properties, it only appears when you want to apply an effect using advanced/shared actions. Have a look at this screenshot:

- When creating and using Shared Actions. This blog will focus only on the parameters in that conext.
What is a Parameter (in shared actions)?
This is my definition: a parameter is an ‘item’ replaceable by another item when you (re)use the shared action either in the same or in another project. That ‘item’ doesn’t always have a fixed type! It depends of the command you are using. Look at a some examples for clarification:
- Command Jump to slide: needs one parameter which is the slide. It is clear that you cannot change to another type of item than a slide.
- Command Change State of…: needs two parameters, first is the multistate object, second is the state you want to show. The first parameter has to be a multistate object of any type: shape, caption, button (for custom states), image, video, animation… Second parameter needs to be a state of that multistate object.
- Commands Hide/Show: need one parameter. Anything that can be showed or hidden is possible: shape, caption, button (for custom states), image, video. But also groups are possible! Look at the practice session below to see how this extends shared action functionality beyond what you are used to.
You may skip the explanation about the two types of parameters and go directly to the Practice part, if you don’t like definition texts. You’ll discover both types in that Practice session as well. BTW: the terms ‘compulsory’ and ‘candidate’ are just my personal choice, not official terms.
Compulsory parameters
All the items mentioned in the previous examples are compulsory: you will always have to choose them in any shared action. Even though some will be the same in all instances of that shared action.
Candidate parameters
You probably know the command ‘Assign’ to store a value in a user variable or a system variable of the category ‘Movie Control’. A variable when used in a shared action can be a parameter, but it is not compulsory. If it is not a parameter, here is a rather unknown secret: importing the shared action in a new project will automatically create that variable, with the same name, description and value as designed originally.
In some circumstances it is necessary to define the variable as parameter. You will see an example in the practice session for the toggle action.
In a conditional action you can have another candidate parameter, the ‘literal‘. Example: you want to limit a number of attempts by the learner to a maximum of 5. If you want to be able to edit that maximum number, you could define the literal as a parameter. This can be a bit tricky, but is beyond the scope of this basic blog.
Learn by Practice
Hope you have watched the Demo project in ‘Use Shared Actions‘. In this first practice session you will create the slide with the ‘slideshow’, using this two-slide project. Please download it if you want to follow.
When you have finished adding the shared actions to the slide and to the buttons, it would look like this (I left the playbar for your convenience):
For those who don’t like reading, will post a video with the 3-step workflow ASAP.
Step 1: explore project
1.1 TImeline and setup
Take a look look at the setup of the second slide. In the Timeline I grouped all design elements at the bottom.
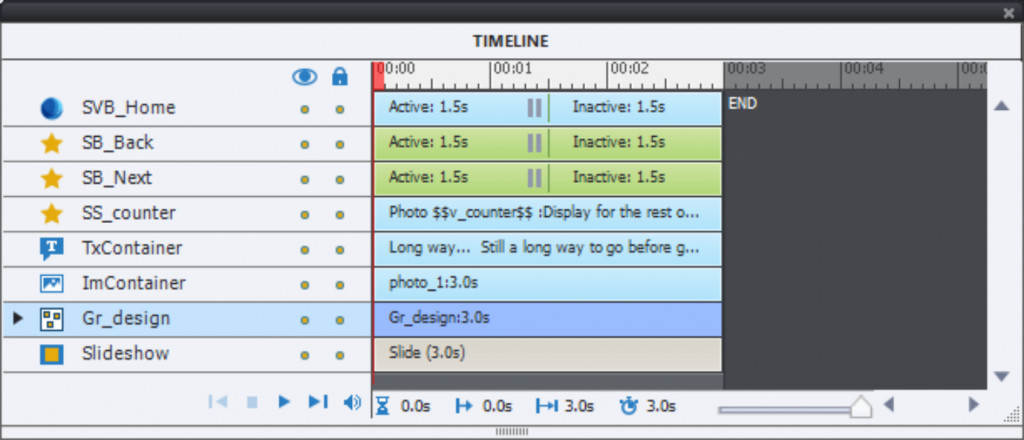
The 5 items on top of the group are:
- ImContainer: a multistate object with 5 photos
- TxContainer: a second multistate object, which has texts in the same sequence to explain the photos
- SS_counter: smart shape with the text having the embedded variable v_counter
- SB_Next: the Next button, a shape button
- SB_Back: the Back button, shape button
- SVB_Home: SVG used as button
1.2 Variables
Open the Variables dialog box, using Project, Variables. You will see two variables: v_counter and v_max. The latter will store the amount of items in your show. Their default values are not important, they will be set with the actions. Just for clarification I set v_counter to start with 0 and v_max to 5 because the example has 5 photos. But they are not important.
1.3 Library
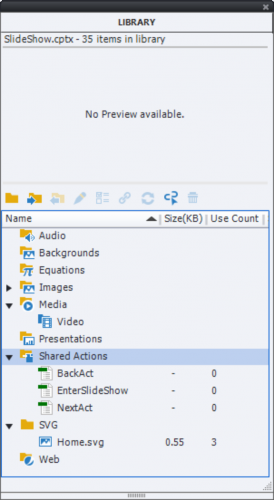
Open the Library panel, and find the subfolder ‘Shared Actions’. You detect 3 shared actions, and their Usage is stil at 0 for the moment:
Step 2: ‘EnterSlideShow’ to Slide
Double-check in the Properties panel or on the stage that NO object is selected, that you are in the Slide Properties.
2.2 Link the action to the On Enter event
There are two ways to do this:
- From the Library: drag the name of the shared action to the slide. You just have to be careful not to drag to an interactive object (the three buttons in this slide). It will automatically be linked to the On Enter event, never to the On Exit event. Moreover the Parameters dialog box (see 2.2) opens directly. This is my preferred workflow.
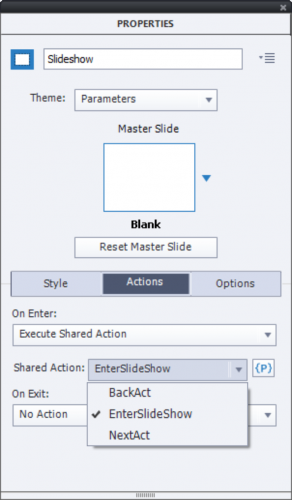
- From the Properties: go to the Actions tab, open the dropdown list next to ‘On Enter’, choose ‘Execute Shared Actions’ and choose the action ‘EnterSlideShow’

2.2 Define the Parameter(s)
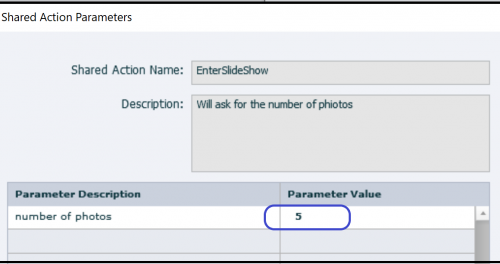
If you used the Library approach, the dialog box ‘Shared Actions Parameters’ will be open. If you used the Properties panel approach you need to click the {P} button next to the Action field. In this dialog box you’ll see both description of the action and of the parameters. Please give a value to all the parameters needed. You can use filtering (will post a video tutorial for a more complicated parameters set).
Step 3: actions for the buttons
The Home button has the simple action to return to the first slide. This will allow you to test the reset actions in the On Enter action of step 2. Before testing you still have to attach the shared actions to the two navigation buttons. Workflow is exactly the same for both.
3.1 Link the action to the Success event
You can use again two workflows, similar to step 2:
- From the Library: No need to select the button! Drag the name of the shared action to the button.. It will automatically be linked to the Success event of the button. Of course, this is my preferred workflow, because the Parameters dialog box (3.2) will open immediately. Saves a lot of clicks.
- From the Properties: select the button, go to the Actions tab, open the dropdown list next to ‘On Enter’, choose ‘Execute Shared Actions’ and choose the action ‘EnterSlideShow’
3.2 Define the Parameter(s)
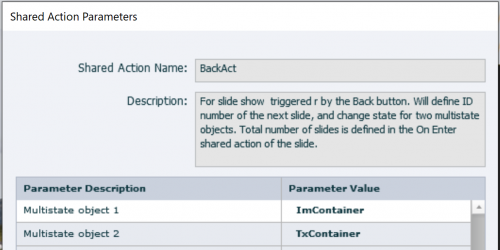
Identical to 2.2. Parameters for both button actions are identical: the two containers. It doesn’t matter if you switch image with text container, sequence is not important.
Step 4: Test
Test and have fun.
More?
How do you use these actions in your projects with your setup? That will be the topic of the next blog and probably the next video.
Intro
This term is used in two rather different workflows:
- When defining Effects, you can set up some parameters. For all effects both the start and the duration are parameters, but for some effects more parameters can be changed. You will not find the term ‘parameter’ in the Timing properties, it only appears when you want to apply an effect using advanced/shared actions. Have a look at this screenshot:

- When creating and using Shared Actions. This blog will focus only on the parameters in that conext.
What is a Parameter (in shared actions)?
This is my definition: a parameter is an ‘item’ replaceable by another item when you (re)use the shared action either in the same or in another project. That ‘item’ doesn’t always have a fixed type! It depends of the command you are using. Look at a some examples for clarification:
- Command Jump to slide: needs one parameter which is the slide. It is clear that you cannot change to another type of item than a slide.
- Command Change State of…: needs two parameters, first is the multistate object, second is the state you want to show. The first parameter has to be a multistate object of any type: shape, caption, button (for custom states), image, video, animation… Second parameter needs to be a state of that multistate object.
- Commands Hide/Show: need one parameter. Anything that can be showed or hidden is possible: shape, caption, button (for custom states), image, video. But also groups are possible! Look at the practice session below to see how this extends shared action functionality beyond what you are used to.
You may skip the explanation about the two types of parameters and go directly to the Practice part, if you don’t like definition texts. You’ll discover both types in that Practice session as well. BTW: the terms ‘compulsory’ and ‘candidate’ are just my personal choice, not official terms.
Compulsory parameters
All the items mentioned in the previous examples are compulsory: you will always have to choose them in any shared action. Even though some will be the same in all instances of that shared action.
Candidate parameters
You probably know the command ‘Assign’ to store a value in a user variable or a system variable of the category ‘Movie Control’. A variable when used in a shared action can be a parameter, but it is not compulsory. If it is not a parameter, here is a rather unknown secret: importing the shared action in a new project will automatically create that variable, with the same name, description and value as designed originally.
In some circumstances it is necessary to define the variable as parameter. You will see an example in the practice session for the toggle action.
In a conditional action you can have another candidate parameter, the ‘literal‘. Example: you want to limit a number of attempts by the learner to a maximum of 5. If you want to be able to edit that maximum number, you could define the literal as a parameter. This can be a bit tricky, but is beyond the scope of this basic blog.
Learn by Practice
Hope you have watched the Demo project in ‘Use Shared Actions‘. In this first practice session you will create the slide with the ‘slideshow’, using this two-slide project. Please download it if you want to follow.
When you have finished adding the shared actions to the slide and to the buttons, it would look like this (I left the playbar for your convenience):
For those who don’t like reading, will post a video with the 3-step workflow ASAP.
Step 1: explore project
1.1 TImeline and setup
Take a look look at the setup of the second slide. In the Timeline I grouped all design elements at the bottom.

The 5 items on top of the group are:
- ImContainer: a multistate object with 5 photos
- TxContainer: a second multistate object, which has texts in the same sequence to explain the photos
- SS_counter: smart shape with the text having the embedded variable v_counter
- SB_Next: the Next button, a shape button
- SB_Back: the Back button, shape button
- SVB_Home: SVG used as button
1.2 Variables
Open the Variables dialog box, using Project, Variables. You will see two variables: v_counter and v_max. The latter will store the amount of items in your show. Their default values are not important, they will be set with the actions. Just for clarification I set v_counter to start with 0 and v_max to 5 because the example has 5 photos. But they are not important.
1.3 Library
Open the Library panel, and find the subfolder ‘Shared Actions’. You detect 3 shared actions, and their Usage is stil at 0 for the moment:

Step 2: ‘EnterSlideShow’ to Slide
Double-check in the Properties panel or on the stage that NO object is selected, that you are in the Slide Properties.
2.2 Link the action to the On Enter event
There are two ways to do this:
- From the Library: drag the name of the shared action to the slide. You just have to be careful not to drag to an interactive object (the three buttons in this slide). It will automatically be linked to the On Enter event, never to the On Exit event. Moreover the Parameters dialog box (see 2.2) opens directly. This is my preferred workflow.
- From the Properties: go to the Actions tab, open the dropdown list next to ‘On Enter’, choose ‘Execute Shared Actions’ and choose the action ‘EnterSlideShow’

2.2 Define the Parameter(s)
If you used the Library approach, the dialog box ‘Shared Actions Parameters’ will be open. If you used the Properties panel approach you need to click the {P} button next to the Action field. In this dialog box you’ll see both description of the action and of the parameters. Please give a value to all the parameters needed. You can use filtering (will post a video tutorial for a more complicated parameters set).

Step 3: actions for the buttons
The Home button has the simple action to return to the first slide. This will allow you to test the reset actions in the On Enter action of step 2. Before testing you still have to attach the shared actions to the two navigation buttons. Workflow is exactly the same for both.
3.1 Link the action to the Success event
You can use again two workflows, similar to step 2:
- From the Library: No need to select the button! Drag the name of the shared action to the button.. It will automatically be linked to the Success event of the button. Of course, this is my preferred workflow, because the Parameters dialog box (3.2) will open immediately. Saves a lot of clicks.
- From the Properties: select the button, go to the Actions tab, open the dropdown list next to ‘On Enter’, choose ‘Execute Shared Actions’ and choose the action ‘EnterSlideShow’
3.2 Define the Parameter(s)
Identical to 2.2. Parameters for both button actions are identical: the two containers. It doesn’t matter if you switch image with text container, sequence is not important.

Step 4: Test
Test and have fun.
More?
How do you use these actions in your projects with your setup? That will be the topic of the next blog and probably the next video.
You must be logged in to post a comment.
- Most Recent
- Most Relevant
WP errors are back in threaded replies… even in Edge. Sighing.
You can see a shared action as a template. Look under the Blank button. It was not the goal of this crash course to explain the content of the shared actions, just the USAGE for newbies.
Conclusion; will need to publish everything on my personal blog… it is so frustrating to try to do it correctly here.
Since it was not possible last week (uploaded that blog many days ago) to include a published CP project, nor a raw cptx project I inserted links to those files in my domain. But as often happens, those downloads also lead to errors. What you tell is typical: since the cptx file is a zipped folder, some users will see a ‘zip’ as extension. Changing that to ‘cptx’ will fix the problem.
Hope the many issues will get fixed all. In Edge I don’t get any WP errors on comments anymore, it continues on Chrome but I switched for the portal to Edge.
Will post a video with the easiest workflow as well, for the developers with very little time to read a blog. Will test if the insertion of the to be downloaded cptx is working then.
…
… But I can’t make it work as expected !…
I attached the shared action correctly on the 3 places… I define the parameters as you proposed…
=> Is there a way to see what’s in the shared actions ?…
(I can send you the project with modifications so you can see by yourself ?…)
😉
…
Someone else reported the same… when in Chrome. Can you try another browser? It is not the first time that Chrome leads to issues with variables and shared actions. It works for me (tried on another system, not the one with the file).
I inserted a preview in Chrome of the filled in project.
…
Hello Lily !…
I’m sure you have already seen that there is a problem with dowloading the project :
“Download the project from
I got this file “Upload_20200503-182253” which we can’t open directly…
In fact, I just renamed it (ending with “.cptx”) and it works fine !…
Hope that helps !…
😉
…


