 Legend
245 posts
Legend
245 posts
Meant both as intro to custom Knowledge Check slides, using a validated Text Entry Box , a multistate object and a toggle button. Has links to other blogs explaining basics about those items.
Why?
Starters in Captivate very soon try to tweak quiz or Knowledge check slides. In the Adobe forums appeared this question, which has an explanatory flowchart to clarify:
As you may see in the thread, multiple are possible. I tried to find the easiest way to achieve the wanted result, without having to use advanced/shared actions, nor tweaking the default quiz slides. This was possible because no scoring was needed, it is a typical Knowledge Check slide.
Not only did I look for a simple solution, but also for a solution which wouldn’t cause any ‘collateral’ problems with navigation in the course. Best way in that case is to avoid the use of multiple slides. That ‘older’ workflow with multiple slides may have been necessary many years ago, but not with all the new features in the recent versions.
Example
Watch the result in this output file:
It has 3 slides, the second slide is achieving the goal.
Used items/tools
Besides graphics and text containers I used:
Text Entry Box, validated. The associated variable exists, but is not used in any action. More about Text Entry Box basics can be found in TEB – back to basics
Multistate Object: for the button ‘Steps’ which is a ‘toggle button’. Toggle buttons means that you use the same button for two functionalities. In this case the buttons has the information pop up, and can also hide it when clicking again (hence the different look of the button). The used workflow with two states is explained step-by-step in another blog: Click/Reveal interaction
The button type is ‘Text button’, because the used Theme (‘Windswept’) uses that type as Submit button for the TEB.
Step-by-step
- Choose a theme for design and create the different text containers. You can use either Text captions or Shapes. The different items are indicated (color coding) in this screenshot:

- Insert a Text Entry Box. Look at the screenshots to see its setup:
Style tab: ‘Validate User Input’ needs to be activated. I also used the ‘More Options’ button to restrict the input to Numbers only, maximum 2 characters. You don’t need to do so, only recommended. That will limit the correct answer in this case to only the number ‘7’
Actions tab: I checked the options to show the feedback for Success and for Failure. Both actions for Success and Last Attempt are set to No action, since you have the Continue button. This will also prevent that the play head continues till the end of the slide when you have clicked the Submit button.
You can choose the number of Attempts (I choose 5). If you choose Infinite attempts, the Last Attempt action will be dimmed.
In this screenshot you see also the correct answer HUD, limited to one answer.
- Create the text buttons ‘Steps’ and ‘Continue’.
- Take out the Rollover and Down states for all buttons. You can do that using the Object State panel (click State View in the Properties panel, or directly in the Properties panel, using the Dropdown list which starts with Normal (Default).

- Open the Object State panel for the button ‘Steps’. Add a custom state. I labeled it Steps, but it is not even necessary to change that name. In that custom state, add a line object diagonally to the button, and add a shape (or a caption) with the text of the steps. Only the clickable area of a button is locked in size and location, you can add as many other items as you want. For more information refer to the link I posted under Used items/tools. The Object State panel should look like this:

- For the button ‘Continue’ you can keep the default Success command ‘Go to Next Slide’, in the Actions tab of its Properties panel.
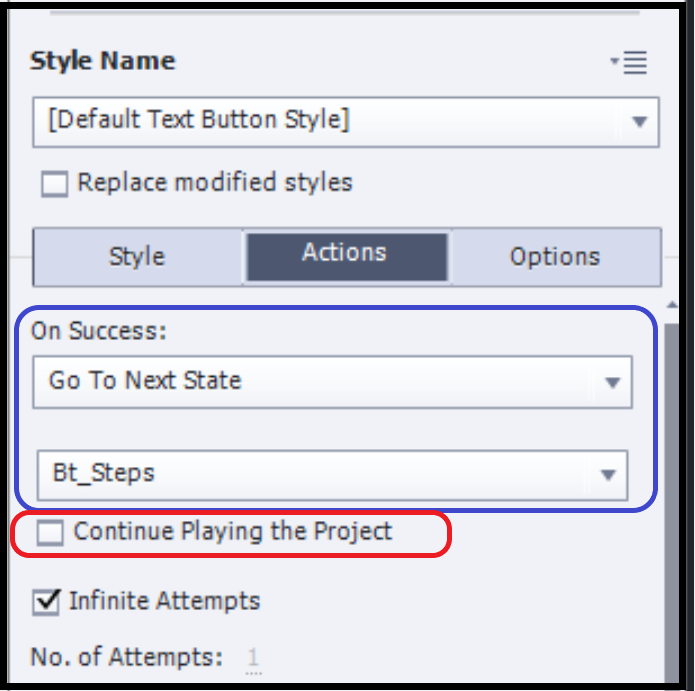
- For the button ‘Steps‘, change the command to ‘Go to Next State’ for the button itself. I labeled the button Bt_Steps, and the Actions tab will look like this. It is VERY important that you uncheck the option ‘Continue playing the Project’ to avoid that the play head continues. You want the slide to be paused.:


Why?
Starters in Captivate very soon try to tweak quiz or Knowledge check slides. In the Adobe forums appeared this question, which has an explanatory flowchart to clarify:
As you may see in the thread, multiple are possible. I tried to find the easiest way to achieve the wanted result, without having to use advanced/shared actions, nor tweaking the default quiz slides. This was possible because no scoring was needed, it is a typical Knowledge Check slide.
Not only did I look for a simple solution, but also for a solution which wouldn’t cause any ‘collateral’ problems with navigation in the course. Best way in that case is to avoid the use of multiple slides. That ‘older’ workflow with multiple slides may have been necessary many years ago, but not with all the new features in the recent versions.
Example
Watch the result in this output file:
It has 3 slides, the second slide is achieving the goal.
Used items/tools
Besides graphics and text containers I used:
Text Entry Box, validated. The associated variable exists, but is not used in any action. More about Text Entry Box basics can be found in TEB – back to basics
Multistate Object: for the button ‘Steps’ which is a ‘toggle button’. Toggle buttons means that you use the same button for two functionalities. In this case the buttons has the information pop up, and can also hide it when clicking again (hence the different look of the button). The used workflow with two states is explained step-by-step in another blog: Click/Reveal interaction
The button type is ‘Text button’, because the used Theme (‘Windswept’) uses that type as Submit button for the TEB.
Step-by-step
- Choose a theme for design and create the different text containers. You can use either Text captions or Shapes. The different items are indicated (color coding) in this screenshot:
- Insert a Text Entry Box. Look at the screenshots to see its setup:
Style tab: ‘Validate User Input’ needs to be activated. I also used the ‘More Options’ button to restrict the input to Numbers only, maximum 2 characters. You don’t need to do so, only recommended. That will limit the correct answer in this case to only the number ‘7’
Actions tab: I checked the options to show the feedback for Success and for Failure. Both actions for Success and Last Attempt are set to No action, since you have the Continue button. This will also prevent that the play head continues till the end of the slide when you have clicked the Submit button.
You can choose the number of Attempts (I choose 5). If you choose Infinite attempts, the Last Attempt action will be dimmed.
In this screenshot you see also the correct answer HUD, limited to one answer. - Create the text buttons ‘Steps’ and ‘Continue’.
- Take out the Rollover and Down states for all buttons. You can do that using the Object State panel (click State View in the Properties panel, or directly in the Properties panel, using the Dropdown list which starts with Normal (Default).
- Open the Object State panel for the button ‘Steps’. Add a custom state. I labeled it Steps, but it is not even necessary to change that name. In that custom state, add a line object diagonally to the button, and add a shape (or a caption) with the text of the steps. Only the clickable area of a button is locked in size and location, you can add as many other items as you want. For more information refer to the link I posted under Used items/tools. The Object State panel should look like this:
- For the button ‘Continue’ you can keep the default Success command ‘Go to Next Slide’, in the Actions tab of its Properties panel.
- For the button ‘Steps‘, change the command to ‘Go to Next State’ for the button itself. I labeled the button Bt_Steps, and the Actions tab will look like this. It is VERY important that you uncheck the option ‘Continue playing the Project’ to avoid that the play head continues. You want the slide to be paused.:


You must be logged in to post a comment.
- Most Recent
- Most Relevant
I like the easier solution to this problem. Thanks, I will give it a try.
You’re welcome!
Why complicate when it can be done in an easy way?
Hey. Interesting way of approaching the issue.
