 Legend
245 posts
Legend
245 posts
Step-by-step workflow, answer to a user question, to have a short video looping until the user clicks a button.
Intro
A user asked recently for a step-by-step workflow to have a video – inserted as slide video – looping until the learner clicks a button. User tried to attach an advanced action to the On Exit event, but because that event is not to be trusted (happens after the last frame) this was not functional.
You can have a look at the example project, where I inserted two short videos which are looping until you click the Next button. To make the loop really visible a playbar with the progress bar is visible.
The workflow (see below) is not suited for longer videos. However I don’t think looping is often used for long videos. It would be not very user friendly. For a long video I would use the features of an interactive video to allow the user to jump to different bookmarked frames. I explained that workflow in:
Example project
One long video was added, which can be replayed with a button, to give control to the learner.
Workflow
Step 1
Create a user variable, which will be used to store the frame number of the first frame of each slide. It is a reusable variable. In the example project it has been used three times: twice for the looping short videos, and once for the long video. The actions for the long video are in the Example project.
I labeled this variable v_start. No need for a default value.
Step 2
Create a Shared action with one parameter: the duration of the slide video.
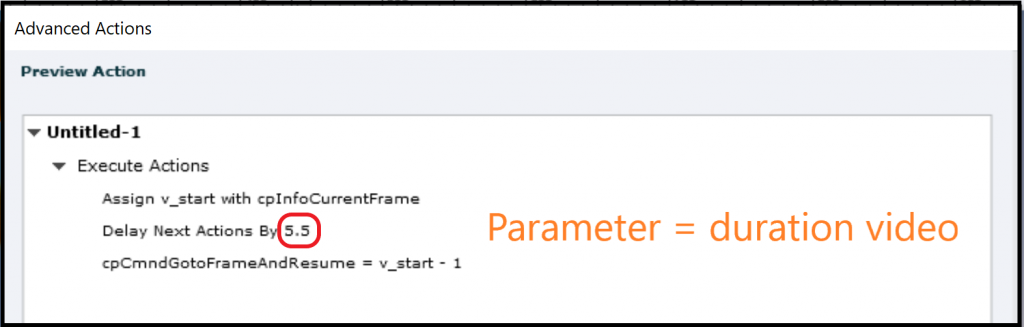
Step 3
Attach the shared action to the On Enter slide event of the slide where you want the video to loop. You find the duration of the video in the Timeline panel. It needs to be entered in seconds, but you can use decimals.
Depending on the styling of the video you may find it useful to add a short Fade in and/or Fade out transition to the video object to make the transition when the video restarts in the loop more smoothly.
Why not suitable for Long video?
Since the command ‘Delay next actions….’ is used, the chance to lose some synchronisation is much bigger for a long video. Similar to audio, the video needs to be loaded when entering the slide. For a long video that may lead to some lagging. But the time in the Delay command starts right away when entering the slide.
Avoid a pause button as well, because the Delay command ignores all pauses.
For that reason, all buttons used in the example file have either no pausing point, (for the short videos which are looping) or a pausing point at the end of the video (for the long video).
Intro
A user asked recently for a step-by-step workflow to have a video – inserted as slide video – looping until the learner clicks a button. User tried to attach an advanced action to the On Exit event, but because that event is not to be trusted (happens after the last frame) this was not functional.
You can have a look at the example project, where I inserted two short videos which are looping until you click the Next button. To make the loop really visible a playbar with the progress bar is visible.
The workflow (see below) is not suited for longer videos. However I don’t think looping is often used for long videos. It would be not very user friendly. For a long video I would use the features of an interactive video to allow the user to jump to different bookmarked frames. I explained that workflow in:
Example project
One long video was added, which can be replayed with a button, to give control to the learner.
Workflow
Step 1
Create a user variable, which will be used to store the frame number of the first frame of each slide. It is a reusable variable. In the example project it has been used three times: twice for the looping short videos, and once for the long video. The actions for the long video are in the Example project.
I labeled this variable v_start. No need for a default value.
Step 2
Create a Shared action with one parameter: the duration of the slide video.
Step 3
Attach the shared action to the On Enter slide event of the slide where you want the video to loop. You find the duration of the video in the Timeline panel. It needs to be entered in seconds, but you can use decimals.
Depending on the styling of the video you may find it useful to add a short Fade in and/or Fade out transition to the video object to make the transition when the video restarts in the loop more smoothly.
Why not suitable for Long video?
Since the command ‘Delay next actions….’ is used, the chance to lose some synchronisation is much bigger for a long video. Similar to audio, the video needs to be loaded when entering the slide. For a long video that may lead to some lagging. But the time in the Delay command starts right away when entering the slide.
Avoid a pause button as well, because the Delay command ignores all pauses.
For that reason, all buttons used in the example file have either no pausing point, (for the short videos which are looping) or a pausing point at the end of the video (for the long video).


You must be logged in to post a comment.
- Most Recent
- Most Relevant
And I definitely like to step-by-step guide
Thank you for this – it’s really useful
thanks for sharing
interesting tutorial as i learn
thanks for the write up!
Thank you!
