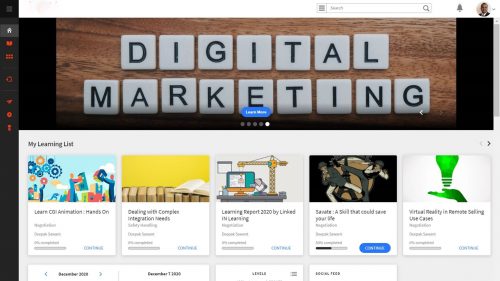
Adobe Captivate Prime brings you a brand-new look and feel for the user homepage. Move widgets around, configure the information they give learners, use AI based recommendations and multi-media banners to drive learning initiatives for your organization, and give learners an enhanced personalized experience.
A guide to switch from the classic UI to the all-new immersive user homepage experience.

The Adobe Captivate Prime user interface has a fresh look and feel for the learner homepage. Designed to deliver an engaging and motivating experience, there are a number of new features that you can now use to dependably draw and hold the attention of your learners. This blog aims to help you understand and configure the new UI elements of the homepage. You can move things around, fine tune the algorithm, see a preview before you finally make the switch to the immersive layout. We have also built in a step for you to enlist the assistance of your CSAM to ensure a smooth transition. We hope you enjoy the new experience.
Please note that you can configure the first THREE steps at any time in readiness for deployment. Only when you are ready to take Step 5 do any of the changes you make actually affect the account setup.
Create an immersive experience for learners in Adobe Captivate Prime
Configure the learner homepage in your Adobe Captivate Prime (referred to as Prime henceforth) to provide an immersive and personalized experience.
This document describes FIVE steps you, the Administrator of the Prime account, must take. Even if your existing account has the ‘Classic’ layout, these steps can help you switch over seamlessly. This document will also help you fine tune the ‘Recommendations’ algorithm so that you can make full use of Prime’s personalization capabilities to align with your organizational requirements.
1. Understand and configure UI elements in the new learner homepage
The new ‘Immersive’ layout of the learner homepage comprises several different widgets. When you navigate your Branding setup as Admin: Admin –>Branding –>Learner Homepage, you can toggle the button at the top from ‘Classic’ to ‘Immersive’ and configure the widgets you want here.

Note: You can do this as many times as you want to without any impact on learners until you confirm all actions in the last step.
The new masthead widget
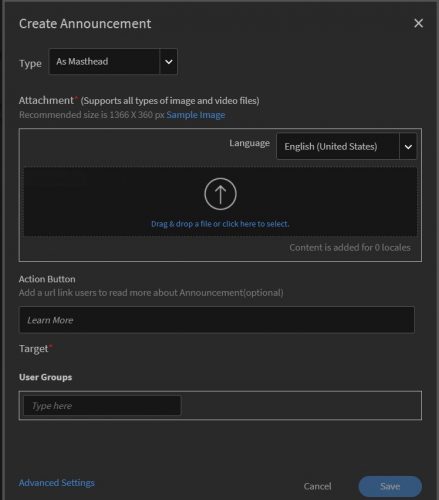
The masthead works as an “Announcement” and you can use a different masthead for every user group you have in your account.
Go to Admin –> Announcements to create “Masthead Announcements”.

Recommended by your Org
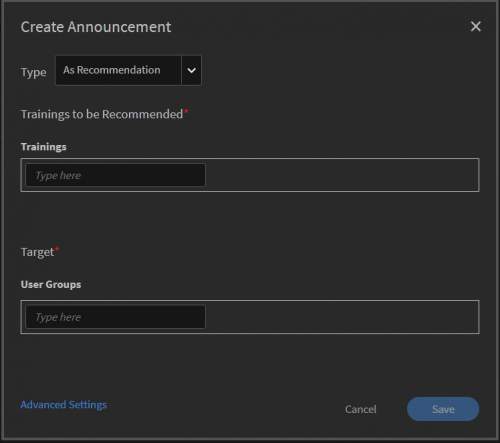
You can use this widget to display featured courses on the homepage of a learner. You can further personalize this widget via the new “Recommendation” type of Announcements.
Go to Admin –> Announcements to create an Announcement “As Recommendation” to personalize this widget.

2. Check out the Live Preview of the new UI before going live
Test your configuration of widgets in the learner homepage, and see what it looks like when you click on this link: https://captivateprime.adobe.com/app/learner?learnerLayout=IMMERSIVE
You can always go back to the earlier steps to reconfigure widgets if you are not satisfied. You can do this as many times as you like.
3. Tune the Recommendation Algorithm
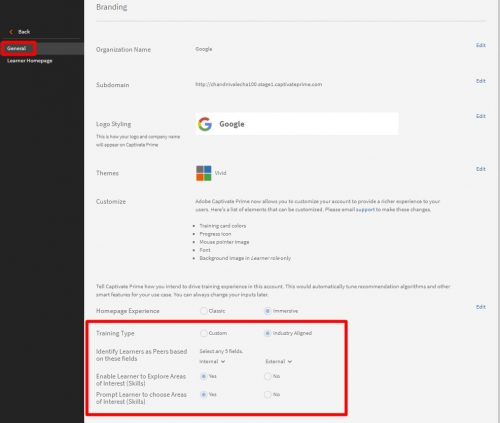
Prime has an algorithm that makes recommendations based on the kinds of training activities that take place in your account. To help Prime better understand this, you must provide certain required inputs. Navigate to Admin–>Branding–>General and scroll down to the section where you can choose the “Training Type” for all your learners and determine peer-based recommendations.
Training type
- Industry Aligned
Select “Industry Aligned” if you largely train internal employees, and the training material you use in this account mainly comprises off-the shelf content such as that by third party providers like LinkedIn Learning or others.
- Custom
Select “Custom” if you largely train external users (or even disparate groups of internal employees) and the training material you use in this account primarily comprises custom training content that you have developed specifically for your different groups of learners.

Identify learners as peers
Similar to the Scope Setting for Gamification or Social Learning, this setting lets you define internal or external groups of learners as peers who will influence each other’s’ recommendations.
1. When Training type is “Custom”:
- If you select Training type as “Custom” then it is Adobe’s recommendation that you leave this setting untouched, i.e. do not identify any learners as peers.

- Leaving it this way will allow all learners in the account to influence each other through learning choices they make.
- However, if you really have very diverse user groups in your account, e.g. you train end customers who belong to different organizations, the dropdown menu should have the different organization names available. [Ensure “Organization Name” is an active field in your user database/csv file, and every learner has an “Organization Name” associated with them.] Therefore, select an “Organization Name” in the dropdown menu, and Prime will accordingly divide your user base into different user groups. Now only peers within an organization can influence a learner’s recommendations, making the recommendations that much more effective and relevant.
2. When Training type is “Industry Aligned”:
- When you select Training type as “Industry Aligned” then Prime automatically uses a learner’s “Profile” data to create peer groups and then recommendations.

For this to work, it is important to make sure that you populate the “Profile” metadata of learners in your account with data that provides some learner characteristics such as Job Designation or Title. If the “Profile” option is not the correct data, you can select any /all of the other fields. You can have a maximum of FIVE Active Fields in the system. Choose the ones you think are most relevant to making training recommendations for a learner. For example, if you have set up Active Fields for “Business Unit” and “Location City”, and assuming that people within a Business Unit and City are ideal peers, then choose those two fields and direct Prime to use the data therein to create peer groups to influence recommendations.
4. Tune the algorithm with Adobe’s assistance
Although completely optional, Adobe highly recommends that you enlist your CSAM’s assistance with the tuning of the algorithm.
- First reach out to your CSAM to indicate your desire to switch from the Classic to the Immersive homepage layout for your learners.
- Your CSAM will work with you from Steps 1 through 3 to ensure they are made correctly.
- They will use engineering support to make the changes in tuning selections (Step 3) for you.
- We will request you to wait for one week during which time the recommendation algorithm will tune itself according to the selections made in Step 3.
If you choose not to fine tune your algorithm with Adobe’s assistance and switch to “Immersive” anyway, users will still have an enhanced experience. The only difference will be that the initial recommendations that learners receive will be more generic in nature and will, over a week’s time, be fine-tuned as the algorithm learns user behaviors.
5. Make the switch – enable the “Immersive” homepage for learners
Go to your Admin interface and make the actual switch to “Immersive”.
Navigate to Admin–>Branding–>General and scroll down to the section where you can choose between the “Classic” and “Immersive” experience for all your learners.

We hope your learners enjoy the new experience! Please feel free to reach out to our support team at captivateprimesupport@adobe.com or your Customer Support Manager for any assistance.
Is it possible to have the “My Learning” chart to the immersive view? I like the new look, but this chart is such a useful tool especially when learners have several courses they need to complete.


