 Explorer
4 posts
Explorer
4 posts
While working with a series of “click/reveal” interactions, I ran into a problem with SVGs (Scalable Vector Graphics) that “blinked” every time there was a state change. While I could have just switched to PNGs, I wanted to keep those SVGs since the graphics were highly detailed medical illustrations, and it was important to keep the image quality sharp for smaller viewports.
I searched through these forums for a solution to “the blink” – I found a discussion of this problem here (and submitted a bug report) but in the meantime, I decided to roll up my sleeves and learn more about using JavaScript in Captivate, in hopes of finding a way to eliminate the distracting blink.
For the example shown (the video above), the SVG bear on the left uses JavaScript inside an Advanced Action; the SVG bear on the right uses an Advanced Action that changes the state of the SVG. From what I’ve experienced, it seems that it is the “change state” action that results in a brief ‘blink’ while the different state loads on the screen. So, although there is a JavaScript method for changing the state of an object (cp.changeState), changing the state is something I wanted to avoid.
Instead, I used JavaScript to change the appearance of the SVG object itself. For this example, to change the appearance of the bear’s face, I added this code to the Advanced Action for “The Face” button:
document.getElementById(“bearSVG3c_object”).getSVGDocument().getElementById(“face”).style.fill=”#fcba03″;
To break this line down:
- The name of the SVG is bearSVG3. To reference the SVG object, I added “c_object” to the name (I learned this from an INCREDIBLY informative post by James Kingsley – many thanks to him!)
- document.getElementById(“bearSVG3c_object”).getSVGDocument() gets the SVG object
- .getElementById(“face”) gets the element inside the SVG with the ID of “face”
- .style.fill=”#fcba03″ changes the fill color of the “face” element to the hex color #fcba03
Other than this line of code, the rest of the interaction was built with an Advanced Action. Now, for the majority of Captivate projects that I work on, I skip Advanced Actions if I am using Javascript, but for this example, I wanted to show how easy it is to incorporate just a little code into an Advanced Action to produced the desired result which, in this case, is getting rid of that “blink”.
Hopefully, someone finds this helpful; I know I am so grateful for the folks who share their JavaScript/Captivate knowledge here, and I wanted to add to that with the tiny bit I’ve learned myself!
Here is the Advanced Action:

Here is the JavaScript for the “If” condition:
document.getElementById(“bearSVG3c_object”).getSVGDocument().getElementById(“face”).style.fill=”#fcba03″;
document.getElementById(“bearSVG3c_object”).getSVGDocument().getElementById(“bodyBelly”).style.fill=”#b3b3b3″;
Here is the JavaScript for the “Else” condition:
document.getElementById(“bearSVG3c_object”).getSVGDocument().getElementById(“face”).style.fill=”#b3b3b3″;
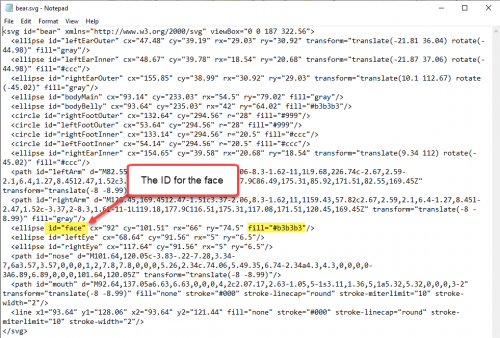
To find the ID of an element inside your SVG, open the SVG in a text editor (like Notepad):
While working with a series of “click/reveal” interactions, I ran into a problem with SVGs (Scalable Vector Graphics) that “blinked” every time there was a state change. While I could have just switched to PNGs, I wanted to keep those SVGs since the graphics were highly detailed medical illustrations, and it was important to keep the image quality sharp for smaller viewports.
I searched through these forums for a solution to “the blink” – I found a discussion of this problem here (and submitted a bug report) but in the meantime, I decided to roll up my sleeves and learn more about using JavaScript in Captivate, in hopes of finding a way to eliminate the distracting blink.
For the example shown (the video above), the SVG bear on the left uses JavaScript inside an Advanced Action; the SVG bear on the right uses an Advanced Action that changes the state of the SVG. From what I’ve experienced, it seems that it is the “change state” action that results in a brief ‘blink’ while the different state loads on the screen. So, although there is a JavaScript method for changing the state of an object (cp.changeState), changing the state is something I wanted to avoid.
Instead, I used JavaScript to change the appearance of the SVG object itself. For this example, to change the appearance of the bear’s face, I added this code to the Advanced Action for “The Face” button:
document.getElementById(“bearSVG3c_object”).getSVGDocument().getElementById(“face”).style.fill=”#fcba03″;
To break this line down:
- The name of the SVG is bearSVG3. To reference the SVG object, I added “c_object” to the name (I learned this from an INCREDIBLY informative post by James Kingsley – many thanks to him!)
- document.getElementById(“bearSVG3c_object”).getSVGDocument() gets the SVG object
- .getElementById(“face”) gets the element inside the SVG with the ID of “face”
- .style.fill=”#fcba03″ changes the fill color of the “face” element to the hex color #fcba03
Other than this line of code, the rest of the interaction was built with an Advanced Action. Now, for the majority of Captivate projects that I work on, I skip Advanced Actions if I am using Javascript, but for this example, I wanted to show how easy it is to incorporate just a little code into an Advanced Action to produced the desired result which, in this case, is getting rid of that “blink”.
Hopefully, someone finds this helpful; I know I am so grateful for the folks who share their JavaScript/Captivate knowledge here, and I wanted to add to that with the tiny bit I’ve learned myself!
Here is the Advanced Action:
Here is the JavaScript for the “If” condition:
document.getElementById(“bearSVG3c_object”).getSVGDocument().getElementById(“face”).style.fill=”#fcba03″;
document.getElementById(“bearSVG3c_object”).getSVGDocument().getElementById(“bodyBelly”).style.fill=”#b3b3b3″;
Here is the JavaScript for the “Else” condition:
document.getElementById(“bearSVG3c_object”).getSVGDocument().getElementById(“face”).style.fill=”#b3b3b3″;
To find the ID of an element inside your SVG, open the SVG in a text editor (like Notepad):


You must be logged in to post a comment.
- Most Recent
- Most Relevant
Great! Thank you for this post. I once mentioned this unwanted effect, and here you come with an answer. It’s not the simplest solution, but for now the only available.
For this example, I built a simple bear using Illustrator and exported it as an SVG. For the project where I used this method originally, I had to extract a complex medical illustration from a Flash module (the original FLA and assets were not available to me). The exported SVG was 1000s of lines long, and I became very familiar with the inner workings of SVG – including using CSS and JavaScript ‘inside’ the SVG itself, as well as manipulating the appearance and behavior from an external script.
So basically anything you can do with CSS to alter the appearance of the illustration could be used the same way I updated the fill color; stroke color/appearance, opacity, etc. When I had to toggle between two completely different images, I built an SVG that held the two separate images (using the <g> tag to group the different images). To switch back and forth from one to another, I set the opacity of one group to 0 and the other to 1 (…style.opacity=“0” or …style.opacity=“1”). On the one hand, this approach resulted in a larger than ideal SVG size (slightly longer initial load time), but once loaded, I didn’t have any of the “blinking” that comes from switching states using these SVGs.
That clarifies a lot. When extracting assets (illustrator) from a complicated drawing, the SVG doesn’t look that readable. I will certainly try to find out about its structure, you inspire me for sure!
Thank you Lieve! The inspiration is mutual, as you have shared so much of your expertise here!
Just to share a couple of things I’ve learned when working with SVGs and Illustrator:
- Once I’m done building/rebuilding the image in Illustrator, I make sure that the elements I want to manipulate are on their own layer, and each of those layers are given a descriptive name.
- When exporting, I choose “Export As…” instead of using “Save As…” For some reason, Illustrator has different SVG Option dialog boxes for Export As and Save As; the options I get when Exporting result in cleaner code (to me). From there I choose “Presentation Attributes” for the styling, and “Layer Names” for Object IDs.
- Once I export the SVG, if I need to add any JavaScript or CSS to the SVG itself, I edit the SVG in VS Code (Dreamweaver or even just Notepad would work). But – if you do this (add code outside of Illustrator), I advise not re-opening the SVG in Illustrator. I’ve lost dozens of lines of CSS just by opening the SVG in Illustrator just “saving” the document.
Hope this make sense!
Indeed I always use Export, never Save as, one of the first things I adopted when exporting from Illustrator. For coding I prefer Brackets or Notepad+.
Thanks for your kind words and explanation!
I love the ingenuity. I shared this with my YouTube channel.
Thank you! I’m trying to share what I learn as a way to give back to this community of developers (like you, Lieve, and many others) whose posts have been SO helpful to me during my own eLearning dev journey!
Interesting approach. Thanks for posting.
This use case is for changing color of one part of the SVG, using the fill style. If you can find it in the SVG text. Did you create the illustration yourself? Which other state changes can be replaced that way besides Fill for an elementary shape (ellipse)?
