 Legend
245 posts
Legend
245 posts
How to use a slide without Fluid Boxes to embed an interactive video in a responsive project based on Fluid Boxes workflow. Use of the Position Properties panel.
Intro
With CP2019 the Position Properties panel, originally used only in Breakpoint Views workflow, can also be used for a Fluid Boxes project. From recent questions on the forum I detected that this can lead to confusion, especially for starting users. That panel is NOT meant at all to be used all the time. To set up a good responsive project it is compulsory that you leave the layout to be monitored by the Fluid Boxes control in the first place. Only for specific situations Fluid Boxes should be overridden. It is similar to the use of Static fluid boxes: their use should also be limited as much as possible. One of the excluded items in a normal fluid box is Interactive video. This workflow explains how to overcome that limitation.
Interactive video slide
It is not compulsory to have fluid boxes on each slide. Be careful: if you use an existing theme for a responsive project, it is possible that you already have fluid boxes on the master slide(s). The Blank master slide however will never have fluid boxes originally in any packaged Captivate theme. I used it for the example screenshots, but filled it with the solid color Black, because the video was very dark.
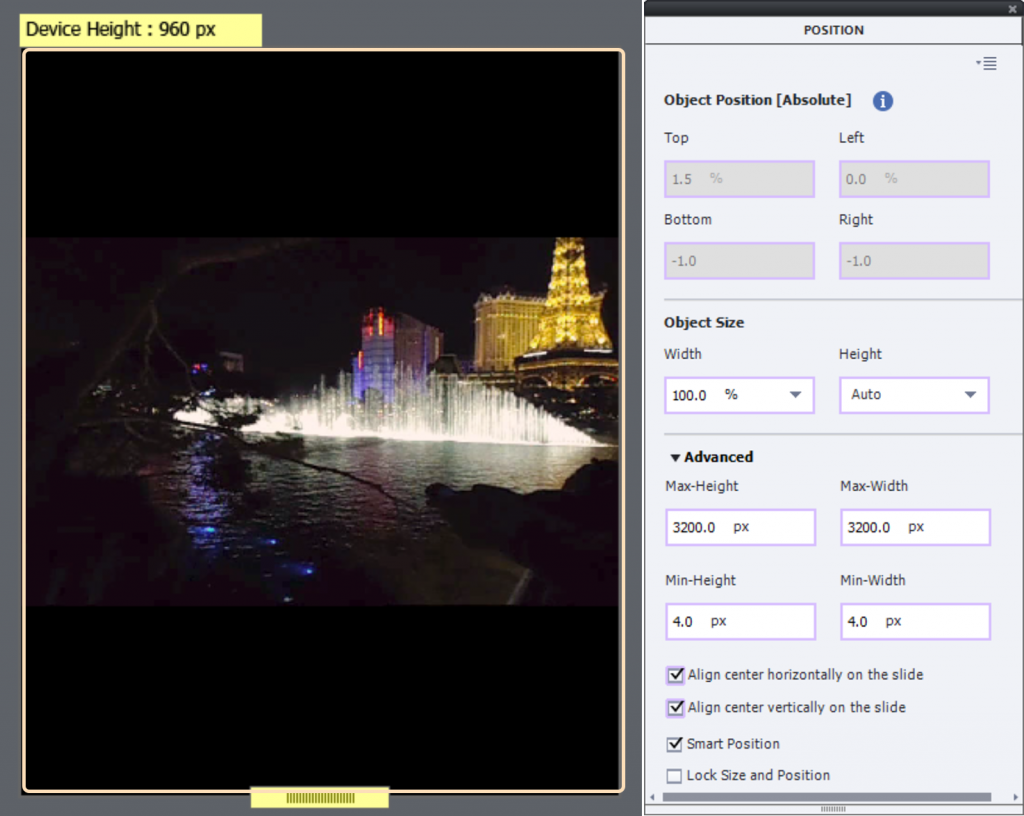
In a normal fluid box you cannot have slide video. Similar to bitmap images it is very important that the width/height ratio is maintained whatever the browser resolution on the device. That is where Position Properties are important. Two possible setups, to have the video filling the slide. The images are for a video, slightly larger than the desktop resolution. It looks like this:
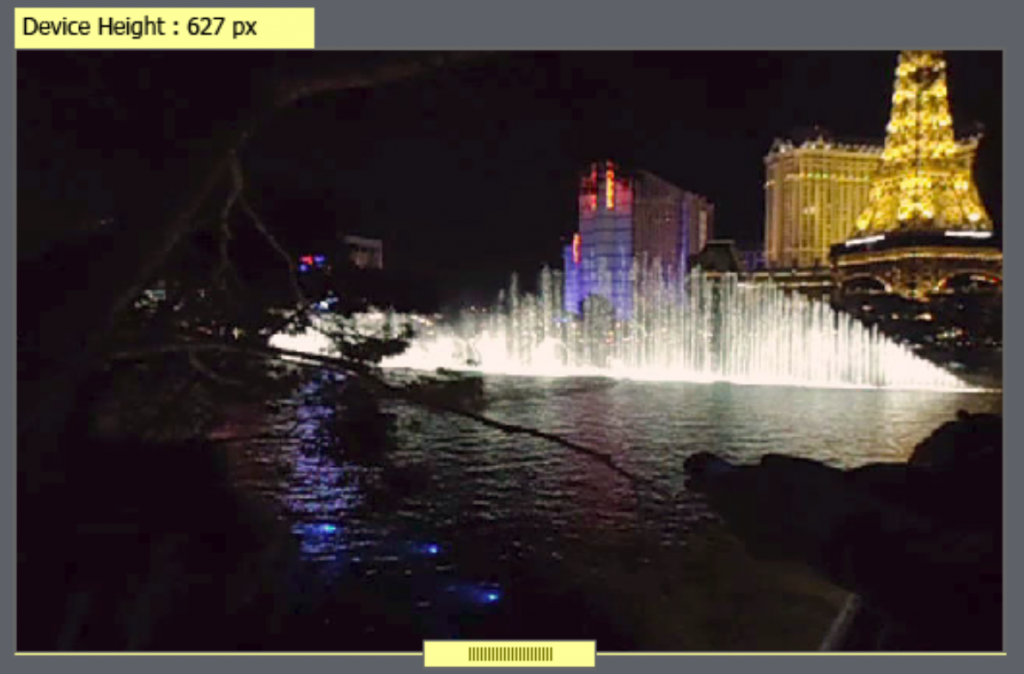
I turned on the feature ‘Preview Height’ under the Style tab, which results in the yellow surrounding box.
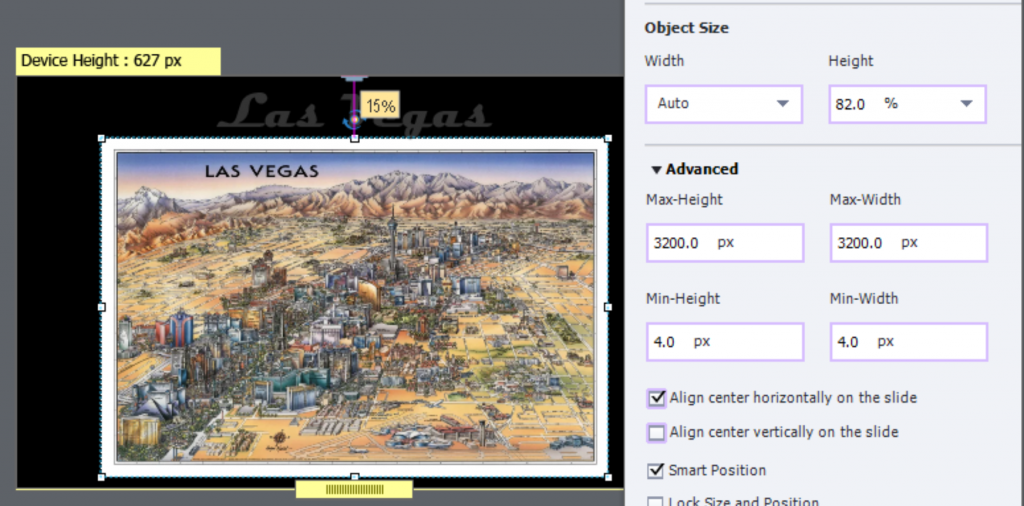
Setup 1: Width = 100%, Height = Auto
This will result in having the video always completely visible. Here is a view of the iPad situation. Due to the black background the missing parts of the slide blend in well with this video. Next to the result you’ll see the Position Panel setup, with Advanced part expanded. Vertical and horizontal alignment are turned on, reason why the % for Left, Right, Top and Bottom are greyed out
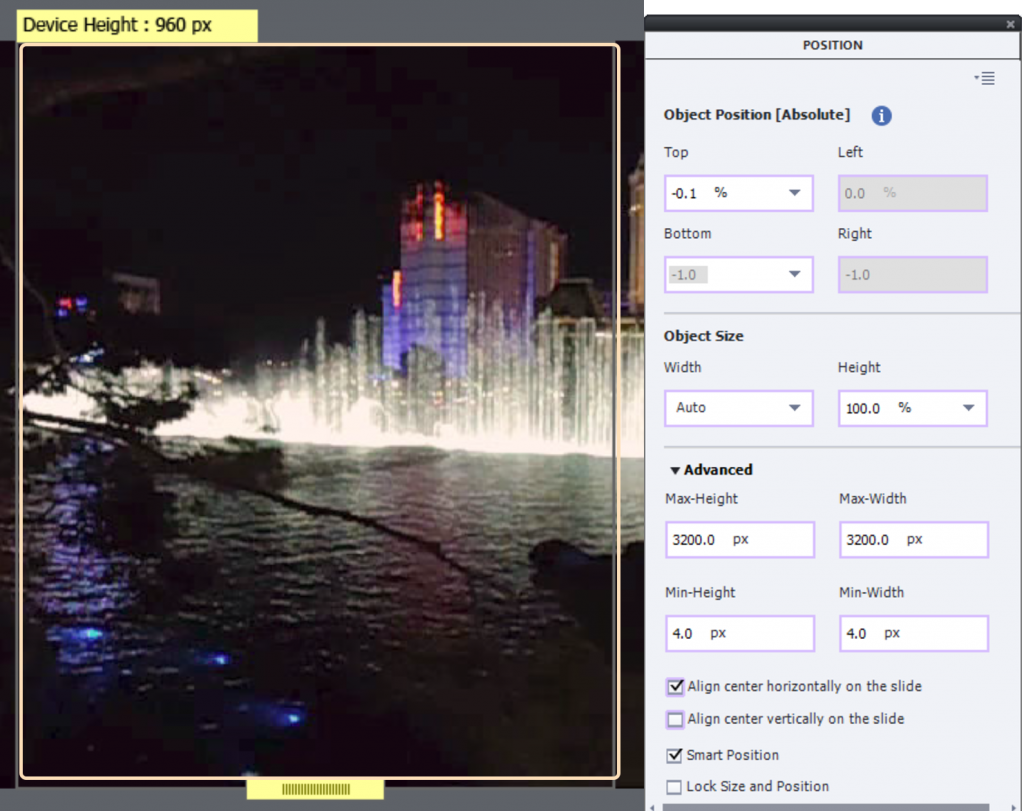
Setup 2: Width = Auto, Height = 100%
This will result in cropping the video as you can see in the setup and the screenshot of the same iPad situation as in the first setup:
It depends on the video which situation you prefer.
Content overlay slides
After a lot of exploration, I detected that you get the best result when creating Overlay slides without using Fluid Boxes as well. For the layout, use a similar approach as you used for the video with the Position Properties. Using Fluid boxes could mess up the slides when they appear in the interactive video. Here is a screenshot of such an overlay slide, when using Setup 1 (Width set to 100%):
It has been setup without vertical alignment in this case. As you may know, the black background (because the video is on a black background) will become transparent when the overlay slide appears to allow the dimmed video to be visible (more about this in an older post).
The same overlay slide for setup 2:
Knowledge Check Overlay slides
Since you are in a responsive project, it is impossible to create those KC slides without using the responsive masters for quiz slides. I tested this out in the same short (dirty) example project and everything works as expected. Just a warning: do take out the playbar at least for this slide, because it could cause a lot of flickering when a Knowledge Check slide appears.
Other use cases
Background images for slides or master slides can be treated the same way.
Position properties panel can also be useful when taking out objects from a fluid box, to attach it to the one of the slide edges, or to another item. A company logo is a typical example.
Those use cases have been treated in many videos, but I never found one about the workflow for an interactive video.
Using SVGs instead of bitmap images in or out of fluid boxes in a responsive project can lead to weird situations. But that needs another blog.
The example project is not provided. If you want to play with it, contact me by mail or through my website. It is just a trial and error project, not an example of a nice interactive video.
Intro
With CP2019 the Position Properties panel, originally used only in Breakpoint Views workflow, can also be used for a Fluid Boxes project. From recent questions on the forum I detected that this can lead to confusion, especially for starting users. That panel is NOT meant at all to be used all the time. To set up a good responsive project it is compulsory that you leave the layout to be monitored by the Fluid Boxes control in the first place. Only for specific situations Fluid Boxes should be overridden. It is similar to the use of Static fluid boxes: their use should also be limited as much as possible. One of the excluded items in a normal fluid box is Interactive video. This workflow explains how to overcome that limitation.
Interactive video slide
It is not compulsory to have fluid boxes on each slide. Be careful: if you use an existing theme for a responsive project, it is possible that you already have fluid boxes on the master slide(s). The Blank master slide however will never have fluid boxes originally in any packaged Captivate theme. I used it for the example screenshots, but filled it with the solid color Black, because the video was very dark.
In a normal fluid box you cannot have slide video. Similar to bitmap images it is very important that the width/height ratio is maintained whatever the browser resolution on the device. That is where Position Properties are important. Two possible setups, to have the video filling the slide. The images are for a video, slightly larger than the desktop resolution. It looks like this:
I turned on the feature ‘Preview Height’ under the Style tab, which results in the yellow surrounding box.
Setup 1: Width = 100%, Height = Auto
This will result in having the video always completely visible. Here is a view of the iPad situation. Due to the black background the missing parts of the slide blend in well with this video. Next to the result you’ll see the Position Panel setup, with Advanced part expanded. Vertical and horizontal alignment are turned on, reason why the % for Left, Right, Top and Bottom are greyed out
Setup 2: Width = Auto, Height = 100%
This will result in cropping the video as you can see in the setup and the screenshot of the same iPad situation as in the first setup:
It depends on the video which situation you prefer.
Content overlay slides
After a lot of exploration, I detected that you get the best result when creating Overlay slides without using Fluid Boxes as well. For the layout, use a similar approach as you used for the video with the Position Properties. Using Fluid boxes could mess up the slides when they appear in the interactive video. Here is a screenshot of such an overlay slide, when using Setup 1 (Width set to 100%):
It has been setup without vertical alignment in this case. As you may know, the black background (because the video is on a black background) will become transparent when the overlay slide appears to allow the dimmed video to be visible (more about this in an older post).
The same overlay slide for setup 2:
Knowledge Check Overlay slides
Since you are in a responsive project, it is impossible to create those KC slides without using the responsive masters for quiz slides. I tested this out in the same short (dirty) example project and everything works as expected. Just a warning: do take out the playbar at least for this slide, because it could cause a lot of flickering when a Knowledge Check slide appears.
Other use cases
Background images for slides or master slides can be treated the same way.
Position properties panel can also be useful when taking out objects from a fluid box, to attach it to the one of the slide edges, or to another item. A company logo is a typical example.
Those use cases have been treated in many videos, but I never found one about the workflow for an interactive video.
Using SVGs instead of bitmap images in or out of fluid boxes in a responsive project can lead to weird situations. But that needs another blog.
The example project is not provided. If you want to play with it, contact me by mail or through my website. It is just a trial and error project, not an example of a nice interactive video.


You must be logged in to post a comment.
- Most Recent
- Most Relevant
