 Legend
245 posts
Legend
245 posts
Setup of a choice slide for a personal avatar, step by step. Use of multistate objects and the functionality of State commands being extended to the full project when used in advanced actions are the used tools.
Intro
Recently I posted an example project, to show how to create a ‘choice’ slide for a personal avatar, and have that choice being applied to all slides in the project using an avatar. Here is the link to that post:
Personal avatar (Multistate objects and Advanced actions) – eLearning (adobe.com)
You can replicate that project using this step-by-step workflow.
Multistate objects
Lot of multistate objects were used in the project:
Slide AvatarChoice
![]() The four buttons with the avatars are SVGs used as buttons. The InBuilt states Rollover and Down were deleted, but a custom state labeled ‘Chosen‘ was added to show the selected avatar by adding a white-stroked border (shape) to the original avatar image.
The four buttons with the avatars are SVGs used as buttons. The InBuilt states Rollover and Down were deleted, but a custom state labeled ‘Chosen‘ was added to show the selected avatar by adding a white-stroked border (shape) to the original avatar image.
Slides Flashlight, CareerSteps, KnowledgeCheck
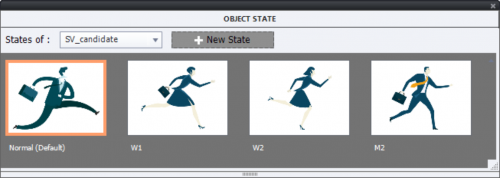
The images SV_Candidate (Flashlight), and People (CareerSteps) have 4 states. The Normal state shows by default the first male avatar. This screenshot shows the states for SV_Candidate, the one for People is similar. They use the same names for the states.
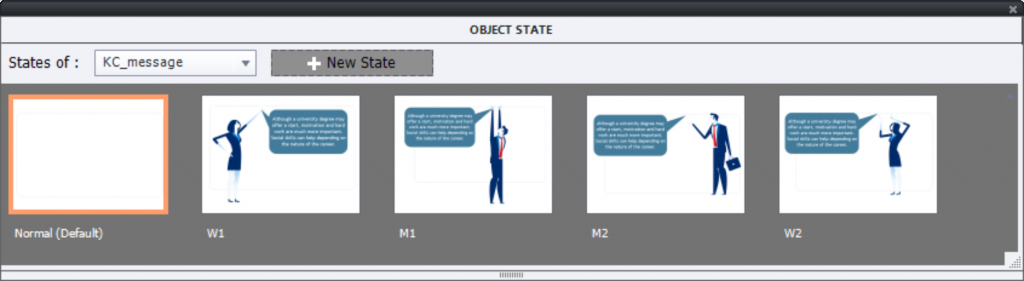
The image KCMessage (KnowledgeCheck) has 5 states, the Normal state being an empty shape (Alpha and Stroke both set to 0). It is just an alternative, because that message needs to be hidden with the On Enter action of this slide. Reason: the message should pop up only after clicking the Submit button. Same names are used for the states, but M1 is new since it is no longer the Normal state. You may prefer this setup, because the advanced actions are easier to ‘read’ since you don’t have to remember that the Normal state is for the M1 avatar:
Events and Actions
W1Act, W2Act, M1Act, M2Act
Those advanced actions are triggered by the Success event of the the buttons on slide AvatarChoice. Here is an example screenshot for the button SVB_W1, the action W1Act:
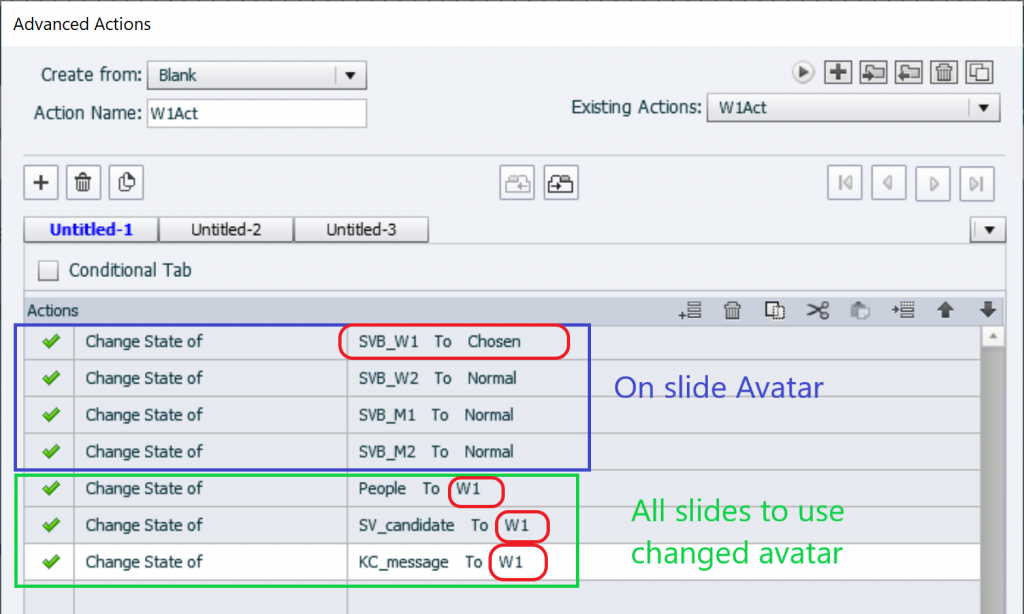
The four first commands, changing states, take care of the buttons on the slide itself. Only the clicked button will switch to the second state ‘Chosen’. You can easily adapt those commands for more or less buttons on that slide, in this case there were 4 buttons.
 The three later commands switch the multistate objects on the other slides to the appropriate state. Add similar commands if you have more than 3 slides to propagate the choice.
Beware: it is important to check the option ‘Retain state on slide revisit’ for the multistate objects on the three slides where the chosen avatar has to be solidified. If you don’t do that, the choice will be visible only on the first visit of that slide, not on later visits.
KnowledgeCheck slide
The On Enter slide event is used to hide the multistate object ‘KC_Message’. 
For the setup of the actions on the slide, refer to this screenshot:
It is of course possible to have different feedback messages, by using conditional actions, but that was not the goal of this blog post.
You cannot have any multistate object in a default feedback message (Failure, Success) on a question/knowledge check slide. That is why you need to create a custom solution.
No shared actions?
Why did I not choose for shared actions (my favourite) in this particular use case? Reason is that such a shared action would need a lot of parameters, even for this short project: 7 for the multistate objects, 4 for the states on the AvatarChoice slide, and 3 for the to be changed state on the other slides. That results in 14 parameters! It is much easier to edit the duplicate advanced actions in this case than applying shared actions with 14 parameters.
Intro
Recently I posted an example project, to show how to create a ‘choice’ slide for a personal avatar, and have that choice being applied to all slides in the project using an avatar. Here is the link to that post:
Personal avatar (Multistate objects and Advanced actions) – eLearning (adobe.com)
You can replicate that project using this step-by-step workflow.
Multistate objects
Lot of multistate objects were used in the project:
Slide AvatarChoice
![]() The four buttons with the avatars are SVGs used as buttons. The InBuilt states Rollover and Down were deleted, but a custom state labeled ‘Chosen‘ was added to show the selected avatar by adding a white-stroked border (shape) to the original avatar image.
The four buttons with the avatars are SVGs used as buttons. The InBuilt states Rollover and Down were deleted, but a custom state labeled ‘Chosen‘ was added to show the selected avatar by adding a white-stroked border (shape) to the original avatar image.
Slides Flashlight, CareerSteps, KnowledgeCheck
The images SV_Candidate (Flashlight), and People (CareerSteps) have 4 states. The Normal state shows by default the first male avatar. This screenshot shows the states for SV_Candidate, the one for People is similar. They use the same names for the states.
The image KCMessage (KnowledgeCheck) has 5 states, the Normal state being an empty shape (Alpha and Stroke both set to 0). It is just an alternative, because that message needs to be hidden with the On Enter action of this slide. Reason: the message should pop up only after clicking the Submit button. Same names are used for the states, but M1 is new since it is no longer the Normal state. You may prefer this setup, because the advanced actions are easier to ‘read’ since you don’t have to remember that the Normal state is for the M1 avatar:
Events and Actions
W1Act, W2Act, M1Act, M2Act
Those advanced actions are triggered by the Success event of the the buttons on slide AvatarChoice. Here is an example screenshot for the button SVB_W1, the action W1Act:
The four first commands, changing states, take care of the buttons on the slide itself. Only the clicked button will switch to the second state ‘Chosen’. You can easily adapt those commands for more or less buttons on that slide, in this case there were 4 buttons.
The three later commands switch the multistate objects on the other slides to the appropriate state. Add similar commands if you have more than 3 slides to propagate the choice.
Beware: it is important to check the option ‘Retain state on slide revisit’ for the multistate objects on the three slides where the chosen avatar has to be solidified. If you don’t do that, the choice will be visible only on the first visit of that slide, not on later visits.
KnowledgeCheck slide
The On Enter slide event is used to hide the multistate object ‘KC_Message’.
For the setup of the actions on the slide, refer to this screenshot:
It is of course possible to have different feedback messages, by using conditional actions, but that was not the goal of this blog post.
You cannot have any multistate object in a default feedback message (Failure, Success) on a question/knowledge check slide. That is why you need to create a custom solution.
No shared actions?
Why did I not choose for shared actions (my favourite) in this particular use case? Reason is that such a shared action would need a lot of parameters, even for this short project: 7 for the multistate objects, 4 for the states on the AvatarChoice slide, and 3 for the to be changed state on the other slides. That results in 14 parameters! It is much easier to edit the duplicate advanced actions in this case than applying shared actions with 14 parameters.


You must be logged in to post a comment.
- Most Recent
- Most Relevant
Thanks, Lieve, for another great example. Your instructions are very helpful.
You’re welcome. Hope this can be some ‘inspiration’.
Thanks for your appreciation. This was one of the use cases I demoed in the Adobe eLearning World Conference in September. All about advanced and shared actions. The recording is still available.
This is a great way to give the learner a personal choice and feel that they are a bit more connected to the learning. Thank you for this, I can see this option being used often!! It looks and works great in your sample project as well!!!
