Guest Blog by: Bryan Jones, author of the Assets eLearning Blog and President of eLearningArt.com, a stock photo site for the eLearning industry.
How most people use characters
One thing I notice when hosting workshops is that the first time users try to insert character images, the end product looks about the same for all users: they use the character as an avatar and the full character (head to toe) is in the viewable area.
It’s not that this is a bad way to use a character; it’s just that it’s only one way to use characters. And that doesn’t leverage a lot of the power that characters provide. I’ve been building character-based eLearning courses for over a decade and I’ve tried to summarize what I’ve learned in this post. Hopefully this will inspire you to use characters to help your courses come to life.
Think beyond avatars; 7 ways to use characters
In general, I use characters in the following 7 ways
- Avatar: Guides the learner through a course
- Presenter: Presents information to the learner
- Conversation: Two or more characters talk with the lessons embedded in the dialog
- Scenario: Character interaction sets up a scenario, learner is presented with options, and learner receives custom feedback based on choice
- Story Telling: Characters play a central role that the learner can learn a lesson from
- Splash Screen: First intro screen to a course
- 1st Person: Learner sees the screen through the eyes of a character

What makes for a “good” character image?
Before we get started, it’s helpful to know what you need out of your characters. You will want:
- Characters with the backgrounds removed so that you can put the characters on any background and mix and match to create your own scenes
- Many poses per character to be able to tell a visual story and for many options
- Multiple angles, not just facing forward, so you can have the characters interacting with more things than just the learner
Characters are available in CP6
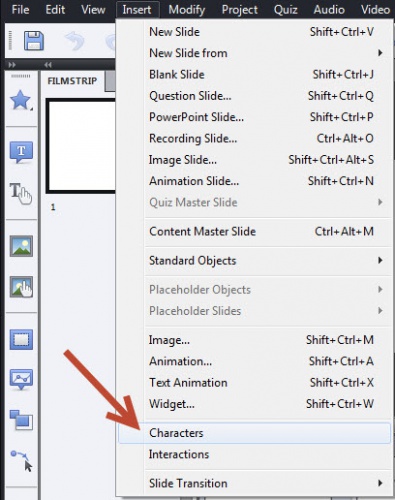
For those of you with CP6, you have some characters embedded in the software. You can check them out under “Insert > Character.”
Some free character images for you
If you don’t have CP6 and need some files to experiment with, you can download free sample images here.
More to come
Over the next several weeks, I’ll provide detailed lessons on the best practices for each of the character techniques listed above. In the next lesson, we’ll teach you how to use avatars to guide your learners through a course.
Also, please join me in my session at the Adobe Learning Summit 2012 on October 29. I look forward to seeing you in Vegas!
Guest Blog by: Bryan Jones, author of the Assets eLearning Blog and President of eLearningArt.com, a stock photo site for the eLearning industry.
How most people use characters
One thing I notice when hosting workshops is that the first time users try to insert character images, the end product looks about the same for all users: they use the character as an avatar and the full character (head to toe) is in the viewable area.
It’s not that this is a bad way to use a character; it’s just that it’s only one way to use characters. And that doesn’t leverage a lot of the power that characters provide. I’ve been building character-based eLearning courses for over a decade and I’ve tried to summarize what I’ve learned in this post. Hopefully this will inspire you to use characters to help your courses come to life.
Think beyond avatars; 7 ways to use characters
In general, I use characters in the following 7 ways
- Avatar: Guides the learner through a course
- Presenter: Presents information to the learner
- Conversation: Two or more characters talk with the lessons embedded in the dialog
- Scenario: Character interaction sets up a scenario, learner is presented with options, and learner receives custom feedback based on choice
- Story Telling: Characters play a central role that the learner can learn a lesson from
- Splash Screen: First intro screen to a course
- 1st Person: Learner sees the screen through the eyes of a character

What makes for a “good” character image?
Before we get started, it’s helpful to know what you need out of your characters. You will want:
- Characters with the backgrounds removed so that you can put the characters on any background and mix and match to create your own scenes
- Many poses per character to be able to tell a visual story and for many options
- Multiple angles, not just facing forward, so you can have the characters interacting with more things than just the learner
Characters are available in CP6
For those of you with CP6, you have some characters embedded in the software. You can check them out under “Insert > Character.”
Some free character images for you
If you don’t have CP6 and need some files to experiment with, you can download free sample images here.
More to come
Over the next several weeks, I’ll provide detailed lessons on the best practices for each of the character techniques listed above. In the next lesson, we’ll teach you how to use avatars to guide your learners through a course.
Also, please join me in my session at the Adobe Learning Summit 2012 on October 29. I look forward to seeing you in Vegas!
You must be logged in to post a comment.
- Most Recent
- Most Relevant
Thanks Margaret. Watch this video to see step by step instructions to add additional characters to the library of characters:
http://www.youtube.com/watch?v=G3zn2k76Rns&feature=player_embedded#!


