 Legend
245 posts
Legend
245 posts
Introduction
Whether I work with clients or answer questions on forums/social media, I often bump onto confusion between themes and templates. Similar confusion can be found in many training schedules and books. Captivate has evolved a lot (since I started using version 1), also in its design tools. These improvements have not been emphasized as much as the more ‘hype’ features. My blog fans know that I like to talk about the “hidden gems”, which can help saving time and frustration. This article will explain my use of custom Themes, and the reason why Templates have lost significance as design tool when Themes appeared with version 6.
Theme versus Template
THEME
The goal of a Captivate theme is to have a consistent design throughout your project’s). A theme can be ‘applied’ to any project, even after creation, as long as it is a project of the same type, normal or responsive. Although most themes will be created for a certain resolution (size in pixels), when they are designed correctly you can also apply them to projects with another resolution. Applying a well designed theme to a project,should change the ‘look’ immediately; it will not take a lot of editing later on.
A theme is saved in a file with extension cptm. You can have themes for a normal (blank) or for a responsive theme. Each Captivate version since 6 ships with several themes. Since Captivate 8 most of those themes are responsive. You can use them for normal projects as well. They show up as thumbnails when you click on the Big Button ‘Themes’. The Captivate themes you are using as a developer are stored in the Public Documents (Windows, for Mac under Shared), in the subfolder ‘Layouts’ of the ‘eLearning Assets’, at the same level as the Theme Colors palettes. Here is a screenshot of that folder (for CP9) on my system. You see that I have several installed versions, each with their themes.
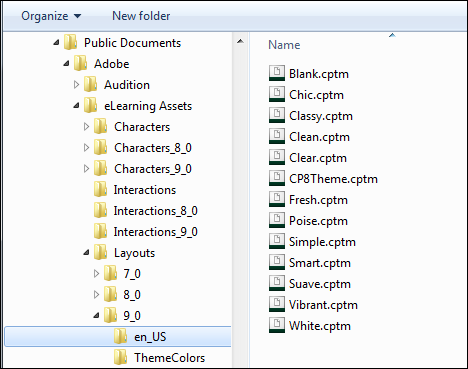
After editing or creating a Custom theme, you can but do not have to store it in this folder. The Thumbnails view (under Themes button) has a Browse button which allows you to navigate to any folder. Personally I prefer to save a custom theme in the project folder (when working for a client). You see in the screenshot one custom theme (CP8Theme) which I used often for example tutorials on my blog.
The described folder in Public Documents, is a copy of the original Layouts folder. That original folder is to be found in the Gallery under the Captivate installation folder. This means that the original default themes are savely stored, you are not interacting with them. If you ever mess up one or more of the themes in the Public documents, you can restore them from that original folder. The work flow is to delete the whole Layouts folder in the Public documents, while Captivate is closed. When restarting the application a fresh duplicate of the original folder will be installed in the Public documents (see also my article: Keep your Customisation).
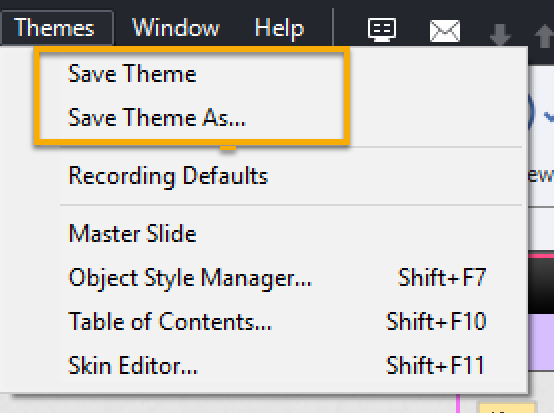
Saving a theme is done with the Themes menu. It is not possible with the big button ‘Themes’. Prefer the option ‘Save Theme as‘ if you started from an existing Captivate theme.
TEMPLATE
A template in Captivate has to be chosen before creating a project. Only way is to use the option ‘File, New Project, Project from Template‘. Consequence is that a template needs to have exact the same resolution as the project. Likewise to themes, you have to distinguish templates for responsive and for normal (blank) projects. A template file has the extension cptl. A project based ona template will get the normal extension cptx. You can edit a template, and that will the only reason why you would save it again as a cptl. It is also possible to create a template from a normal cptx-file with the option ‘File, Save As‘. There is no ‘reserved’ folder for templates, Captivate has no included ‘templates’. The term is often wrongly used! Most so-called Captivate ‘templates’ to be found on the web, are just cptx-projects, not real Captivate templates. Rarely will be mentioned as well that the resolution is fixed. Rescaling of a project is possible, but will always lead to quality decrease.
When a template is saved, the used theme, preferences etc are saved with the template. You can always change the design, by applying another theme. A theme can be applied after creation.
Components of a Theme
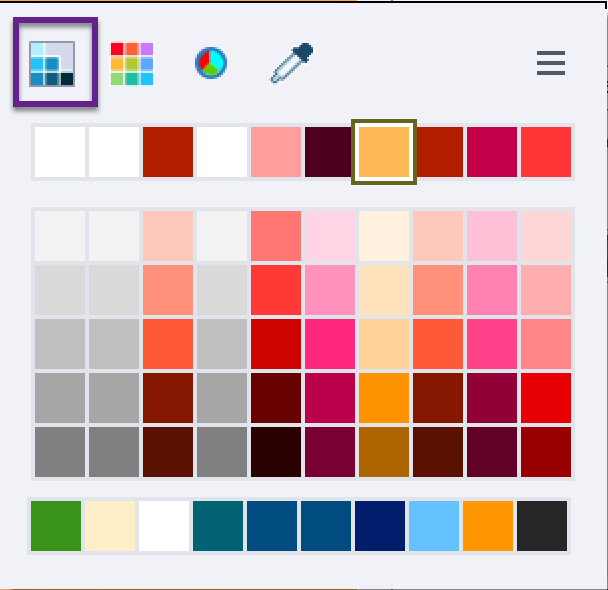
1. Theme colors palette
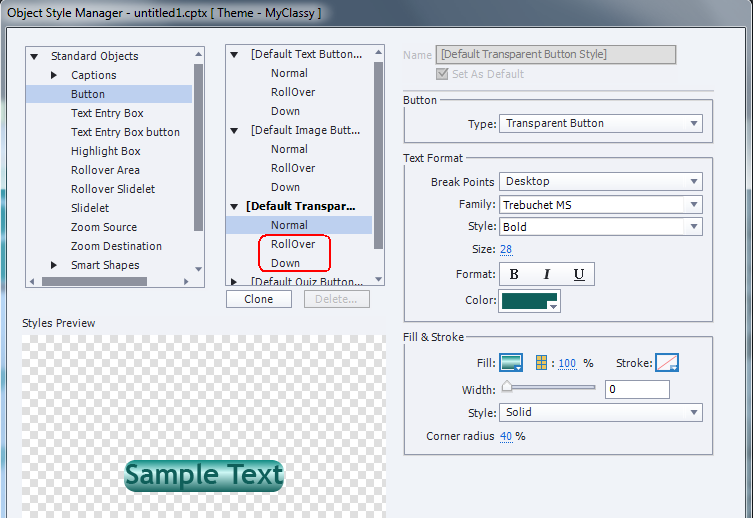
2. Object Styles – Object Style Manager (SHIFT-F7)
Some tips:
- Use only colors from the palette defined in Step 1.
- Do not hesitate to change one of the (grayed out) styles between brackets [Default…]. You can overwrite those styles, since you are working on a custom theme. Those are the styles that will be applied immediately when you insert an object. Another approach is to clone a style and set it as Default style. The problem is that you’ll end up with tons of custom styles, which makes selecting the proper style in dropdown lists not easier. That is why I always change existing default styles.
- For buttons: the InBuilt states Rollover and Down are available together with Normal for change in the OSM, do not forget to check/edit those states. This is valid for Text Buttons, Image Buttons and Transparent buttons.
- For shapes: it is not (yet) possible to define a default style for shape used as text container, and another default style for shapes used as buttons. Any defined shape style should include InBuilt states (Normal, Rollover, Down) because any shape can be converted to a button. For responsive styles: do not forget to create them for each breakpoint.
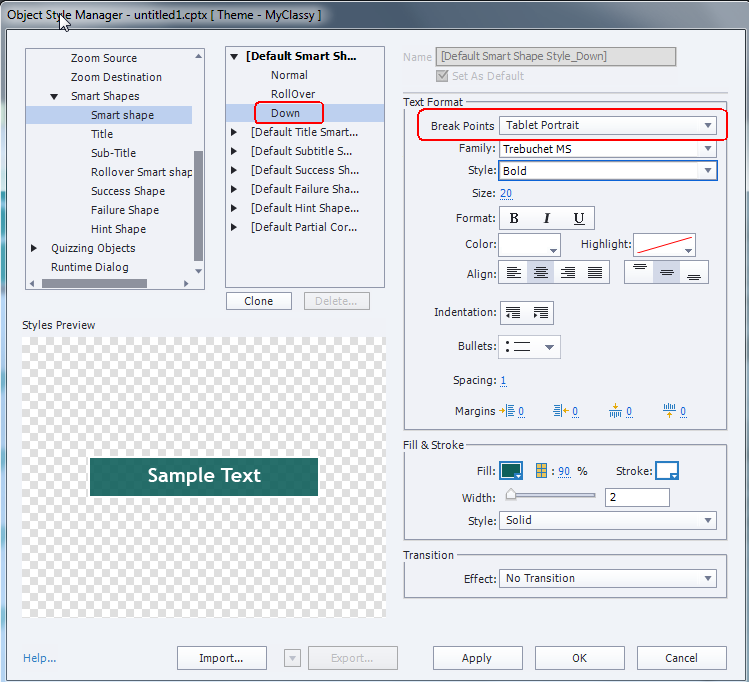
- Quizzing objects are a separate category. Quiz buttons cannot be replaced by shape buttons (yet), but you can define an individual object style for each quiz button. Feedback captions can be replaced by shapes.
Feedback captions and shapes not always use theme colors in the default Themes included with Captivate. Be careful: if you want to have consistent colors in your project, you’ll need to check those styles. - It is not possible to define real Effects in an Object style. Only the ‘old’ Transitions can be defined.
3. Master slides
Each theme needs at least 6 master slides (Blank Master slide, 4 Quiz master slides and a Score master slides), besides the main master slide, but you can create as many master slides as you want. You can add different type of placeholders on master slides, but be careful with the 5 master slides for Quiz: the embedded objects (without individual timeline) have a lot of functionality built in!
Some tips
- Use the new Rulers to assist you for designing master slides. You’ll find some suggestions in Guides Rule!
- If you ever will use the theme for software simulations: keep a real Blank master slide, because it is used both for software simulations and for PPT import. You don’t want those slides covered up with other stuff.
- Remember that shape buttons can be used on master slides, they can have actions. This can be a big time saver for custom buttons like the ones from these posts: Toggle buttons and Replay slide button
- Do not forget to label the master slides
- When using the dropdown list from ‘Insert, New Slide from‘ know that the sequence in this list is taken over from the sequence in the Master slide panel. It can be useful to change that sequence throughout the development cycle, if you have a lot of master slides.
4. Skin
Use the theme colors palette to customize the skin: playbar, borders and Table of Contents. You can even insert a logo on the TOC and eventually insert custom expand/collapse icons.
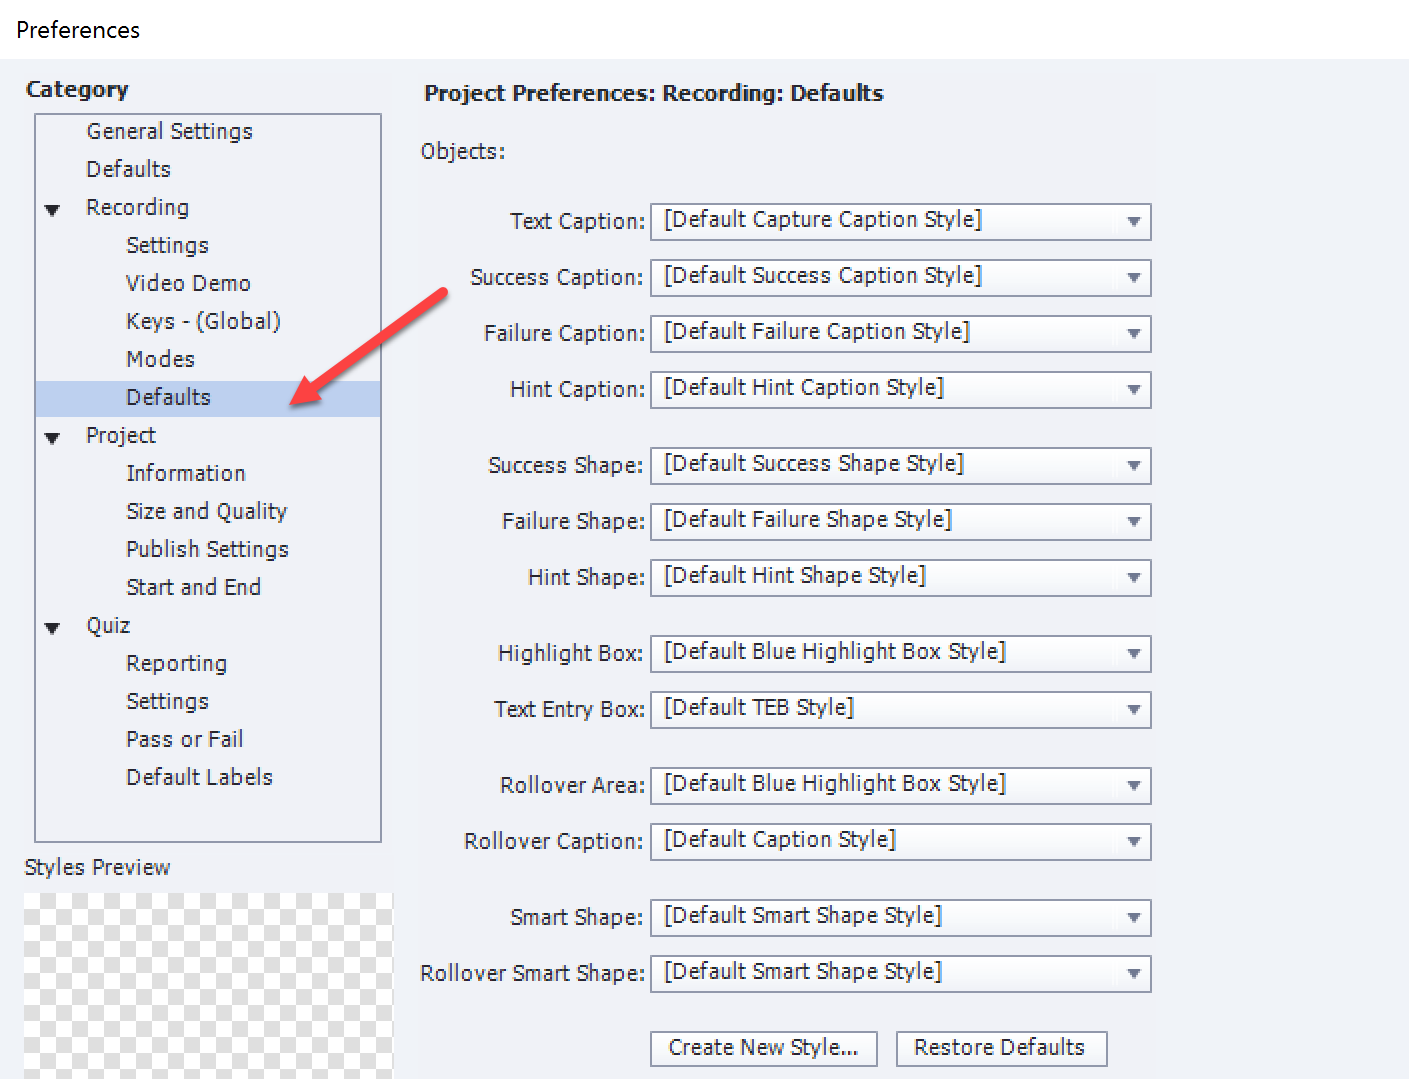
5. Recording defaults
- Create a default style for the highlight box in step 2: with a big bright red stroke and outer fill. Set it to display as default highlight box style.
- Open Preferences, Recording, Defaults and check the default Highlight box style: it will still be set at the original default style in the original theme. Bit annoying, but it also allows you to save two different sets of object styles within a theme: one for normal slides, and one for software capture slides.
Do not forget to save the theme (using the Themes menu)!
Do you need a Template?
It is one of my usual questions! When you see the design power and flexibility of a custom theme, why would you still need a template? I have been using templates in earlier versions of Captivate:. On of the reasons was to reuse variables and advanced actions (see: Template for reusing script). This is no longer necessary in more recent versions. I have a dedicated project with much used shared actions. That project is opened as External Library in any new project, to access those shared ations. Variables, used in those shared actions, are created automatically when the shared action is dragged into the Library of the new project. When you copy an object, that triggers an advanced action, the action will be copied along when pasted into another project. Only actions triggered by slide events are not that easy to reuse.
Years ago I created templates to have footnotes on each slide, pointing to the name of the project, showing the slide number and the total amount of slides. But now I insert them on master slides, using system variables or user variables that can be populated later on.
When would I use a template in Captivate 8/9? For courses that have several modules, where you want to have some slides in common, maybe have custom navigation/control buttons that cannot be put on the master slide, but need to be timed for the rest of the project. I would rarely use it to have placeholder slides, unless some team members need to have that assistance. Lot of placeholders have fixed object size, which can just be annoying. If you do have a lot of advanced actions (maybe variables), that cannot be replaced by shared actions, identical entries in Project Info, variables not included in shared actions: those would be situations where I would think about creating a template. It is getting a rare work flow in my case.
Conclusion
Hopefully this article did clarify the differences between themes and templates. Next time when you hear my question “Do you really need a template?” this will no longer be a mystery, right?
Introduction
Whether I work with clients or answer questions on forums/social media, I often bump onto confusion between themes and templates. Similar confusion can be found in many training schedules and books. Captivate has evolved a lot (since I started using version 1), also in its design tools. These improvements have not been emphasized as much as the more ‘hype’ features. My blog fans know that I like to talk about the “hidden gems”, which can help saving time and frustration. This article will explain my use of custom Themes, and the reason why Templates have lost significance as design tool when Themes appeared with version 6.
Theme versus Template
THEME
The goal of a Captivate theme is to have a consistent design throughout your project’s). A theme can be ‘applied’ to any project, even after creation, as long as it is a project of the same type, normal or responsive. Although most themes will be created for a certain resolution (size in pixels), when they are designed correctly you can also apply them to projects with another resolution. Applying a well designed theme to a project,should change the ‘look’ immediately; it will not take a lot of editing later on.
A theme is saved in a file with extension cptm. You can have themes for a normal (blank) or for a responsive theme. Each Captivate version since 6 ships with several themes. Since Captivate 8 most of those themes are responsive. You can use them for normal projects as well. They show up as thumbnails when you click on the Big Button ‘Themes’. The Captivate themes you are using as a developer are stored in the Public Documents (Windows, for Mac under Shared), in the subfolder ‘Layouts’ of the ‘eLearning Assets’, at the same level as the Theme Colors palettes. Here is a screenshot of that folder (for CP9) on my system. You see that I have several installed versions, each with their themes.
After editing or creating a Custom theme, you can but do not have to store it in this folder. The Thumbnails view (under Themes button) has a Browse button which allows you to navigate to any folder. Personally I prefer to save a custom theme in the project folder (when working for a client). You see in the screenshot one custom theme (CP8Theme) which I used often for example tutorials on my blog.
The described folder in Public Documents, is a copy of the original Layouts folder. That original folder is to be found in the Gallery under the Captivate installation folder. This means that the original default themes are savely stored, you are not interacting with them. If you ever mess up one or more of the themes in the Public documents, you can restore them from that original folder. The work flow is to delete the whole Layouts folder in the Public documents, while Captivate is closed. When restarting the application a fresh duplicate of the original folder will be installed in the Public documents (see also my article: Keep your Customisation).
Saving a theme is done with the Themes menu. It is not possible with the big button ‘Themes’. Prefer the option ‘Save Theme as‘ if you started from an existing Captivate theme.
TEMPLATE
A template in Captivate has to be chosen before creating a project. Only way is to use the option ‘File, New Project, Project from Template‘. Consequence is that a template needs to have exact the same resolution as the project. Likewise to themes, you have to distinguish templates for responsive and for normal (blank) projects. A template file has the extension cptl. A project based ona template will get the normal extension cptx. You can edit a template, and that will the only reason why you would save it again as a cptl. It is also possible to create a template from a normal cptx-file with the option ‘File, Save As‘. There is no ‘reserved’ folder for templates, Captivate has no included ‘templates’. The term is often wrongly used! Most so-called Captivate ‘templates’ to be found on the web, are just cptx-projects, not real Captivate templates. Rarely will be mentioned as well that the resolution is fixed. Rescaling of a project is possible, but will always lead to quality decrease.
When a template is saved, the used theme, preferences etc are saved with the template. You can always change the design, by applying another theme. A theme can be applied after creation.
Components of a Theme
1. Theme colors palette
2. Object Styles – Object Style Manager (SHIFT-F7)
Some tips:
- Use only colors from the palette defined in Step 1.
- Do not hesitate to change one of the (grayed out) styles between brackets [Default…]. You can overwrite those styles, since you are working on a custom theme. Those are the styles that will be applied immediately when you insert an object. Another approach is to clone a style and set it as Default style. The problem is that you’ll end up with tons of custom styles, which makes selecting the proper style in dropdown lists not easier. That is why I always change existing default styles.
- For buttons: the InBuilt states Rollover and Down are available together with Normal for change in the OSM, do not forget to check/edit those states. This is valid for Text Buttons, Image Buttons and Transparent buttons.
- For shapes: it is not (yet) possible to define a default style for shape used as text container, and another default style for shapes used as buttons. Any defined shape style should include InBuilt states (Normal, Rollover, Down) because any shape can be converted to a button. For responsive styles: do not forget to create them for each breakpoint.
- Quizzing objects are a separate category. Quiz buttons cannot be replaced by shape buttons (yet), but you can define an individual object style for each quiz button. Feedback captions can be replaced by shapes.
Feedback captions and shapes not always use theme colors in the default Themes included with Captivate. Be careful: if you want to have consistent colors in your project, you’ll need to check those styles. - It is not possible to define real Effects in an Object style. Only the ‘old’ Transitions can be defined.
3. Master slides
Each theme needs at least 6 master slides (Blank Master slide, 4 Quiz master slides and a Score master slides), besides the main master slide, but you can create as many master slides as you want. You can add different type of placeholders on master slides, but be careful with the 5 master slides for Quiz: the embedded objects (without individual timeline) have a lot of functionality built in!
Some tips
- Use the new Rulers to assist you for designing master slides. You’ll find some suggestions in Guides Rule!
- If you ever will use the theme for software simulations: keep a real Blank master slide, because it is used both for software simulations and for PPT import. You don’t want those slides covered up with other stuff.
- Remember that shape buttons can be used on master slides, they can have actions. This can be a big time saver for custom buttons like the ones from these posts: Toggle buttons and Replay slide button
- Do not forget to label the master slides
- When using the dropdown list from ‘Insert, New Slide from‘ know that the sequence in this list is taken over from the sequence in the Master slide panel. It can be useful to change that sequence throughout the development cycle, if you have a lot of master slides.
4. Skin
Use the theme colors palette to customize the skin: playbar, borders and Table of Contents. You can even insert a logo on the TOC and eventually insert custom expand/collapse icons.
5. Recording defaults
- Create a default style for the highlight box in step 2: with a big bright red stroke and outer fill. Set it to display as default highlight box style.
- Open Preferences, Recording, Defaults and check the default Highlight box style: it will still be set at the original default style in the original theme. Bit annoying, but it also allows you to save two different sets of object styles within a theme: one for normal slides, and one for software capture slides.
Do not forget to save the theme (using the Themes menu)!
Do you need a Template?
It is one of my usual questions! When you see the design power and flexibility of a custom theme, why would you still need a template? I have been using templates in earlier versions of Captivate:. On of the reasons was to reuse variables and advanced actions (see: Template for reusing script). This is no longer necessary in more recent versions. I have a dedicated project with much used shared actions. That project is opened as External Library in any new project, to access those shared ations. Variables, used in those shared actions, are created automatically when the shared action is dragged into the Library of the new project. When you copy an object, that triggers an advanced action, the action will be copied along when pasted into another project. Only actions triggered by slide events are not that easy to reuse.
Years ago I created templates to have footnotes on each slide, pointing to the name of the project, showing the slide number and the total amount of slides. But now I insert them on master slides, using system variables or user variables that can be populated later on.
When would I use a template in Captivate 8/9? For courses that have several modules, where you want to have some slides in common, maybe have custom navigation/control buttons that cannot be put on the master slide, but need to be timed for the rest of the project. I would rarely use it to have placeholder slides, unless some team members need to have that assistance. Lot of placeholders have fixed object size, which can just be annoying. If you do have a lot of advanced actions (maybe variables), that cannot be replaced by shared actions, identical entries in Project Info, variables not included in shared actions: those would be situations where I would think about creating a template. It is getting a rare work flow in my case.
Conclusion
Hopefully this article did clarify the differences between themes and templates. Next time when you hear my question “Do you really need a template?” this will no longer be a mystery, right?


You must be logged in to post a comment.
- Most Recent
- Most Relevant
I am new to captivate ..very helpful thanks
Themes have now even more features in 11.5. Maybe you should also have a look at this blog:
http://blog.lilybiri.com/themes-are-time-savers-what-is-new-in-11-dot-5
Thank for this useful clarification, Lieve. I personally still use templates to guide other team members when they are new to Captivate and/or there is a need for consistency throughout all the modules on a project –particularly in terms of layout and sequencing. But I will definitely revisit whether I am maximizing the benefits of themes after reading this post.
Since CP9 templates can create lot of issues, especially if they have variables and advanced/shared actions. I totally avoid them since that version. For design consistency Themes are sufficient. For much used assets, shared actions I use external libraries.
Thank you.
Hi Lieve,
I’ve been experimenting with Captivate Themes (.cptm) and can see why you like them.
Initially, I thought that Captivate Themes only stored values for formatting (e.g., color, text size etc.), but now realize they also store master slides and place holders, as well. I was surprised that even non-place holder graphics were saved (e.g., graphic of a computer).
Given that you can pull in variables through shared actions, it would seem that a Captivate theme provides most everything you would want in a “template”.
Jim
That was what I tried to explain. I never use a template, especially because they are bit buggy concerning variables and advanced actions. You can also have advanced actions on Enter for a master slide. Whenever I offer a personalised training, sometimes to developers who have taken many courses and/or read books, I discover that almost never themes are really exposed in those training/books. Very strange…. Timeline, Themes, Quizzes, the three basic topics for each training, but never get the time needed to understand them.
That’s interesting, as Themes (.cptm) seem like a very powerful option.
After re-reading your post on themes, your strategy of using themes and shared actions makes more sense as it capitalizes on the strengths of Captivate and uses them in a very efficient manner.
Part of the mis-understanding, on my part, was moving beyond the idea that a “theme” only refers to formatting. A “Theme” (.cptm) also includes some level of content.
Very nice overview and details about options we have to customize Captivate projects. I appreciate the distinction of differences between a theme and a template.
You’re welcome. Themes are one out of 3 subjects in any basic Captivate training I offer. If you are curious, the other 2 are the Timeline (cause n° 1 of frustratioss because of lack of understanding) and Quizzes.
You’re welcome, themes are very powerful and often neglected in most training and manuals.
Thanks for the details info on using Themes in Captivate
Will this work with responsive framework?
Yes, as explained you have to build a responsive theme if you want to use it for a responsive project. All included themes with Captivate are responsive. It depends on the workflow you are using, how to set up master slides and object styles. For Fluid Boxes I posted another article about content master slides with Fluid Boxes. You don’t have to bother about font size in that case. If you set up a theme with Breakpoint views, be careful to set up the font size in the OSM for all breakpoint views and to design the master slides with the Position Properties panel in order to make them fully responsive.
Are you talking about a responsive or a non-responsive theme?
Use the same theme: create the custom theme with the wanted background (maybe on the main master slide). Do not ignore all the other components: set up the perfect color palette (taking into account the brand colors), set up styles for all the objects you are using, and create master slides. Save that as a custom theme with the Themes menu. Do not save the custom theme to the Layouts folder but to the same folder as where you want to store your courses. In a new project use the big button Themes and indicate the custom theme (there is a Browse functionality if the custom theme is nor appearing as a thumbnail). You can even set the custom theme as the default theme (right-click menu) so that every future project will automatically use that theme. Themes are very powerful, too much underestimated.
Thanks Lieve, Is it possible to resize the photo so it can fit for the screen?
Hi Lieve, how about if i need a same backgrounds for some modules? for the uniformity purposes.
Thank you for the clarifications. Tons of useful information here. I made the jump from v5 to v9 and I’m still adjusting my workflow.
You’re welcome. It is a big jump from 5 to 9. Maybe you can find more information on my personal blog: http://blog.lilybiri.com.
I’m already a fan. I used a variation of your Navigation Help Slides technique on some recent projects. Thanks!
