 Staff
3 posts
Staff
3 posts
In this article, I will be discussing some facts you need to know for getting started on working with fluid boxes. This will basically involve giving an overview on what are fluid boxes, how to use them, insertion and selection of fluid boxes.
So, let us get started!
What is a Fluid box?
As part of Adobe Captivate 2017 release, Fluid boxes are the containers which layout your content intelligently as per the defined settings. They are adaptive across various devices and screen sizes, to provide great learning experience while maintaining the integrity of your content.
With Fluid boxes, come their properties like Flow direction, Wrapping, Stretching, Alignment, Padding, Optional and Static which we will discuss in detail across this article.
How to use Fluid boxes?
One of the most important things to keep in mind while working with fluid boxes is to have a layout design ready for your content before you start placing the actual course content on your slide. This step is a critical one, as it serves to provide a strong base foundation for building your responsive project.
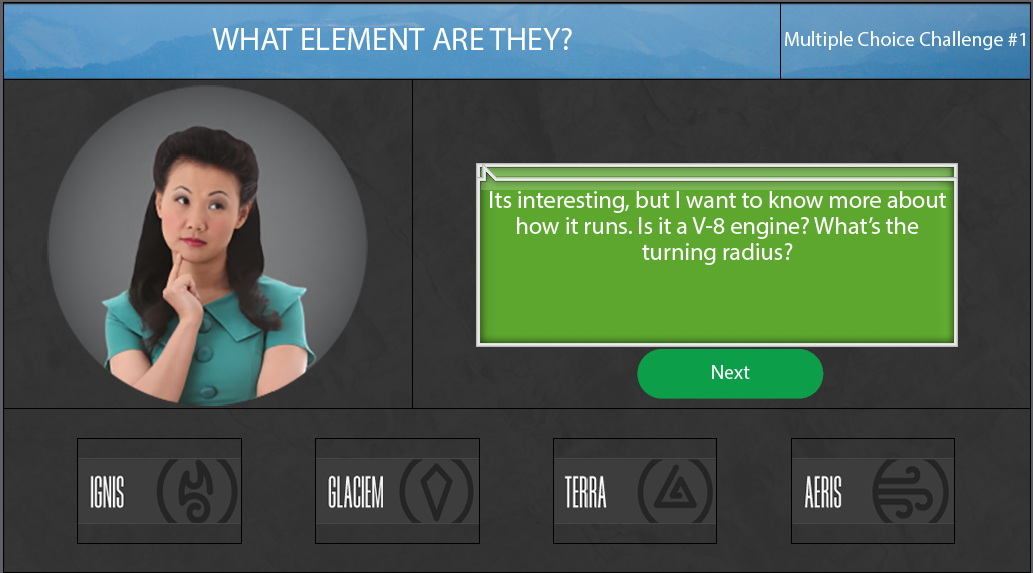
For example: To create a slide as shown below:
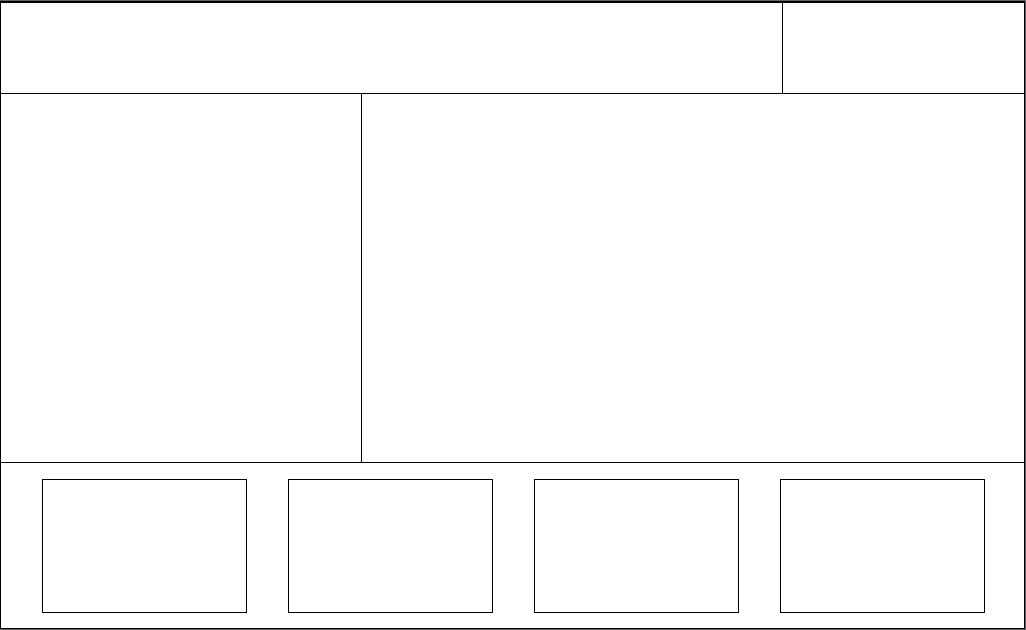
You must have already prepared a layout, something like this:
How to insert Fluid boxes?
You can insert Fluid boxes using the Fluid box option  present in Captivate tool bar.
Upon clicking Fluid Box button, you will see two options:

Horizontal and Vertical are the flow direction for your fluid boxes which are inserted as children within your Root Fluid box (I will be referring to the Root fluid box as the main Fluid box on the slides within which all other fluid boxes or objects will be contained). Remember, every time you chose to insert multiple fluid boxes, they get inserted as children within a Root Fluid box.
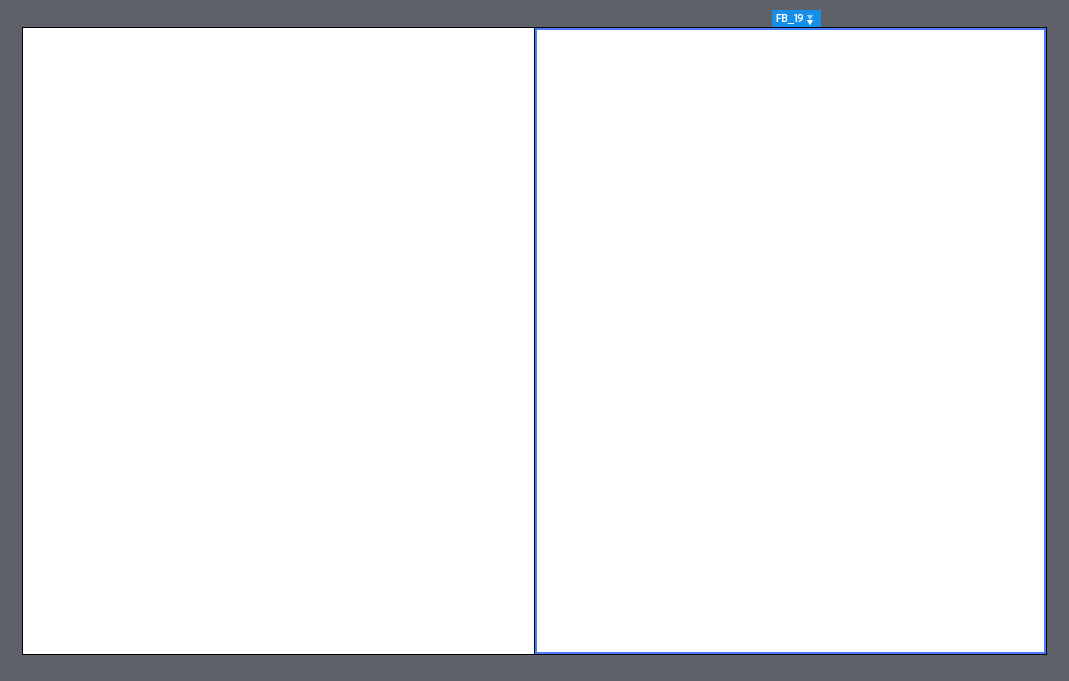
For example, if you chose to insert two horizontal fluid boxes  , they get inserted on a slide like below:

After you insert fluid boxes, always the Root fluid box is selected on the slide and it is highlighted with the dark blue boundary.
The blue handle which is common between the boundary of inserted fluid boxes is used for resizing the fluid boxes. This will only appear if the parent fluid box of child fluid boxes is selected (In this case it is Root Fluid box by default).
Also, if you notice the Properties panel, a Fluid box selector panel appears which shows the fluid boxes currently inserted on a slide in a hierarchal fashion. Blue color highlight in the Fluid box selector panel shown the fluid box which is currently selected on the slide.

How to select a Fluid Box?
There are 3 basic ways of selecting a fluid box. One of the basic thing to remember is that when a fluid box is selected on a slide, it is always marked with a dark blue boundary (as shown below).
In above figure, child fluid box 2 is selected on the slide, highlighted in dark blue boundary. Label on top of selected fluid box (in this case FB_19) is the name of the fluid box. Arrows on the label represent the flow of selected Fluid box.
Ways to select a fluid box:
- Click on the empty area within the fluid box
- Use the Fluid box selector panel
- This approach comes handy if a Fluid box contains other fluid boxes or objects within it and it is hard to find the empty area within the fluid box to click.
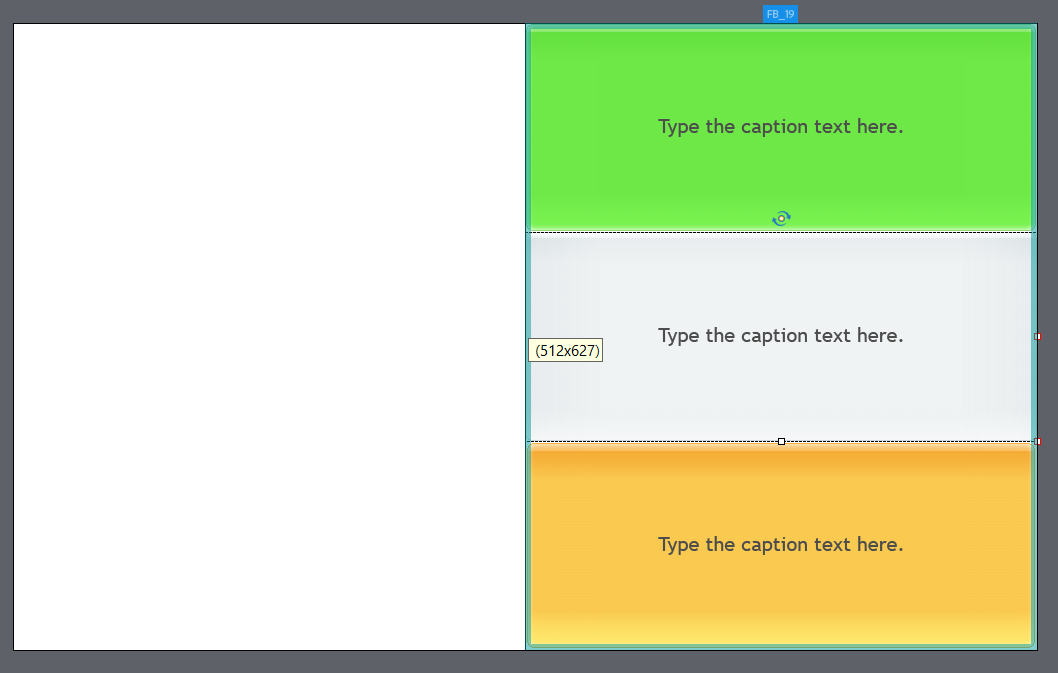
For example, in a case like below, when there are three text captions filling out the entire area of child fluid box 2, how do you select the fluid box:

It is simple. Select any object within the fluid box (In this case I will be selecting the grey text caption). Move your mouse pointer on the boundary of the selected object, which is overlapping with the Fluid box. Fluid box will get highlight in light bluish green color (as shown below). All you must do is click on this highlighted boundary and Fluid box will get selected. Remember, you must click for fluid box to get selected
Same approach needs to be followed if a fluid box containing child fluid boxes need to be selected. First select any of the child fluid boxes of the fluid box you want to select and then move the mouse pointer to overlapping boundary and then click on the highlighted light bluish green boundary.
Points to be noted-
- Fluid box which is currently selected is always represented by a solid dark blue boundary.
- Fluid box which is currently not selected and is serving as a parent for fluid boxes or objects within it, is always represented by a light bluish green boundary upon hovering over its boundary.
Check out the Knowledge Fact – 2
Have you started using Fluid Boxes, please share your experience & any questions you have around this new feature…
In this article, I will be discussing some facts you need to know for getting started on working with fluid boxes. This will basically involve giving an overview on what are fluid boxes, how to use them, insertion and selection of fluid boxes.
So, let us get started!
What is a Fluid box?
As part of Adobe Captivate 2017 release, Fluid boxes are the containers which layout your content intelligently as per the defined settings. They are adaptive across various devices and screen sizes, to provide great learning experience while maintaining the integrity of your content.
With Fluid boxes, come their properties like Flow direction, Wrapping, Stretching, Alignment, Padding, Optional and Static which we will discuss in detail across this article.
How to use Fluid boxes?
One of the most important things to keep in mind while working with fluid boxes is to have a layout design ready for your content before you start placing the actual course content on your slide. This step is a critical one, as it serves to provide a strong base foundation for building your responsive project.
For example: To create a slide as shown below:
You must have already prepared a layout, something like this:
How to insert Fluid boxes?
You can insert Fluid boxes using the Fluid box option present in Captivate tool bar.
Upon clicking Fluid Box button, you will see two options:
Horizontal and Vertical are the flow direction for your fluid boxes which are inserted as children within your Root Fluid box (I will be referring to the Root fluid box as the main Fluid box on the slides within which all other fluid boxes or objects will be contained). Remember, every time you chose to insert multiple fluid boxes, they get inserted as children within a Root Fluid box.
For example, if you chose to insert two horizontal fluid boxes , they get inserted on a slide like below:
After you insert fluid boxes, always the Root fluid box is selected on the slide and it is highlighted with the dark blue boundary.
The blue handle which is common between the boundary of inserted fluid boxes is used for resizing the fluid boxes. This will only appear if the parent fluid box of child fluid boxes is selected (In this case it is Root Fluid box by default).
Also, if you notice the Properties panel, a Fluid box selector panel appears which shows the fluid boxes currently inserted on a slide in a hierarchal fashion. Blue color highlight in the Fluid box selector panel shown the fluid box which is currently selected on the slide.
How to select a Fluid Box?
There are 3 basic ways of selecting a fluid box. One of the basic thing to remember is that when a fluid box is selected on a slide, it is always marked with a dark blue boundary (as shown below).
In above figure, child fluid box 2 is selected on the slide, highlighted in dark blue boundary. Label on top of selected fluid box (in this case FB_19) is the name of the fluid box. Arrows on the label represent the flow of selected Fluid box.
Ways to select a fluid box:
- Click on the empty area within the fluid box
- Use the Fluid box selector panel
- This approach comes handy if a Fluid box contains other fluid boxes or objects within it and it is hard to find the empty area within the fluid box to click.
For example, in a case like below, when there are three text captions filling out the entire area of child fluid box 2, how do you select the fluid box:
It is simple. Select any object within the fluid box (In this case I will be selecting the grey text caption). Move your mouse pointer on the boundary of the selected object, which is overlapping with the Fluid box. Fluid box will get highlight in light bluish green color (as shown below). All you must do is click on this highlighted boundary and Fluid box will get selected. Remember, you must click for fluid box to get selected
Same approach needs to be followed if a fluid box containing child fluid boxes need to be selected. First select any of the child fluid boxes of the fluid box you want to select and then move the mouse pointer to overlapping boundary and then click on the highlighted light bluish green boundary.
Points to be noted-
- Fluid box which is currently selected is always represented by a solid dark blue boundary.
- Fluid box which is currently not selected and is serving as a parent for fluid boxes or objects within it, is always represented by a light bluish green boundary upon hovering over its boundary.
Check out the Knowledge Fact – 2
Have you started using Fluid Boxes, please share your experience & any questions you have around this new feature…


You must be logged in to post a comment.
- Most Recent
- Most Relevant
Fluid boxes are a great idea, but there are many limitations. so far. On the other hand, there are great features helping to make projects more responsive. I wish I could check, how widespread the use of fluid boxes is among Captivate users ?
Where’s Pooja? I used to understand her.
Is there a video demo of this set up?
This sort of makes sense – so i need to unmake it as a Fluid Box to edit the content then reassign it as a Fluid Box?
Also I see other folks having problems getting the Assets to load in the 2017 Library? The folder shows in my User/Shared/Adobe folder but not in Captivate (we run Mac OS Sierra)
Yes Dendra. See the logic is Fluid boxes and objects cannot be siblings at same hierarchical level. This is the reason you have to unlock object from a fluid box, if you want to create additional layout within that fluid box.
Also, as far as the Mac assets issue is concerned, please do the following.
Under User/Shared/Adobe/eLearning Assets/Stock folder, there will be thumbnails folder. Edit permissions for this folder and give “everyone” read and write permission. Any downloaded asset post doing this action will reflect in the Captivate.
Regards,
Zeeshan
mmm – so I deleted all previous folders of the elearning Assets and did a clean install.
I went to insert one of the characters in a test blank slide and got this message
An error occurred while loading the image. The file is damaged or the file type is not supported by Adobe Captivate.
I had to install via the Terminal as the Install .dmg folder would not open.
Dendra Best, you have post a query under blog section. So reposting it here on your behalf.
Can anyone tell me why Fluid Boxes is greyed out on the Menu Bar now?
We run Mac OS Sierra.
Dendra
This can happen for at least two reasons: you have chosen the Project > Switch to Breakpoint Mode option OR you have clicked in a fluid box that already has content in it. To modify fluid boxes, they can’t contain content. You can choose the content, click the Unlock from Fluid Box option, and then you can modify the fluid box.
Thanks for the reply Joe.
Just to add up, while working on a Responsive project make sure to check if the slide already contains a fluid box coming from a master slide.
For example, while using White theme (which is normally default) and starting a new Responsive project, Title slide already has fluid box coming from the content master slide. This fluid box contains a title place holder as well. For this reason, when you select this Fluid box, you will be unable to add any further fluid boxes until you chose to unlock the placeholder item.
Kindly let me know, if you need further clarification.
Regards,
Zeeshan
