 Newbie
38 posts
Newbie
38 posts
Drag-and-drop interactions in Adobe Captivate test the users if they can match related items from a group of items.
Assets and samples
The procedures in this document require you to use assets such as images and sample Adobe Captivate project files. You can choose to use your own assets and samples. However, it is recommended that you download and extract the following zip file to your computer: drag-drop-interactions
Click Play to view the first HTML5 preview (countries and monuments).
Click Play to view the second HTML5 preview (fruits and vegetables)
Create your first drag-and-drop interaction
Let’s create a basic drag-and-drop interaction on how to match countries with their capital cities.
- Open a blank project.
- Add a Blank Slide from the Slides menu in the toolbar.
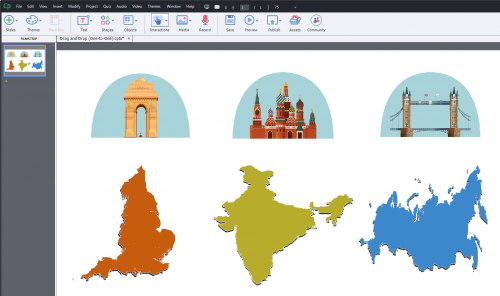
- Add the images of the monuments and countries given to you, to the slide. Check the picture below.

- From the Insert menu, launch the Drag and Drop Interaction wizard.
- In the first step of the wizard, set the monuments as the drag sources.
To select the monuments simultaneously, press CTRL and click them. Click Next.

- In the second step of the wizard, set the countries as the drop targets. To select the countries simultaneously, press CTRL and click them. Click Next.

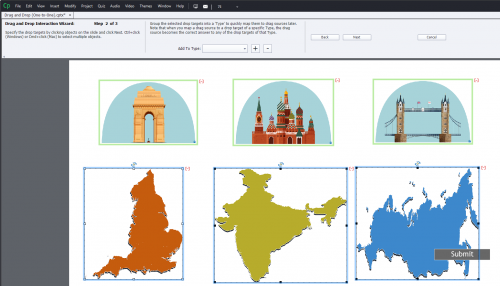
- In the third step, map the monuments with their respective countries. Drag the handle at the center of the drag source and drop it on the respective drop target. Click Finish to close out the wizard.
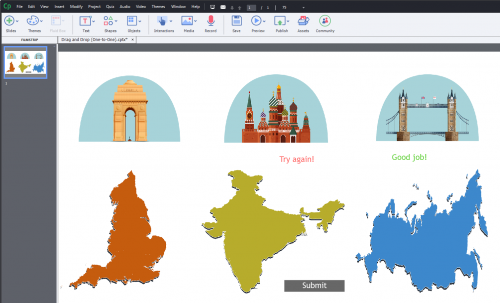
- During the last step of the wizard, two text captions appear on the stage-Type success text here, and Type failure text here. Now, click into these captions to edit the feedback messages which the user gets on either passing or failing the assessment. You can also customize the properties of the text, such as color, size, alignment, and font style.A Submit button also appears on the slide in the last step of the wizard. So, the user has to click Submit to complete the task given to them.


- You can give more than one attempt to the user. Go to Properties Inspector, Drag and Drop tab, Actions section, and change the No.of Attempts to 3.
When you choose this option, you can also reset the interaction done by the user before the next attempt. In the same Actions Section, select Reset All under Reset. - You can alternatively let the users work their way through in a more interactive way instead of them submit the answers.
- Select the drop target. Go to the Properties Inspector, Drag and Drop tab, Format section, and click the Objects Actions button.
- The Accepted Drag Sources dialog box opens.
- Deselect Accept All, set the number of attempts by editing Count. Now check the acceptable drag source for the chosen drop target. Similarly set the acceptable drag sources for the other drop targets.
- To see the drag-and-drop interaction in action, click Preview.
Customize the drag-and-drop interaction
Applying effects to drag sources and drop targets
You can create visual effects while dropping the drag source to the drop target. For the same, select the drag sources, go to the Properties Inspector, Drag and Drop tab, Format section and select either Zoom In or Glow option.
Similarly, you can also set Zoom In effect for the drop target.
Set a display message
You can display optional messages for the correct and wrong matching done, or give the user a hint.
Select the drop target, go to the Properties Inspector, Drag and Drop tab, and under Display, check the On Accept option. The text caption for success appears on the slide. You can set the success message.
Similarly, you can check the On Reject option, or Hint option and set the appropriate message.
Using the Interactions Properties
You can choose to send the drag source to its original position if the user accidentally moves it. You can also let the user re-drag it if they don’t drop it at the correct point. Use the Interactions Properties in the Options panel under the Drag and Drop tab to achieve these actions.

Create a responsive drag-and-drop interaction
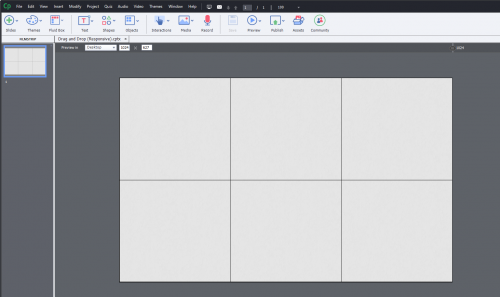
- Open a responsive project.
- Insert two vertical Fluid Boxes from the toolbar.
- Insert three horizontal Fluid Boxes in the top row and in the bottom row.

- As in the previous section, add the images of monuments and countries given to you, to the slide.
- Adjust the Fluid Boxes to fit them around the individual images.

- Move the Preview Slider across to see how the images appear on different form factors. For example, the below image shows how they appear on an iPad.

- Launch the Drag and Drop Interaction wizard.
- Set the drag sources, drop targets, and map them like in the previous section. Also edit the success and failure feedback text captions.
Preview the project.
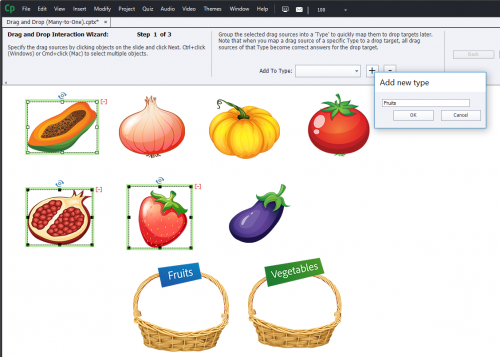
Use Types in a drag-and-drop interaction
You can also use drag-and-drop interactions to let the users group similar items from a collection of items. This task is achieved by using the option Types. As an example, let’s create a project to separate fruits and vegetables from their mix.
- Open a blank project.
- Add a Blank Slide from the Slides menu in the toolbar.
- Add the images of fruits and vegetables given to you, to the slide.
- Launch the Drag and Drop interaction wizard.
- In the first step, set all the fruits and vegetable items as drag sources. While doing it, classify them into separate groups using Types. You can accomplish this task in two phases as follows:
- Select all the fruit items simultaneously. To name this group as Fruits, click the + symbol against the Add
To Type option on the wizard toolbar. - Similarly, select all the individual vegetable items simultaneously and create a Type named Vegetables.
Click Next.


- Select all the fruit items simultaneously. To name this group as Fruits, click the + symbol against the Add

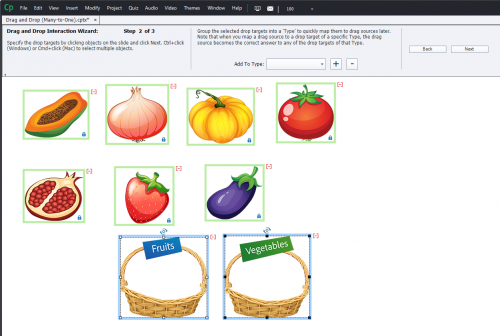
- Select the baskets as the drop targets. Click Next.

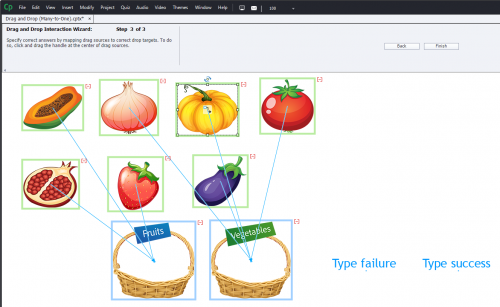
- Drag the handle at the center of one of the fruit items and point it to the Fruits basket. While dragging the item, all the other fruit items also automatically point to the Fruits basket. Similarly, when you map a vegetable item to the Veggies basket, all the other vegetable items also map to the basket. Click Finish.

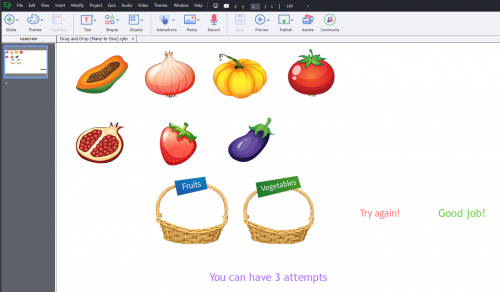
- Set the success and failure messages. Also, add a text caption and name it as You can have 3 attempts
- You can give more than one attempt to the user. Go to Properties Inspector, Drag and Drop tab, Actions section, and change the No.of Attempts to 3.
When you choose this option, you can also reset the interaction done by the user before the next attempt. In the same Actions Section, select Reset All under Reset.

To see the Interaction in action, Click Preview.
Include drag-and-drop interaction in an Adobe Captivate quiz
Drag-and-drop interaction can be included in an Adobe Captivate Quiz so that along with the regular quiz questions, your drag-and-drop interaction can also be graded.
Let’s add the drag-and-drop interaction given in the first section of this article to a quiz.
- Open a blank project.
Name the title as Start the Quiz.
Also, add a button which has the start symbol, from the Shapes menu in the toolbar, to the slide. Go to the Properties Inspector, Properties tab, Actions section and set On Success as Go to the next slide. - To create a simple drag-and-drop interaction, follow the steps 3-8 in the previous section.
- Select the drag-and-drop slide in the Filmstrip. Go to the Properties Inspector, Drag and Drop tab, Actions section, and under Reporting, check Insert in Quiz. You can see that Add to Total is checked automatically once Insert in Quiz is checked.
You can also collect the answers given by the user in a session, and send them to an LMS to publish it in a report. For this option, Under Reporting, check Report Answers. - To show the score to the users after they submit the answers:
- Go to the Quiz menu on the menu bar and choose Quiz Preferences.
- The Quiz Preferences dialog box opens. In the dialog box, in the Categories pane, under Quiz, select Settings.
- Check Show Score at the End of the Quiz. A Quiz Results slide will be added after the drag-and-drop interaction slide.

- Remove the feedback text captions from the drag-and-drop slide.
- To see the quiz in action, preview the project.

Assets and samples
The procedures in this document require you to use assets such as images and sample Adobe Captivate project files. You can choose to use your own assets and samples. However, it is recommended that you download and extract the following zip file to your computer: drag-drop-interactions
Click Play to view the first HTML5 preview (countries and monuments).
Click Play to view the second HTML5 preview (fruits and vegetables)
Create your first drag-and-drop interaction
Let’s create a basic drag-and-drop interaction on how to match countries with their capital cities.
- Open a blank project.
- Add a Blank Slide from the Slides menu in the toolbar.
- Add the images of the monuments and countries given to you, to the slide. Check the picture below.
- From the Insert menu, launch the Drag and Drop Interaction wizard.
- In the first step of the wizard, set the monuments as the drag sources.
To select the monuments simultaneously, press CTRL and click them. Click Next.
- In the second step of the wizard, set the countries as the drop targets. To select the countries simultaneously, press CTRL and click them. Click Next.
- In the third step, map the monuments with their respective countries. Drag the handle at the center of the drag source and drop it on the respective drop target. Click Finish to close out the wizard.
- During the last step of the wizard, two text captions appear on the stage-Type success text here, and Type failure text here. Now, click into these captions to edit the feedback messages which the user gets on either passing or failing the assessment. You can also customize the properties of the text, such as color, size, alignment, and font style.A Submit button also appears on the slide in the last step of the wizard. So, the user has to click Submit to complete the task given to them.
- You can give more than one attempt to the user. Go to Properties Inspector, Drag and Drop tab, Actions section, and change the No.of Attempts to 3.
When you choose this option, you can also reset the interaction done by the user before the next attempt. In the same Actions Section, select Reset All under Reset. - You can alternatively let the users work their way through in a more interactive way instead of them submit the answers.
- Select the drop target. Go to the Properties Inspector, Drag and Drop tab, Format section, and click the Objects Actions button.
- The Accepted Drag Sources dialog box opens.
- Deselect Accept All, set the number of attempts by editing Count. Now check the acceptable drag source for the chosen drop target. Similarly set the acceptable drag sources for the other drop targets.
- To see the drag-and-drop interaction in action, click Preview.
Customize the drag-and-drop interaction
Applying effects to drag sources and drop targets
You can create visual effects while dropping the drag source to the drop target. For the same, select the drag sources, go to the Properties Inspector, Drag and Drop tab, Format section and select either Zoom In or Glow option.
Similarly, you can also set Zoom In effect for the drop target.
Set a display message
You can display optional messages for the correct and wrong matching done, or give the user a hint.
Select the drop target, go to the Properties Inspector, Drag and Drop tab, and under Display, check the On Accept option. The text caption for success appears on the slide. You can set the success message.
Similarly, you can check the On Reject option, or Hint option and set the appropriate message.
Using the Interactions Properties
You can choose to send the drag source to its original position if the user accidentally moves it. You can also let the user re-drag it if they don’t drop it at the correct point. Use the Interactions Properties in the Options panel under the Drag and Drop tab to achieve these actions.
Create a responsive drag-and-drop interaction
- Open a responsive project.
- Insert two vertical Fluid Boxes from the toolbar.
- Insert three horizontal Fluid Boxes in the top row and in the bottom row.
- As in the previous section, add the images of monuments and countries given to you, to the slide.
- Adjust the Fluid Boxes to fit them around the individual images.
- Move the Preview Slider across to see how the images appear on different form factors. For example, the below image shows how they appear on an iPad.
- Launch the Drag and Drop Interaction wizard.
- Set the drag sources, drop targets, and map them like in the previous section. Also edit the success and failure feedback text captions.
Preview the project.
Use Types in a drag-and-drop interaction
You can also use drag-and-drop interactions to let the users group similar items from a collection of items. This task is achieved by using the option Types. As an example, let’s create a project to separate fruits and vegetables from their mix.
- Open a blank project.
- Add a Blank Slide from the Slides menu in the toolbar.
- Add the images of fruits and vegetables given to you, to the slide.
- Launch the Drag and Drop interaction wizard.
- In the first step, set all the fruits and vegetable items as drag sources. While doing it, classify them into separate groups using Types. You can accomplish this task in two phases as follows:
- Select all the fruit items simultaneously. To name this group as Fruits, click the + symbol against the Add
To Type option on the wizard toolbar. - Similarly, select all the individual vegetable items simultaneously and create a Type named Vegetables.
Click Next.
- Select all the fruit items simultaneously. To name this group as Fruits, click the + symbol against the Add
- Select the baskets as the drop targets. Click Next.
- Drag the handle at the center of one of the fruit items and point it to the Fruits basket. While dragging the item, all the other fruit items also automatically point to the Fruits basket. Similarly, when you map a vegetable item to the Veggies basket, all the other vegetable items also map to the basket. Click Finish.
- Set the success and failure messages. Also, add a text caption and name it as You can have 3 attempts
- You can give more than one attempt to the user. Go to Properties Inspector, Drag and Drop tab, Actions section, and change the No.of Attempts to 3.
When you choose this option, you can also reset the interaction done by the user before the next attempt. In the same Actions Section, select Reset All under Reset.
To see the Interaction in action, Click Preview.
Include drag-and-drop interaction in an Adobe Captivate quiz
Drag-and-drop interaction can be included in an Adobe Captivate Quiz so that along with the regular quiz questions, your drag-and-drop interaction can also be graded.
Let’s add the drag-and-drop interaction given in the first section of this article to a quiz.
- Open a blank project.
Name the title as Start the Quiz.
Also, add a button which has the start symbol, from the Shapes menu in the toolbar, to the slide. Go to the Properties Inspector, Properties tab, Actions section and set On Success as Go to the next slide. - To create a simple drag-and-drop interaction, follow the steps 3-8 in the previous section.
- Select the drag-and-drop slide in the Filmstrip. Go to the Properties Inspector, Drag and Drop tab, Actions section, and under Reporting, check Insert in Quiz. You can see that Add to Total is checked automatically once Insert in Quiz is checked.
You can also collect the answers given by the user in a session, and send them to an LMS to publish it in a report. For this option, Under Reporting, check Report Answers. - To show the score to the users after they submit the answers:
- Go to the Quiz menu on the menu bar and choose Quiz Preferences.
- The Quiz Preferences dialog box opens. In the dialog box, in the Categories pane, under Quiz, select Settings.
- Check Show Score at the End of the Quiz. A Quiz Results slide will be added after the drag-and-drop interaction slide.
- Remove the feedback text captions from the drag-and-drop slide.
- To see the quiz in action, preview the project.


You must be logged in to post a comment.
- Most Recent
- Most Relevant
This was really clear and thorough for a newbie like me – thank you!
Missing is something that often appears on the forum and causes confusion for newbies. If you have limited attempts as in this example, the slide has a Succes and a ‘Failure” event, that allows to trigger actions. The word ‘Failure’ however is totally misleading, because that event only occurs at the Last Attempt. I have logged this ‘bug’ for each version since 6. It should be labeled the same way as for Quiz slides ‘Last Attempt’. Even more confusing is the fact that when the Attempts are set to Unlimited, the ‘Failure’ action is not dimmed, which should be the case as for Quiz slides. Failure action will never occur with Unlimited attempts.
I talked about this in one of my most recent posts about D&D:
https://elearning.adobe.com/2018/06/dragdrop-tweaks/
You will read in that post also about the timing of the Pausing point for D&D slides, which is not visible on the Timeline.
In any basic training I always warn that all D&D objects, drag sources and drop targets, need to be on the slide from the first frame.
I totally understand that the InBuilt states are beyond a basic tutorial, but not the information I just provided.
I am a bit confused about the drag and drop in captivate..
almost all my activities are drag and drop type..
For example, there are 10 red balls and 10 green balls. There is one basket, You have to put balls into the basket so the probability of taking a red ball is 0.3..
there is “Reset” button: to put the task into the initial state.
there is “I am done” button to return to the list of assigned tasks..
The activity reports to the learning management system “pass” or “failed”.
The important festures:
1. The learner can try as many times as he or she wants without knowing the result. This is to elmiminate technical errors lie “ i wanted to put red ball but put green insted “. . It is fair asin real life or at exam we can try as many times as we need before we submit.
2. The learning management system treats all activities the same way and I set number of attempts on it”s level.
. I am struggling to implement exactly this. Am I missing something obvious here?
I have written several blogs about D&D, in this portal or on my personal blog. You are talking about a LMS, which means that you want to transfer a score, and have to set up the D&D slide as a question, not as a Knowledge Check slide. Can you have a look at this older post, describing the difference:
http://blog.lilybiri.com/drag-and-drop-tips
Since that post, which explains also the Object actions, multistate objects have appeared, and the D&D objects have several InBuilt states, and you can add custom states. Here is another link:
https://elearning.adobe.com/2017/08/built-in-states-for-dragdrop-objects/
The score for D&D is always Pass/Fail. The only type of Question slide that has the functionality of partial scoring is the MCQ with multiple correct answers. You can use the Object actions for tweaking, combined with a user variable etc… Sorry but cannot post a whole training about D&D here in this small comment window. Please try to look at the mentioned posts, and come back with more questions.
