PREREQUISITES
To understand this article, you need to know how to create object states, how to create a variable, and how to create conditional actions based on multiple accordions.
CONTENT
Below, I present an idea of how to ‘zoom’ an object with the use of advanced actions. As the title suggests, It’s not a real zoom, just the impression for the learner/viewer. Let’s first look at how it works.
STEPS:
1. Prepare pictures which will be the phases of a zoomed object:
As you can see above, each picture represents a particular zooming stage. There are altogether 9 stages. (The first picture is just a binoculars layer. )
2. Create the other objects you will need and place everything on a slide.
In my example, apart from the multistate object (pictures representing each phase of a zoom inserted into 9 object states ), there are navigation buttons (smart shapes with a button function allowed), and a message “no more zoom” which appears after the user reaches the final zoom state.
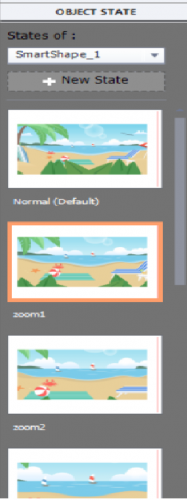
3. Prepare Object states.
It’s important what names you give to object states so that you won’t have problems with the proper sequence of showing the zoom phases. Look at the picture:
I named the first state ( the one you land on when you enter the course) ‘normal’ – meaning: not zoomed in at all/initial. The next ones are called zoom 1, zoom 2 etc. up to zoom 8 (there are 8 zoom states plus the initial ( ‘normal’) state.). Now we will know what to refer to while creating conditional actions.
4. Prepare advanced actions.
A. Zooming in.
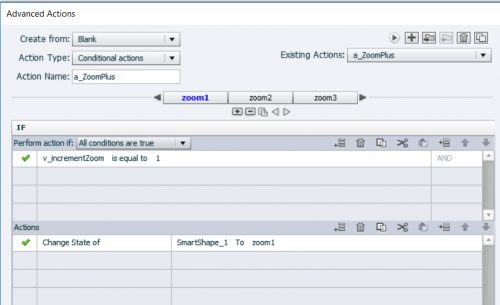
There are two conditional actions. The first, which I called a_ZoomPlus, is attached to the “+” smart shape, and another, which I called a_zoomMinus, is attached to the “–” button. We will also need one variable, which I called v_incrementZoom. Now let’s look what these actions do. The first one increases the value of the above-mentioned variable by 1.
In ffect, when you click the “+” smart shape, It will increase the value of our variable by one (In my presentation, I inserted the variable above the picture so you can see it work) and zoom1 accordion will be activated.
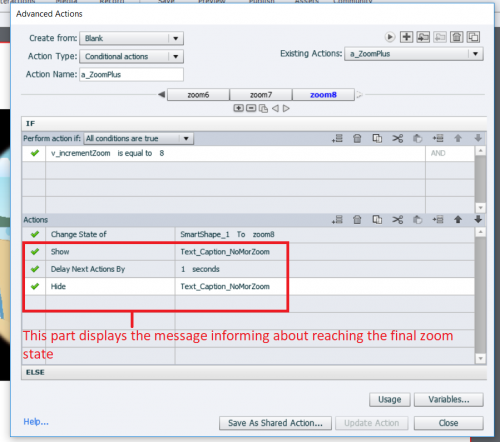
As you can see above, the conditional action says: if value of the ‘v_incrementZoom’ is equal to 1, move to ‘zoom1’ state of our picture. Consequently, with the next click, the value will be increased to 2, which will move us to ‘zoom2’ state of the picture. And so on, until you reach the final zoom state (zoom 8). The final accordeon has one additional element (which, in fact, is optional.)
Now we know how to fake enlarging an element. How about the movement in the oposite direction ? Let’s see.
B. Zooming out.
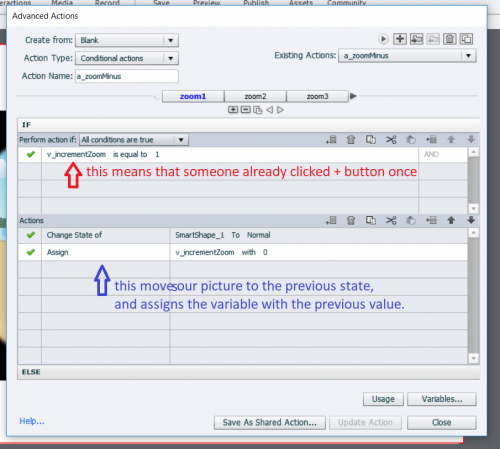
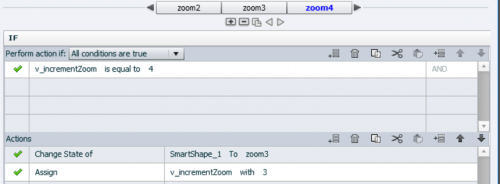
In the action attached to the ‘- ‘ button, we have 8 accordions: zoom1 to zoom 8. This action executes the effect depending on what is the current value of the “v_incrementZoom” variable ( our only viarable in this project -at least we won’t mix up variable names ![]() ). In the example above the current value is 1, which means that ”+” button has been clicked once. If we now decide to click “-” button, we will go one step back in our zooming process, and the value of our variable will be assigned with the previous value. In this way, the Captivate will know that we are moving back (the state of the object was changed, and the value of the variable was changed to the number corresponding with a given zoom state – in this case we returned the value corresponding with the situation that “+” button hasn’t been clicked at all.). As you can imagine, the other accordions are analogical. You alwas move one number back with variable, and one state back with the picture. Let’s look at one more example:
). In the example above the current value is 1, which means that ”+” button has been clicked once. If we now decide to click “-” button, we will go one step back in our zooming process, and the value of our variable will be assigned with the previous value. In this way, the Captivate will know that we are moving back (the state of the object was changed, and the value of the variable was changed to the number corresponding with a given zoom state – in this case we returned the value corresponding with the situation that “+” button hasn’t been clicked at all.). As you can imagine, the other accordions are analogical. You alwas move one number back with variable, and one state back with the picture. Let’s look at one more example:
Here we moved from zoom 4 (variable value = 4; meaning: the “+” button has been clicked 4 times) zoom3, variable value = 3.
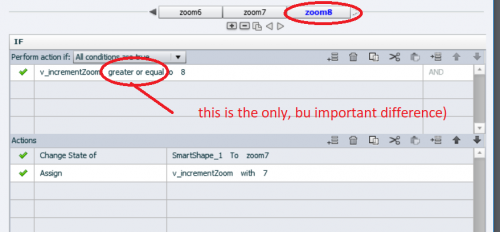
Now, let’s look at the last accordion because it is a little bit different.
In the last accordion, we must change the condition to “greater or equal”. Why ? Because the value will increase with each users’s click. If the user clicks a 3 more times after reaching the final zoom state, the value will increase to 11. (Theoretically they shouldn’t, beacuse there is the message ‘no more zoom’, but people like experimenting ![]() – “what if I click a couple more times ?”). And if we left the condition as “is equal”, the program wouldn’t know what to do. But if yu make the condition “equal or greataer” no matter how many times a desperate user clicks the “+” button, after clicking the “-” button they will always land on z00m7 (one zooming state back) and variable value 7.
– “what if I click a couple more times ?”). And if we left the condition as “is equal”, the program wouldn’t know what to do. But if yu make the condition “equal or greataer” no matter how many times a desperate user clicks the “+” button, after clicking the “-” button they will always land on z00m7 (one zooming state back) and variable value 7.
In this way we can moove 8 zoomin phases into the picture, and go back to the initial state step by step. Nothing sophisticated, but it works.
Afterthought
This approach can be applied to some other situations. For example “moving” from one place to another, or displaying different parts of a device which a student is learning to use.
I realize that such an effect can be achieved with some other methods, maybe more productive. At least I presented an alternative which is workable. And I invented this little interaction from scratch. It’s better than doing a sudoku ![]() (and probably I broke out the already opened door, as I’m sure someone must have used a similar approach before.)
(and probably I broke out the already opened door, as I’m sure someone must have used a similar approach before.)
Thank you for your patience and attention.
Enjoy Captivate !
You must be logged in to post a comment.
- Most Recent
- Most Relevant
This was fascinating to read through. As you said, there may be other methods to achieve this interaction, but I believe there’s still value in taking the time to mess around with doing things in a more manual way like this. It really teaches you better just how much goes into even what we might think of these days as a pretty basic interaction like zooming in and out of an image. Keeps me from taking for granted the absolute miracle that is my computer. Thanks for posting!


