 Legend
245 posts
Legend
245 posts
Workflow to convert all instances of an Illustrated character to SVG’s, using Illustrator.
Intro
The Assets panel is a nifty new feature, and I am confident that its use will be enhanced in the future. You could have read my first comments in this post. Under tip 2 I mentioned a special feature for the Characters of the Illustrated category. One of the complaints often heard about downloading characters is that you have to do this one by one, which is taking a lot of time. If you like the Illustrated category, and also have access to Illustrator, you can find a tip which could save you a lot of time. It is no secret that the new features for SVG’s are my favorites, and they’ll figure here as well. What would you think about characters i SVG-format? You can edit the colors within Captivate as explained here.
Step 1: Download Illustrated Work File
Open the Assets Library in Captivate. Go to the Discover tab, and open Characters. Choose Illustrated, and eventually the wanted category and find you favorite character. Look under the (mostly 25) possibilities for the Illustrated Working File. It is sometimes at the end, sometimes at the start. Only the sticky characters do not have such file. Download the file, while choosing the format AI. It will be stored in the Others subfolder under eLearnng Assets.
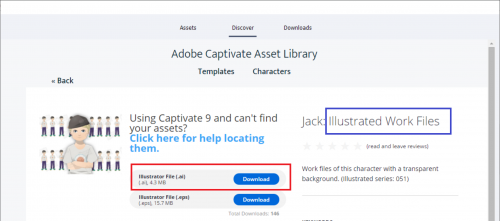
After the download you’ll be able to open the folder immediately from the popup dialog box. I mentioned already that it is under Others in eLearning assets (under Public documentsAdobe if you are on Windows).
Step 2 Illustrator – preparation environment
Be sure, personally I am not at all an expert in Illustrator, my expertise is more with Photoshop, Captivate, Audition and InDesign (some apps as well). It will be baby-steps here. Three items in the Illustrator environment will be import, try to make them visible and get acquainted with them. The workspace is not that important, I used Essentials:
- Selector tool (black arrow) which is the first tool in the vertical Toolbox, indicated by a red circle in the next screenshot. It has also a shortcut key V
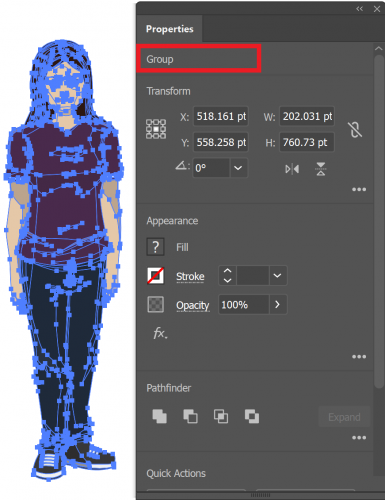
- Properties panel: it may be open, just find it or you can open it from the Windows menu. You’ll only use it to identify the nature of a selection. It is highlighted in light blue. In the screenshot you see that the selection is a ‘Group’. You are familiar with grouping in Captivate.
- Asset Export panel: you’ll probably have to open it from the Window menu, highlighted in green.This is the secret Illustrator weapon! It is a floating panel, I tend to increase its size.

Characters mostly have same poses with changed face: disappointed, speaking, normal and happy.
Step 3: Identify and change status of character
This sound terrifying, but it is not. Problem is that apparently the files for the characters were not created/finished all the same way. The ideal situation would be that each character instance was one group (of paths).
Choose the Selector (arrow) and drag a rectangle surrounding (or cutting) the character you want to save. You’ll see a lot of blue lines (paths) appear in the image. If the Properties panel indicates that this is a group, it is great! Here is an example (character Sydney):
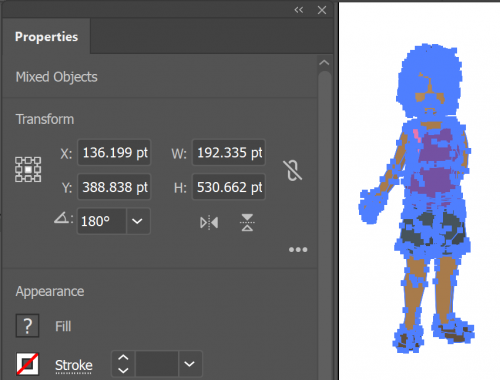
However if the selected paths are indicated as Mixed Objects, you need to group them. You can do this with the same shortcut key CTRL-G as in Captivate, or from the menu Object, Group. Here is an example before grouping (character Jessica):
Step 4 Drag objects to Asset Export panel
Drag all the assets you want to export to that panel. They’ll get a generic name Asset1…. but you can double click that name and edit to a more meaningful name. If by accident, you drag a character which is not grouped, you’ll get all assets separately as asset. That may be interesting for other situations (like the post I created about the Geographical question, or a future Color question).
Step 5: choose fomat(s) to export
You can now indicate to which format you want to export, and multiple formats are possible. In the screenshot below you’ll see that I choose SVG, but also PNG’s in 3 different sizes. The last option indicated an exact height for the PNG. That way you can increase the quality to what you want exactly, since the original image is vector-based. When you download a character in the default way from the Assets panel, you get only two choices, both with a fixed size (high and low).
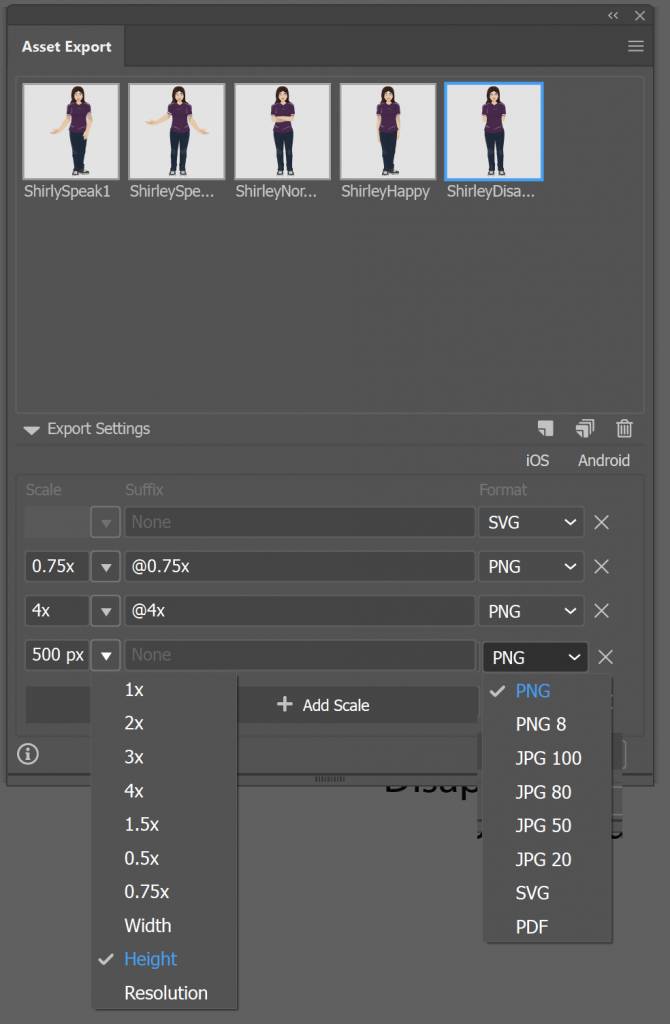
Available formats are visible in this screenshot. For the characters, which have a transparent background you should not use JPEG because it will replace the background by a solid color:.Now click the Export button. You will be asked to indicate the location for the images. You can put them in a subfolder of the eLearning assets or anywhere. They will not show up in the Downloads section of the Assets panel.
Conclusion
I like that Export Asset panel a lot. When possible I will use SVG format in this case, because it is so easy to edit colors in Captivate, or by roundtripping with Illustrator. This blog post is also meant as a possible workaround for having all characters available immediately without having to download them one by one. Too bad that you do not get such an overview image for the normal characters, only for the illustrated ones.
If you still want PNG’s you can convert them to exactly the wanted size, which is important to have the best quality for bitmap images. This is especially important if you want only part of the image to show.
Intro
The Assets panel is a nifty new feature, and I am confident that its use will be enhanced in the future. You could have read my first comments in this post. Under tip 2 I mentioned a special feature for the Characters of the Illustrated category. One of the complaints often heard about downloading characters is that you have to do this one by one, which is taking a lot of time. If you like the Illustrated category, and also have access to Illustrator, you can find a tip which could save you a lot of time. It is no secret that the new features for SVG’s are my favorites, and they’ll figure here as well. What would you think about characters i SVG-format? You can edit the colors within Captivate as explained here.
Step 1: Download Illustrated Work File
Open the Assets Library in Captivate. Go to the Discover tab, and open Characters. Choose Illustrated, and eventually the wanted category and find you favorite character. Look under the (mostly 25) possibilities for the Illustrated Working File. It is sometimes at the end, sometimes at the start. Only the sticky characters do not have such file. Download the file, while choosing the format AI. It will be stored in the Others subfolder under eLearnng Assets.
After the download you’ll be able to open the folder immediately from the popup dialog box. I mentioned already that it is under Others in eLearning assets (under Public documentsAdobe if you are on Windows).
Step 2 Illustrator – preparation environment
Be sure, personally I am not at all an expert in Illustrator, my expertise is more with Photoshop, Captivate, Audition and InDesign (some apps as well). It will be baby-steps here. Three items in the Illustrator environment will be import, try to make them visible and get acquainted with them. The workspace is not that important, I used Essentials:
- Selector tool (black arrow) which is the first tool in the vertical Toolbox, indicated by a red circle in the next screenshot. It has also a shortcut key V
- Properties panel: it may be open, just find it or you can open it from the Windows menu. You’ll only use it to identify the nature of a selection. It is highlighted in light blue. In the screenshot you see that the selection is a ‘Group’. You are familiar with grouping in Captivate.
- Asset Export panel: you’ll probably have to open it from the Window menu, highlighted in green.This is the secret Illustrator weapon! It is a floating panel, I tend to increase its size.
Characters mostly have same poses with changed face: disappointed, speaking, normal and happy.
Step 3: Identify and change status of character
This sound terrifying, but it is not. Problem is that apparently the files for the characters were not created/finished all the same way. The ideal situation would be that each character instance was one group (of paths).
Choose the Selector (arrow) and drag a rectangle surrounding (or cutting) the character you want to save. You’ll see a lot of blue lines (paths) appear in the image. If the Properties panel indicates that this is a group, it is great! Here is an example (character Sydney):
However if the selected paths are indicated as Mixed Objects, you need to group them. You can do this with the same shortcut key CTRL-G as in Captivate, or from the menu Object, Group. Here is an example before grouping (character Jessica):
Step 4 Drag objects to Asset Export panel
Drag all the assets you want to export to that panel. They’ll get a generic name Asset1…. but you can double click that name and edit to a more meaningful name. If by accident, you drag a character which is not grouped, you’ll get all assets separately as asset. That may be interesting for other situations (like the post I created about the Geographical question, or a future Color question).
Step 5: choose fomat(s) to export
You can now indicate to which format you want to export, and multiple formats are possible. In the screenshot below you’ll see that I choose SVG, but also PNG’s in 3 different sizes. The last option indicated an exact height for the PNG. That way you can increase the quality to what you want exactly, since the original image is vector-based. When you download a character in the default way from the Assets panel, you get only two choices, both with a fixed size (high and low).
Available formats are visible in this screenshot. For the characters, which have a transparent background you should not use JPEG because it will replace the background by a solid color:.Now click the Export button. You will be asked to indicate the location for the images. You can put them in a subfolder of the eLearning assets or anywhere. They will not show up in the Downloads section of the Assets panel.
Conclusion
I like that Export Asset panel a lot. When possible I will use SVG format in this case, because it is so easy to edit colors in Captivate, or by roundtripping with Illustrator. This blog post is also meant as a possible workaround for having all characters available immediately without having to download them one by one. Too bad that you do not get such an overview image for the normal characters, only for the illustrated ones.
If you still want PNG’s you can convert them to exactly the wanted size, which is important to have the best quality for bitmap images. This is especially important if you want only part of the image to show.


You must be logged in to post a comment.
- Most Recent
- Most Relevant
Thank you for this post. I am also a beginner at Illustrator, so a quick way to utilize the .ai files from the Assets tab. I really appreciate it!
You’re welcome. The export Assets from Illustrator is very welcome when you need SVGs in Captivate. I use that feature daily, and I am not at all an AI expert.
When I discovered those work files, my ‘creative’ mind was speeding up. Thought it worthwhile to publish this possibility for all users who have access to Illustrator.
Great information! I look forward to trying this. Thanks!
