 Master
16 posts
Master
16 posts
INTRODUCTION
In this tutorial, I want to share my idea of creating “dynamic” navigation buttons. By saying “dynamic”, I mean that they will appear only when you need them. I will use advanced actions combined with JavaScript.
PRESENTATION
Since a picture is worth a thousand words, let’s start with a presentation. While watching the mini-presentation, you will notice, that an arrow button is invisible for the time when an avatar is presenting the content. It appears only when the avatar stops talking. You will notice, that the button starts moving slightly, to signalize that you are ready to proceed. So check how it works. The presentation lasts about 10 seconds, then the button appears.
If you ask me “why should I use such a technique”, I would say that, firstly, it removes unnecessary elements for the time when they are not really needed, and secondly, it makes it easy for the learner to know what to do and when. Additionally, it creates the impression that the e-learning material is more interactive and “lives” together with the learner.
HOW TO
Except for the JavaScript part, the idea is really simple. Follow the steps below:
1. Hide the navigation button.
2. Create an advanced action.
3. From the drop-down menu choose the action “show button”.
2. Use the function “delay next action by” and do what it says. Delay showing the button by the time you need for presenting the learning material. The easiest method is to check how much time of delay you need on a timeline. Place the delay script above “show button” action.
That’s it. Easy peasy! The problem is, that this button doesn’t move. This tiny movement is important. It creates the feeling that the presentation is “alive”. So let’s add some life to the button with the use of JavaScript.
JAVASCRIPT PART
It’s not my intention to explain the script itself. If you know JS basics, you will see how it works. If not, I wouldn’t be able to provide you with sufficient information in such a short blog. I will just say how to use this script. It’s a ready-to-use chunk of code that you copy and paste into your advanced action. By the way, this is the most advantageous combination in Captivate. It can be quite powerful and provides the creator with a limitless number of combinations.
IPMORTANT! Before pasting the code into your project, paste it into the notepad (windows default application or anything similar.), copy it there, and only then paste it into your project. Don’t use applications like MS Word because they add extra things you can’t see (like for example tags). It might cause errors. Of course, the best idea is to use a code editor, something like Visual Studio Code, but maybe it’s a bit of an overkill for such a tiny chunk.
The whole code looks like that:
function arrowMovement(){
var moveArrow = document.getElementById(“nav_1c”)
var options = {
iterations: 70,
iterationStart: 0,
delay: 0,
endDelay: 0,
duration:700,
fill: ‘forwards’,
easing: ‘ease-in-out’,
}
var keyframes = [
{ transform: ‘translateX(0px)’ },
{ transform: ‘translateX(3px)’ },
{ transform: ‘translateX(1px)’ },
{ transform: ‘translateX(3px)’ },
{ transform: ‘translateX(0px)’ },
]
moveArrow.animate(keyframes, options);
}
arrowMovement()
In the editor, to make it work for your project, you need to copy the name of your button and paste it into the place in the parenthesis. Be careful, you replace only the name up to the letter “c”. The letter “c” must remain untouched. It signals the Captivate API. So in the code, you have something like:
(“nav_1c”)
If your button’s name is myNavButton this part of the code for your project will look like this:
(“myNavButtonc“).
The rest of the code must remain unchanged. Now, with this little change, you are ready to paste the code into your project.
Open your advanced action, click on one of the rows and choose “execute javascript”. Here is the place to paste the chunk of code. There’s another field for the window. From the drop-down menu use “current”. Now, move the JS script to the top of the advanced action. Save the script.
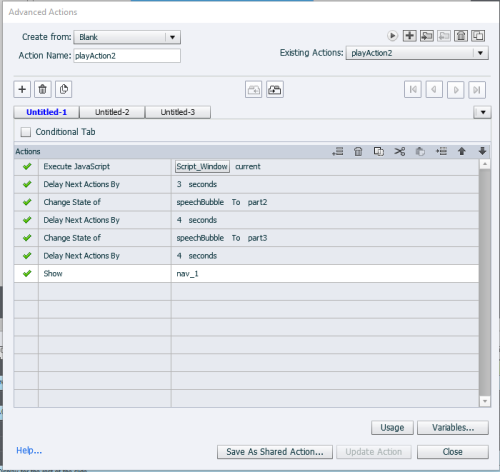
Now your code will work. This is what the advanced action will look like:
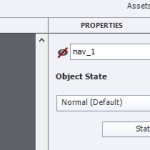
The last thing to do is activate the script on a slide. Go to PROPERTIES -> On Enter -> Execute Advanced Actions -> Script. Chose your advanced action from the drop-down menu.
Happy Captivating!
You can check my other posts related to JS:
https://elearning.adobe.com/2020/07/navigation-buttons-with-javascript/
INTRODUCTION
In this tutorial, I want to share my idea of creating “dynamic” navigation buttons. By saying “dynamic”, I mean that they will appear only when you need them. I will use advanced actions combined with JavaScript.
PRESENTATION
Since a picture is worth a thousand words, let’s start with a presentation. While watching the mini-presentation, you will notice, that an arrow button is invisible for the time when an avatar is presenting the content. It appears only when the avatar stops talking. You will notice, that the button starts moving slightly, to signalize that you are ready to proceed. So check how it works. The presentation lasts about 10 seconds, then the button appears.
If you ask me “why should I use such a technique”, I would say that, firstly, it removes unnecessary elements for the time when they are not really needed, and secondly, it makes it easy for the learner to know what to do and when. Additionally, it creates the impression that the e-learning material is more interactive and “lives” together with the learner.
HOW TO
Except for the JavaScript part, the idea is really simple. Follow the steps below:
1. Hide the navigation button.
2. Create an advanced action.
3. From the drop-down menu choose the action “show button”.
2. Use the function “delay next action by” and do what it says. Delay showing the button by the time you need for presenting the learning material. The easiest method is to check how much time of delay you need on a timeline. Place the delay script above “show button” action.
That’s it. Easy peasy! The problem is, that this button doesn’t move. This tiny movement is important. It creates the feeling that the presentation is “alive”. So let’s add some life to the button with the use of JavaScript.
JAVASCRIPT PART
It’s not my intention to explain the script itself. If you know JS basics, you will see how it works. If not, I wouldn’t be able to provide you with sufficient information in such a short blog. I will just say how to use this script. It’s a ready-to-use chunk of code that you copy and paste into your advanced action. By the way, this is the most advantageous combination in Captivate. It can be quite powerful and provides the creator with a limitless number of combinations.
IPMORTANT! Before pasting the code into your project, paste it into the notepad (windows default application or anything similar.), copy it there, and only then paste it into your project. Don’t use applications like MS Word because they add extra things you can’t see (like for example tags). It might cause errors. Of course, the best idea is to use a code editor, something like Visual Studio Code, but maybe it’s a bit of an overkill for such a tiny chunk.
The whole code looks like that:
function arrowMovement(){
var moveArrow = document.getElementById(“nav_1c”)
var options = {
iterations: 70,
iterationStart: 0,
delay: 0,
endDelay: 0,
duration:700,
fill: ‘forwards’,
easing: ‘ease-in-out’,
}
var keyframes = [
{ transform: ‘translateX(0px)’ },
{ transform: ‘translateX(3px)’ },
{ transform: ‘translateX(1px)’ },
{ transform: ‘translateX(3px)’ },
{ transform: ‘translateX(0px)’ },
]
moveArrow.animate(keyframes, options);
}
arrowMovement()
In the editor, to make it work for your project, you need to copy the name of your button and paste it into the place in the parenthesis. Be careful, you replace only the name up to the letter “c”. The letter “c” must remain untouched. It signals the Captivate API. So in the code, you have something like:
(“nav_1c”)
If your button’s name is myNavButton this part of the code for your project will look like this:
(“myNavButtonc“).
The rest of the code must remain unchanged. Now, with this little change, you are ready to paste the code into your project.
Open your advanced action, click on one of the rows and choose “execute javascript”. Here is the place to paste the chunk of code. There’s another field for the window. From the drop-down menu use “current”. Now, move the JS script to the top of the advanced action. Save the script.
Now your code will work. This is what the advanced action will look like:
The last thing to do is activate the script on a slide. Go to PROPERTIES -> On Enter -> Execute Advanced Actions -> Script. Chose your advanced action from the drop-down menu.
Happy Captivating!
You can check my other posts related to JS:
https://elearning.adobe.com/2020/07/navigation-buttons-with-javascript/


You must be logged in to post a comment.
- Most Recent
- Most Relevant
One update. What you see in the Advanced Actions table is changing the state of a speech bubble. So in effect, it delays the appearance of the arrow by 11 seconds.
