 Legend
227 posts
Legend
227 posts
 Gone are the days when you had to use multiple objects and advanced actions to depict changing the state of an object in Adobe Captivate.
Here comes Adobe Captivate 9, with the power of multi-state objects. You can now convert any interactive or non-interactive object to a multi-state object. This will immensely help you in developing interactive content easily without using multiple objects, or “hide and show” techniques in a single project or slide.
You can add any number of custom states to both interactive and non-interactive objects. And for the interactive objects, you can also configure inbuilt states like normal, rollover, and down states for buttons; and dragstart, dragover, dropcorrect, dropincorrect, etc. inbuilt states for objects in drag and drop interactions, which are automatically triggered with the object actions.
Watch this video to see how I build a custom accordion interaction in Captivate 8 and then in Captivate 9. In Captivate 8 workflow, I use multiple objects, group them, write advanced actions, and then apply the advanced actions to the buttons. And in Captivate 9, I just create a multi-state object and trigger a simple action to change the state to show related content.
Like what you see? Here are the steps to convert objects to multi-state objects and use the state-specific actions:
- Create a new project in Adobe Captivate 9.
- Add a shape and select it.
- In the Properties Inspector, click the plus symbol in the Object State section.

- Label the new state, and click OK.

- Now change some properties of the shape.
- Add more states, if required.
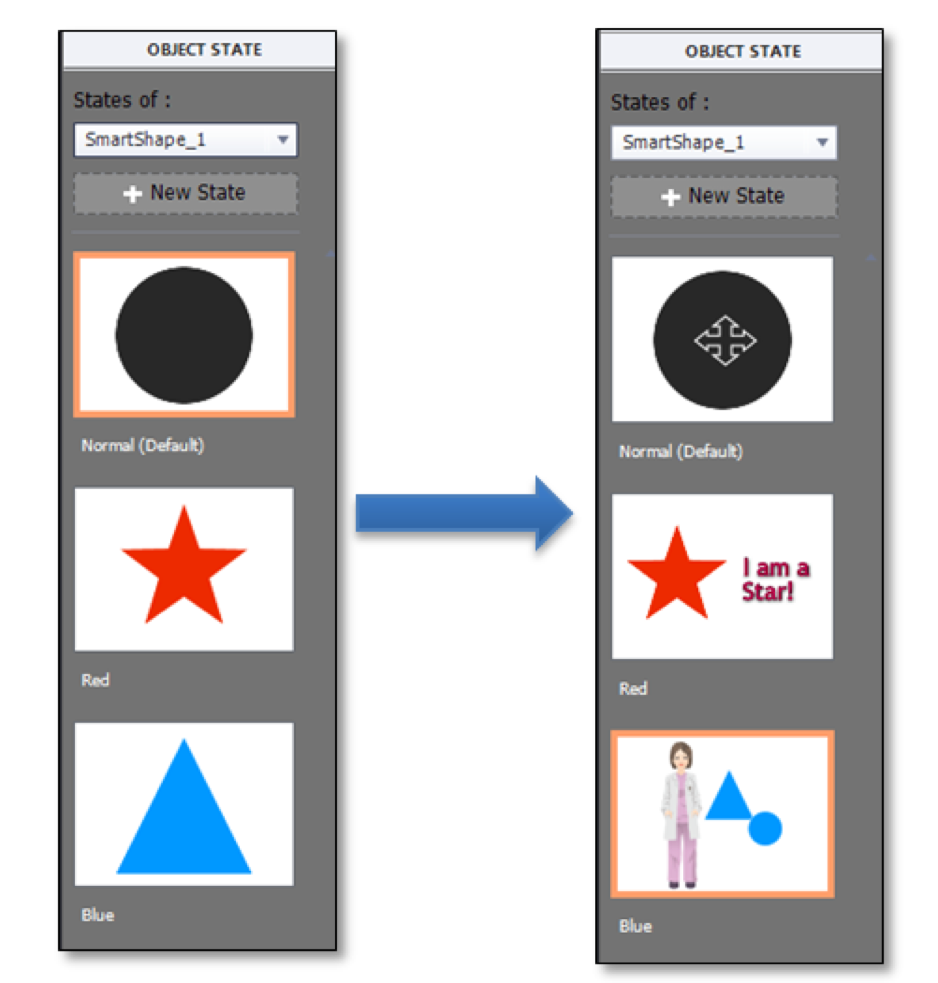
- You can also see all the states of the object together in the State view. To do so, select the object, and click State View in the Properties Inspector.

- Object states will now show up in the Object State panel.
- You can add new states in this panel, and also add additional objects to each state.

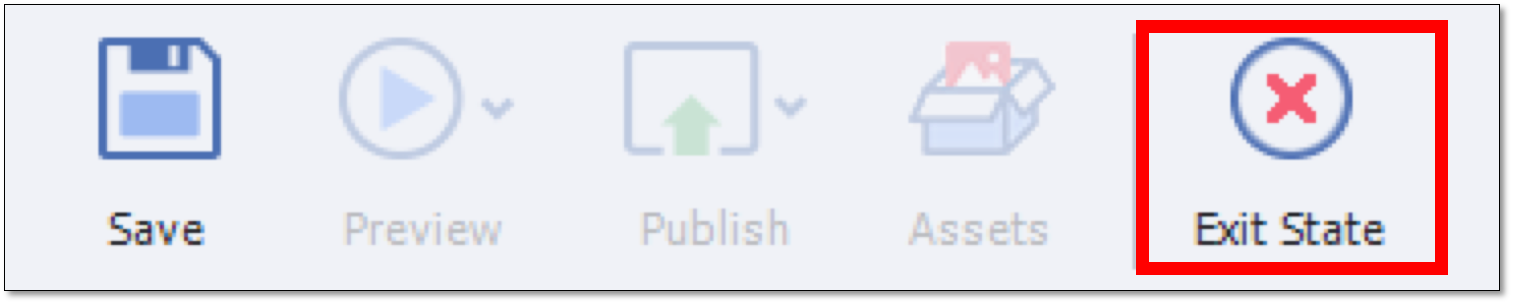
- To exit the State View, click the Exit State button on the toolbar.

- Now, add buttons to show different states.
- Select the button and go to the Actions panel. Select the On Success Action to the newly added Change State of action.
- Select the object and its desired state and uncheck Continue Playing the Project.

- You can also add Back and Next buttons for the states and use the newly added Go to Next State and Go to Previous State actions.


Ready to build interactions using multi-state objects? Here are some example interactions:
Need more help with multi-state objects. Refer this Help document to learn more about it.
So, how are you planning to use this new feature to build your eLearning interactions? Chime in your thoughts here.
Happy Captivating! ![]()
If you are using Captivate 2017, then download the multi-state object workbook – [Workbook] Multi-state Objects in Adobe Captivate 2017
Gone are the days when you had to use multiple objects and advanced actions to depict changing the state of an object in Adobe Captivate.
Here comes Adobe Captivate 9, with the power of multi-state objects. You can now convert any interactive or non-interactive object to a multi-state object. This will immensely help you in developing interactive content easily without using multiple objects, or “hide and show” techniques in a single project or slide.
You can add any number of custom states to both interactive and non-interactive objects. And for the interactive objects, you can also configure inbuilt states like normal, rollover, and down states for buttons; and dragstart, dragover, dropcorrect, dropincorrect, etc. inbuilt states for objects in drag and drop interactions, which are automatically triggered with the object actions.
Watch this video to see how I build a custom accordion interaction in Captivate 8 and then in Captivate 9. In Captivate 8 workflow, I use multiple objects, group them, write advanced actions, and then apply the advanced actions to the buttons. And in Captivate 9, I just create a multi-state object and trigger a simple action to change the state to show related content.
Like what you see? Here are the steps to convert objects to multi-state objects and use the state-specific actions:
- Create a new project in Adobe Captivate 9.
- Add a shape and select it.
- In the Properties Inspector, click the plus symbol in the Object State section.
- Label the new state, and click OK.
- Now change some properties of the shape.
- Add more states, if required.
- You can also see all the states of the object together in the State view. To do so, select the object, and click State View in the Properties Inspector.
- Object states will now show up in the Object State panel.
- You can add new states in this panel, and also add additional objects to each state.
- To exit the State View, click the Exit State button on the toolbar.
- Now, add buttons to show different states.
- Select the button and go to the Actions panel. Select the On Success Action to the newly added Change State of action.
- Select the object and its desired state and uncheck Continue Playing the Project.
- You can also add Back and Next buttons for the states and use the newly added Go to Next State and Go to Previous State actions.
Ready to build interactions using multi-state objects? Here are some example interactions:
Need more help with multi-state objects. Refer this Help document to learn more about it.
So, how are you planning to use this new feature to build your eLearning interactions? Chime in your thoughts here.
Happy Captivating! ![]()
If you are using Captivate 2017, then download the multi-state object workbook – [Workbook] Multi-state Objects in Adobe Captivate 2017


You must be logged in to post a comment.
- Most Recent
- Most Relevant
Good article ! To make things more challenging, I think you can insert films into object states ?
Yes, you can have video states.
This was incredibly helpful! Very interesting to see how Version 9 upgraded this process to make it even more streamlined. Thanks for the tip!
I’m new to captivate and trying to create a box that users will be able to select and deselect or click and unclick. What I managed to do is I created an object that changes its state after the first click et. a checked box image appears on top of it. Now what I need to achieve is to allow user to uncheck this same object if they decide to change their mind and then the checked box image would disappear. I have no idea how to do it. Please help.
I think you are using Change state of action to change the state, instead try using goto Next state action in captivate.
Any thoughts on adding a “Loop Action” advanced action?
Hi, I’m using the highlight box to force focus to a specific area of the screen by using the “Fill Outer Area” which works great. Is there any way to have two highlight boxes on screen at the same time? I need to highlight two different areas of the screen at the same time.
Thanks!
How can I change the color a PNG image from orange to green, over the period of 2 seconds in the timeline?
Hi Ron, you can use the Delay action in a standard action and change state of object. Then trigger than action at the beginning of the slide.
Nice tip! Just what I was looking for 🙂
I’m already registered 🙂
It seems that when I change the state of an object (like: a button to a ‘visited’ state) it reverts back to the original state when I return to that slide (a custom menu) — any ideas how to persist the state when returning to the menu slide??
Hi Marc, retaining visited state is currently not available and we are considering to add this functionality in the future update/version.
Marc, did you figure out a was to do this? I am having the same issue, and may just head back to Storyline. I was giving Captivate a shot.
Hi Dr. Jaisingh-
Is there a workaround for retaining visited state?
The only way currently is to avoid the use of states and use Show/Hide Actions instead. That way, if you show something, it will remain showing until you decide to hide hit and vice-versa.
Hello
If I have 10 random questions (related to a pool of question) and i want out of the 10 only 6 questions are markable. But i do not want to specify which questions will be marked in Captivate. I want Captivate to decide that. Is it possible to do that in Adobe Captivate 8? Thanks for your response.
Hi, Hansa,
That’s an interesting question. However, I’m confused as to what criterion you want Captivate to use for marking deciding whether a question is markable or not.
How can I trigger a change of state based on the timeline? Storyline has cue points. Anything like that in Captivate?
Hi James, that’s not currently supported in Captivate.
But boy, that would be nice!
Hi Pooja, I see that this post is from 2015. Does Captivate now currently support changing triggering states based on the timeline?
I had a similar question as I wanted an object to change state in time with the audio (a shape indicating data quality was decreasing from 100% to 10%). Pooja’s videos above about the walking man provides the necessary advanced action. Create an advanced action that combines “change state of” with “delay next actions by”. Have this advanced action “on enter” for the slide and calculate the delays to appear at the times you wish based on the timeline. This “emptied” my object perfectly in time with the audio. Thank you, Pooja, for these great videos!
I’m happily Captivating!
🙂
You’re always captivating Joe…you’re just that kinda guy…LOL.
Hi Joe, any ideas on how to retain button states on a menu driven course…like a landing page. I want the learner to know where they have clicked.
Hi, Sean,
The only way currently is to avoid the use of states and use Show/Hide Actions instead. That way, if you show something, it will remain showing until you decide to hide hit and vice-versa.
Thank you for getting back to me Joe.
How do I set that up?
I will be showing it in a webinar this Tuesday, Sean, Go to the Training Mag site and click on the Webinars option.
