 Staff
44 posts
Staff
44 posts
I saw an interesting question this morning in the community, but of course I cannot find it now to tell you who began the thought. 😉
Nonetheless – the question was fairly universal and the use case sounded interesting so I thought I’d give it a stab. The core of the question was – how can I create looping animation in Captivate on a single slide to simulate one of those repeating roadway animations – like the old 8 bit games.
There are of course many ways to approach this problem. You could just animate the little trees, track and other elements using Animate or Edge. Those animations can be pulled into Captivate. You can also create animation effects and pull those into Captivate to assign to Captivate objects. But I thought it might be cool to try to leverage the responsive animation in Captivate in order to create a looping roadway that would work across any device.
http://www.director-3d.com/Captivate/tutorials/jsAnim/animateMe/
A note to the wise – this project works fine for a minute or so, and then my scaling effect starts to introduce drift and other issues that would make the approach flawed in a serious project if the screen needed to stay fixed for any serious length of time. But this should be plenty to get you started, and also includes a few techniques that some may find useful.
Here’s a screen shot of the project with Timeline. I’ve also included a link to the source code, so you can easily load up the project and tinker around with it on your own.

So the project here is quite simple. You’ll note that there are only two obvious animations, and those are basically motion paths that cause the pine trees to move down the screen and to the outside corners. The motion paths continue on – to eventually move the tree up and back around. This allows me to effectively reset the tree to its origin point – so that I can start again from the same basic position.
I’m using some timing magic here to cause the tree to seem to ‘appear’ on the hilltop, rather than fly in from the sky. The key is that while the animation loop is 5 seconds long, I’m recalling the animation on the right at 4 second intervals. This apparently causes the Captivate sprite to reset it’s position to the endpoint, and then restarts the animation. I use the same method on the left hand tree, except that it is 6 seconds of animation, with a call back loop set to 5 seconds.

You might notice some other mischief here. Note first that my animation effects are applied not as timeline dependent animation. They are applied as triggered animation. Therefore I can have animation cycles that are technically longer than the timeline of the sprite itself. In this case, the timeline for the sprite is 1.6 seconds long. But my triggered animation is 5 seconds long. You’ll note that the zoom in effect – which scales the tree up as it slides toward bottom right, is triggered right away, and coincides with the motion path – which is a custom curve. At 2.0 seconds, I add the zoom out effect (right after the zoom in has completed.) The zoom in went from 100% to 250%. The zoom out reverses that moving from 250% down to 100% I want the zooming to complete (go back to 100%) before the animation trigger is called again, so I limit the zoom total to 4.0 seconds. (There is room for some error here, because of the way I will use a timer to trigger the loops, so if there were a lot of lag – the trees could start growing out of control.)
So for the uninitiated, what do I mean about this timeline vs. triggered animation? In Captivate, you can easily create an animated effect on an object right on the timeline. Just select the item and start choosing animations to add to it. Captivate will trigger the animations according to their order on the timeline. You can see the effects on the effects level view of the timeline – just by clicking the little triangle to expand your view to see all of the effects (animations) associated with the given sprite. But sometimes, you don’t want to just run an animation when the player comes to it. Sometimes you want the user to do something to ‘trigger’ an animation to occur at a specific moment. This is generally tied to user input – like clicking on a button.
Now you may be thinking, uh … but your animation happens automatically, and yet you are saying it is triggered? Well – it turns out that it is possible to sneak around the system by using JavaScript to trigger the animation – over and over, at regular time intervals. I trigger the right tree once every 4 seconds, and I trigger the left tree one time every 5 seconds. To do this, I have to build the animation in Captivate as though I were going to let a user click a button, and then get JavaScript to click the button for me every 4 or 5 seconds.
Let’s start with building the button. I’ve built two buttons from simple smart shapes. Nothing special here, they are small box shapes, with use as button selected. Instead of accepting the default action, I’ve assigned each one to ‘Apply Effect.’
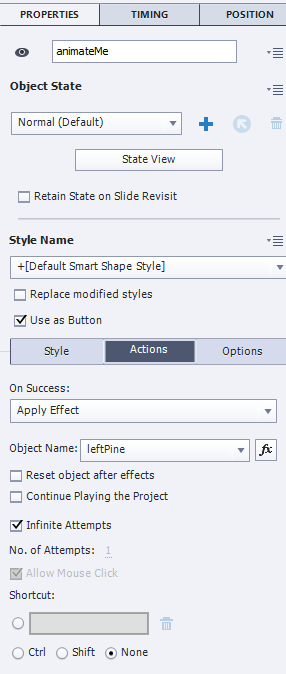 Note here for example in the property inspector of the first button that I’ve named the button appropriately – ‘animateMe’ so that it’s easier for me to refer to this instanced object in the JavaScript. The object is a basic rectangular smart shape. And it has the ‘Use as Button’ option selected.
In the Actions tab you can see that I’ve changed the action to Apply Effect, and selected the object name of the on screen sprite that I want to trigger for animation.
This smart shape button is going to be basically invisible. I’ve made it 10% alpha, removed the outline, and made it only 4px by 4px in size. It’s hiding in the upper right hand corner of the project. I also made certain to deselect the ‘Continue Playing the Project’ button. This is absolutely essential. You want to ensure that the playhead never moves past the pause trigger – which is set to 1.5 seconds for this project on both of the little buttons.
The Infinite Attempts box is checked to ensure that I can click the button as often as I like and still execute the desired command. The effect will be applied each time.
I’ve created a second little button that sits directly beneath it and named that button similarly. It is called animateMe_2. I’ll need to remember those names when I go to create the JavaScript, as it will refer to the instanced trigger items by their names. As soon as I’ve associated a trigger sprite with the corresponding animation sprite, that animation sprite will display a new option under animation – to use the trigger.
If you go back to the pine tree sprite, you’ll now find the option to use the trigger to activate the animation. With the pine tree selected, look in the timing palette in the property inspector. If you don’t see the timing palette, use Window: Timing, to navigate to the correct panel.

Under ‘Animation Trigger’ you are now able to select the option to use the ‘OnSuccess’ event from the animateMe_2 sprite. You can then build out any collection of animations that you like – and even create a complex series of animations. Note that you can either adjust the effect start time and duration from the property inspector, timing panel. Or you can simply open the timing details under the sprite’s bar on the timeline by ticking the tiny black triangle to the left of the sprite. This will expose the individual animations in the context of a timeline.
So how do we make JavaScript click the button? Well to do that we will create one simple JavaScript that runs when the project starts. I’ve added a single script to the onEnter event of the slide. On the enter event I’ve told Captivate to ‘Execute JavaScript.’ Below that option is a button to open and edit JavaScript in a little window. Here is what my JavaScript looks like.

The first task is to create a virtual egg timer. We want a timer that will trip an alarm every 5 seconds, and then send a message to Captivate to click that button each time the timer rings. That first line of code creates such an egg timer. SetInterval is a command in JavaScript that asks the system to create a new timer that rings every n seconds. The first argument (that’s the word right after setInterval) tells JavaScript which set of commands to run when the alarm rings. The very first bit of that line is just setting up a variable – a sort of container, to hold that timer in. It will also make it possible for us to properly delete that timer when we are all done.
After that there is a line that triggers the button for the first time. This happens right away, before the timer has had a chance to run. The command to trigger that mouse event is like this:
cp.runJavaScript(cp.model.data.animateMe.oca);
Notice the ‘animateMe’ part. If that looks familiar, it should. It is the name of the sprite that we want to trigger. Just change the name here to trigger different sprites.
Now we have to define the callback function – the set of commands that will run when that egg timer runs out. We provided the name of this function earlier when we setup the timer, but now we need to actually create the script that will be called. Scripts like this consist of one part that defines them as functions, and assigns them a name. And a second part that gives each command that we will want to execute when the callback is triggered.
The first part ‘function replayAnimation ()’ is that naming and defining part. It is always followed by curly braces. like this {}. Everything inside those curly braces is the command list that will be executed. In our case there is only one line to execute. You’ll recognize it as the same exact line we used before to trigger the button.
When you play the project you’ll see that the trees slide down and out, reappear at the top and repeat. I hope you find some tidbits in here you can use. I bet many of you have developed your own tricks that are a lot better than mine. Perhaps you’ll share? Feel free to comment, but also to submit your own articles, demos etc.
SOURCE: http://www.director-3d.com/Captivate/tutorials/jsAnim/animateMe.cptx
ONLINE SAMPLE: http://www.director-3d.com/Captivate/tutorials/jsAnim/animateMe/
–Allen
I saw an interesting question this morning in the community, but of course I cannot find it now to tell you who began the thought. 😉
Nonetheless – the question was fairly universal and the use case sounded interesting so I thought I’d give it a stab. The core of the question was – how can I create looping animation in Captivate on a single slide to simulate one of those repeating roadway animations – like the old 8 bit games.
There are of course many ways to approach this problem. You could just animate the little trees, track and other elements using Animate or Edge. Those animations can be pulled into Captivate. You can also create animation effects and pull those into Captivate to assign to Captivate objects. But I thought it might be cool to try to leverage the responsive animation in Captivate in order to create a looping roadway that would work across any device.
http://www.director-3d.com/Captivate/tutorials/jsAnim/animateMe/
A note to the wise – this project works fine for a minute or so, and then my scaling effect starts to introduce drift and other issues that would make the approach flawed in a serious project if the screen needed to stay fixed for any serious length of time. But this should be plenty to get you started, and also includes a few techniques that some may find useful.
Here’s a screen shot of the project with Timeline. I’ve also included a link to the source code, so you can easily load up the project and tinker around with it on your own.
So the project here is quite simple. You’ll note that there are only two obvious animations, and those are basically motion paths that cause the pine trees to move down the screen and to the outside corners. The motion paths continue on – to eventually move the tree up and back around. This allows me to effectively reset the tree to its origin point – so that I can start again from the same basic position.
I’m using some timing magic here to cause the tree to seem to ‘appear’ on the hilltop, rather than fly in from the sky. The key is that while the animation loop is 5 seconds long, I’m recalling the animation on the right at 4 second intervals. This apparently causes the Captivate sprite to reset it’s position to the endpoint, and then restarts the animation. I use the same method on the left hand tree, except that it is 6 seconds of animation, with a call back loop set to 5 seconds.
You might notice some other mischief here. Note first that my animation effects are applied not as timeline dependent animation. They are applied as triggered animation. Therefore I can have animation cycles that are technically longer than the timeline of the sprite itself. In this case, the timeline for the sprite is 1.6 seconds long. But my triggered animation is 5 seconds long. You’ll note that the zoom in effect – which scales the tree up as it slides toward bottom right, is triggered right away, and coincides with the motion path – which is a custom curve. At 2.0 seconds, I add the zoom out effect (right after the zoom in has completed.) The zoom in went from 100% to 250%. The zoom out reverses that moving from 250% down to 100% I want the zooming to complete (go back to 100%) before the animation trigger is called again, so I limit the zoom total to 4.0 seconds. (There is room for some error here, because of the way I will use a timer to trigger the loops, so if there were a lot of lag – the trees could start growing out of control.)
So for the uninitiated, what do I mean about this timeline vs. triggered animation? In Captivate, you can easily create an animated effect on an object right on the timeline. Just select the item and start choosing animations to add to it. Captivate will trigger the animations according to their order on the timeline. You can see the effects on the effects level view of the timeline – just by clicking the little triangle to expand your view to see all of the effects (animations) associated with the given sprite. But sometimes, you don’t want to just run an animation when the player comes to it. Sometimes you want the user to do something to ‘trigger’ an animation to occur at a specific moment. This is generally tied to user input – like clicking on a button.
Now you may be thinking, uh … but your animation happens automatically, and yet you are saying it is triggered? Well – it turns out that it is possible to sneak around the system by using JavaScript to trigger the animation – over and over, at regular time intervals. I trigger the right tree once every 4 seconds, and I trigger the left tree one time every 5 seconds. To do this, I have to build the animation in Captivate as though I were going to let a user click a button, and then get JavaScript to click the button for me every 4 or 5 seconds.
Let’s start with building the button. I’ve built two buttons from simple smart shapes. Nothing special here, they are small box shapes, with use as button selected. Instead of accepting the default action, I’ve assigned each one to ‘Apply Effect.’
Note here for example in the property inspector of the first button that I’ve named the button appropriately – ‘animateMe’ so that it’s easier for me to refer to this instanced object in the JavaScript. The object is a basic rectangular smart shape. And it has the ‘Use as Button’ option selected.
In the Actions tab you can see that I’ve changed the action to Apply Effect, and selected the object name of the on screen sprite that I want to trigger for animation.
This smart shape button is going to be basically invisible. I’ve made it 10% alpha, removed the outline, and made it only 4px by 4px in size. It’s hiding in the upper right hand corner of the project. I also made certain to deselect the ‘Continue Playing the Project’ button. This is absolutely essential. You want to ensure that the playhead never moves past the pause trigger – which is set to 1.5 seconds for this project on both of the little buttons.
The Infinite Attempts box is checked to ensure that I can click the button as often as I like and still execute the desired command. The effect will be applied each time.
I’ve created a second little button that sits directly beneath it and named that button similarly. It is called animateMe_2. I’ll need to remember those names when I go to create the JavaScript, as it will refer to the instanced trigger items by their names. As soon as I’ve associated a trigger sprite with the corresponding animation sprite, that animation sprite will display a new option under animation – to use the trigger.
If you go back to the pine tree sprite, you’ll now find the option to use the trigger to activate the animation. With the pine tree selected, look in the timing palette in the property inspector. If you don’t see the timing palette, use Window: Timing, to navigate to the correct panel.
Under ‘Animation Trigger’ you are now able to select the option to use the ‘OnSuccess’ event from the animateMe_2 sprite. You can then build out any collection of animations that you like – and even create a complex series of animations. Note that you can either adjust the effect start time and duration from the property inspector, timing panel. Or you can simply open the timing details under the sprite’s bar on the timeline by ticking the tiny black triangle to the left of the sprite. This will expose the individual animations in the context of a timeline.
So how do we make JavaScript click the button? Well to do that we will create one simple JavaScript that runs when the project starts. I’ve added a single script to the onEnter event of the slide. On the enter event I’ve told Captivate to ‘Execute JavaScript.’ Below that option is a button to open and edit JavaScript in a little window. Here is what my JavaScript looks like.
The first task is to create a virtual egg timer. We want a timer that will trip an alarm every 5 seconds, and then send a message to Captivate to click that button each time the timer rings. That first line of code creates such an egg timer. SetInterval is a command in JavaScript that asks the system to create a new timer that rings every n seconds. The first argument (that’s the word right after setInterval) tells JavaScript which set of commands to run when the alarm rings. The very first bit of that line is just setting up a variable – a sort of container, to hold that timer in. It will also make it possible for us to properly delete that timer when we are all done.
After that there is a line that triggers the button for the first time. This happens right away, before the timer has had a chance to run. The command to trigger that mouse event is like this:
cp.runJavaScript(cp.model.data.animateMe.oca);
Notice the ‘animateMe’ part. If that looks familiar, it should. It is the name of the sprite that we want to trigger. Just change the name here to trigger different sprites.
Now we have to define the callback function – the set of commands that will run when that egg timer runs out. We provided the name of this function earlier when we setup the timer, but now we need to actually create the script that will be called. Scripts like this consist of one part that defines them as functions, and assigns them a name. And a second part that gives each command that we will want to execute when the callback is triggered.
The first part ‘function replayAnimation ()’ is that naming and defining part. It is always followed by curly braces. like this {}. Everything inside those curly braces is the command list that will be executed. In our case there is only one line to execute. You’ll recognize it as the same exact line we used before to trigger the button.
When you play the project you’ll see that the trees slide down and out, reappear at the top and repeat. I hope you find some tidbits in here you can use. I bet many of you have developed your own tricks that are a lot better than mine. Perhaps you’ll share? Feel free to comment, but also to submit your own articles, demos etc.
SOURCE: http://www.director-3d.com/Captivate/tutorials/jsAnim/animateMe.cptx
ONLINE SAMPLE: http://www.director-3d.com/Captivate/tutorials/jsAnim/animateMe/
–Allen


You must be logged in to post a comment.
- Most Recent
- Most Relevant
Hi Allen,
thank you very much for this great explanation!
Could you help me with the following problem: I need a repeating animation (similar to your example) but additionally I need a Pause-/Resume-Button. If you press the button the animation pauses, if you press it again the animation resumes. I think it should be possible by using some simple JS but I don`t know the correct commands.
Any help is greatly appreciated! Thank you very much in advance!
Awesome Allen, that’s what I looked for long time ago.
Isn’t this running in flash Version? seems just working in html5 outputs.
hope to see animation loop native in CP one time!
best,
Matthias
I built it as responsive, so it’s HTML5 output. I didn’t test it in Flash.
jep, we tested it in flash – not working
hrmmmm … will have to have a look. What is it that didn’t work? Possibly JS callback doesn’t trigger the button click? … goes snooping.
