 Legend
639 posts
Legend
639 posts
Probably my favourite feature addition for Adobe Captivate in recent years is multi state objects. When it was first released with the launch of Adobe Captivate 9, I was initially lukewarm to multi-state objects. Prior to version 9, I had three states in my image buttons for up, down, and over; and that was just fine with me. What I didn’t realize was how many different situations I could use multi state objects for. I decided to share some of my experiences with you.
With Buttons
A real game changer for me is the ability to have multi state objects with shapes used as buttons. In the past you could certainly use image buttons that would display three different states depending on condition. Of course you could only use buttons on a single slide and were limited to just the up, down and over states. Now of course I can use a shape as a button and select almost any formatting for each state that I might want. You can select different colours, alternative font colours and formatting and even fill your shape with multiple images for each state.
 But why stop there? You can also add additional states to your buttons. I have been known to add a state that I call ‘On’ in addition to my Normal, RollOver, and Down states. The addition of the ‘On’ state lets users know if a feature I’ve added to my project is activated. This requires is a small amount of Advanced Actions to make it work. Below is the code to create your own Closed Captioning toggle button, where toggle_closed_captioning is the name of the button you see illustrated.
Toggle_cc
IF ( cpCmndCC == 0 )
Assign cpCmndCC with 1
Change State of toggle_closed_captioning to On
ELSE
Assign cpCmndCC with 0
Change State of toggle_closed_captioning to Off
I’ve also used similar advanced actions and multi state objects to toggle other Adobe Captivate system variables as well. For example, the above code can work to toggle cpCmndTOCVisible (table of contents) and the cpCmndMute (audio on/off). Multi state objects makes the whole thing work seamlessly. You just couldn’t do this with a single object in previous versions of Captivate.
With Drag and Drop
You can also use multi state objects with the drag and drop functionality, but here is a way you might not have thought of before. Certainly you can change the state of the object depending on where the user is in the drag process. Adobe Captivate has the following default states available to you for Drag Sources:
Normal – the default state of the object
DragOver – When the drag source is over a drop target
DropAccept – When the drag source is accepted on the drop target
DropReject – When the drag source is rejected from the drop target
DragStart – when the user first clicks on the drag source
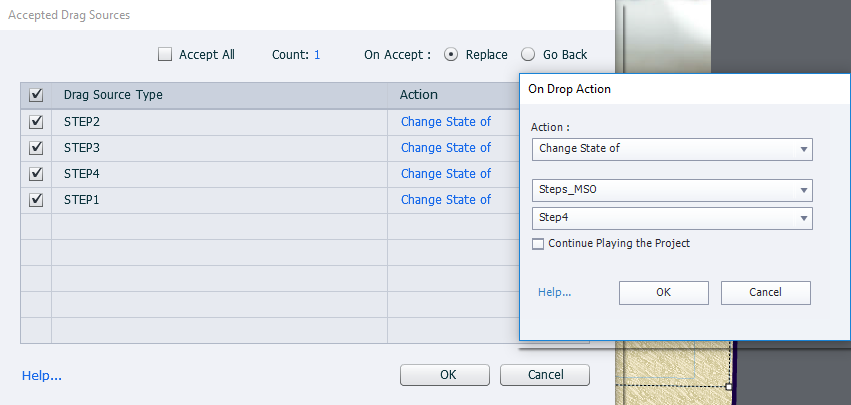
But what you might not be aware of is the fact that your drag and drop can change the state of another object. In this scenario I created an image of a passport with a series of immigration stamps to represent steps in an airport process.

The images of the stamps were my drag sources and a transparent shape in front of the passport image was my drop target. Between the image of the passport and the drop target was another transparent shape that I simply called Steps_MSO which contained a normal (default) state which was simply blank and four custom states called Step1, 2, 3, and 4. In steps 1 through four, I added detailed explanations of the steps in this process. Using the Object Actions to Change State of Steps_MSO to one of the four steps, I was able to create a really interesting interaction where the user can stamp the passport using the drag and drop function to reveal more details about the process.
To recreate this type of interaction for yourself, please take a look at the following YouTube Tutorial:
As Feedback
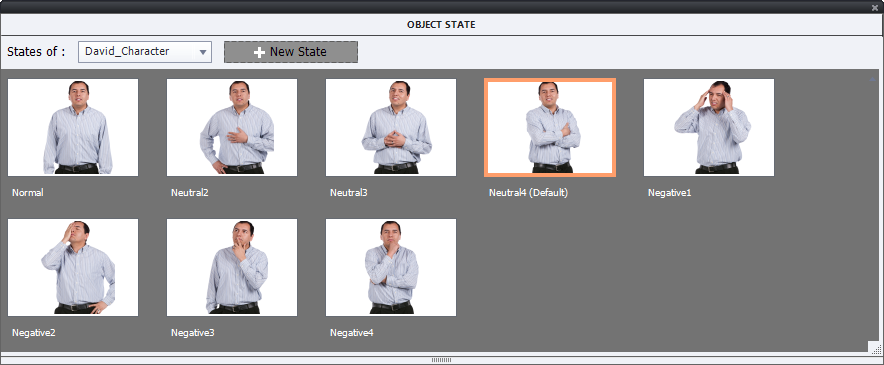
Another way I have used multi state objects, which you may not initially think of, is as a way to communicate your feedback to your users. In this example I had a drag and drop knowledge check which included the image of one of the Cut-Out Characters. In this example, I loaded eight different versions of the same character into my course by adding them one by one. I selected one of the characters that I had placed on my stage and clicked on the State View button in the Properties Inspector. I added the other images as alternate states to the single image. Using the object actions button of my drag and drop panel, I was able to show an emotional reaction to each selection that the user would make. If the user made a poor choice, David would scowl or slap his forehead. If the user made a good choice David would look pleased and so on.
You can watch the tutorial to see in greater detail how to recreate this type of interaction here:
In Conclusion
So I think it becomes extremely clear that multi state objects can be used for more than just rollover effects for buttons. While some of the multi state object scenarios could be accomplished using multiple objects with complicated show / hide scenarios, I think you’ll agree that multi state objects keeps it relatively simple. Multi state objects allows me to truly express an aspect of my creativity that I just never attempted before in previous versions of Captivate.
Probably my favourite feature addition for Adobe Captivate in recent years is multi state objects. When it was first released with the launch of Adobe Captivate 9, I was initially lukewarm to multi-state objects. Prior to version 9, I had three states in my image buttons for up, down, and over; and that was just fine with me. What I didn’t realize was how many different situations I could use multi state objects for. I decided to share some of my experiences with you.
With Buttons
A real game changer for me is the ability to have multi state objects with shapes used as buttons. In the past you could certainly use image buttons that would display three different states depending on condition. Of course you could only use buttons on a single slide and were limited to just the up, down and over states. Now of course I can use a shape as a button and select almost any formatting for each state that I might want. You can select different colours, alternative font colours and formatting and even fill your shape with multiple images for each state.
But why stop there? You can also add additional states to your buttons. I have been known to add a state that I call ‘On’ in addition to my Normal, RollOver, and Down states. The addition of the ‘On’ state lets users know if a feature I’ve added to my project is activated. This requires is a small amount of Advanced Actions to make it work. Below is the code to create your own Closed Captioning toggle button, where toggle_closed_captioning is the name of the button you see illustrated.
Toggle_cc
IF ( cpCmndCC == 0 )
Assign cpCmndCC with 1
Change State of toggle_closed_captioning to On
ELSE
Assign cpCmndCC with 0
Change State of toggle_closed_captioning to Off
I’ve also used similar advanced actions and multi state objects to toggle other Adobe Captivate system variables as well. For example, the above code can work to toggle cpCmndTOCVisible (table of contents) and the cpCmndMute (audio on/off). Multi state objects makes the whole thing work seamlessly. You just couldn’t do this with a single object in previous versions of Captivate.
With Drag and Drop
You can also use multi state objects with the drag and drop functionality, but here is a way you might not have thought of before. Certainly you can change the state of the object depending on where the user is in the drag process. Adobe Captivate has the following default states available to you for Drag Sources:
Normal – the default state of the object
DragOver – When the drag source is over a drop target
DropAccept – When the drag source is accepted on the drop target
DropReject – When the drag source is rejected from the drop target
DragStart – when the user first clicks on the drag source
But what you might not be aware of is the fact that your drag and drop can change the state of another object. In this scenario I created an image of a passport with a series of immigration stamps to represent steps in an airport process.
The images of the stamps were my drag sources and a transparent shape in front of the passport image was my drop target. Between the image of the passport and the drop target was another transparent shape that I simply called Steps_MSO which contained a normal (default) state which was simply blank and four custom states called Step1, 2, 3, and 4. In steps 1 through four, I added detailed explanations of the steps in this process. Using the Object Actions to Change State of Steps_MSO to one of the four steps, I was able to create a really interesting interaction where the user can stamp the passport using the drag and drop function to reveal more details about the process.
To recreate this type of interaction for yourself, please take a look at the following YouTube Tutorial:
As Feedback
Another way I have used multi state objects, which you may not initially think of, is as a way to communicate your feedback to your users. In this example I had a drag and drop knowledge check which included the image of one of the Cut-Out Characters. In this example, I loaded eight different versions of the same character into my course by adding them one by one. I selected one of the characters that I had placed on my stage and clicked on the State View button in the Properties Inspector. I added the other images as alternate states to the single image. Using the object actions button of my drag and drop panel, I was able to show an emotional reaction to each selection that the user would make. If the user made a poor choice, David would scowl or slap his forehead. If the user made a good choice David would look pleased and so on.
You can watch the tutorial to see in greater detail how to recreate this type of interaction here:
In Conclusion
So I think it becomes extremely clear that multi state objects can be used for more than just rollover effects for buttons. While some of the multi state object scenarios could be accomplished using multiple objects with complicated show / hide scenarios, I think you’ll agree that multi state objects keeps it relatively simple. Multi state objects allows me to truly express an aspect of my creativity that I just never attempted before in previous versions of Captivate.


You must be logged in to post a comment.
- Most Recent
- Most Relevant
You can add a command to an on enter action for the slide to delay next action by a certain number of seconds and then use the command to change the state of an object.
Is it possible to change the state of an object without asking the learner to click on something? Is it possible to associate this change to a specific timing on the audio?
Great videos. Thanks!
Apparently I’m a big time spammer so this forum has blocked me. Instead Google search for a video called Adobe Captivate – Enhancements to Multi State Objects that explains how you can add roll over and down states to smart shapes used as buttons on matter slides. You cannot do anything that requires invoking the object label (like an advanced action), since there are no object labels on the matter slide.
Paul – We will soon fix the search functionality! Sorry about not finding the content quickly!
No worries.
Hey shouldn’t you be on a flight to Vegas by now?
Still have 12hrs more for flight…!
For Paul, I currently do not see how to work with multistate objects on a master slide in Captivate 2017. When I select a shape I have created as a button, there are no master slide options in the properties (the “+” icon is disabled) in the Object State area, and under “Interactions,” everything is disabled except “Learning Interactions” (so I cannot create an Interaction Button on a master slide). You can select the “Use as Button” option in the Style Name area for a shape, but it does not dynamically activate the multistate icons in the Object State area. Can someone explain how to work with multistate objects in the Master slide view? I would like to have a button with two states that appears on every slide.
Hello! Can multi-state objects be used in the Master Slide View? When I change an object to become a button, there is no option to see the State Views. Thanks!
Sorry no. At present multi state objects cannot reside on a slide master.
Multi state objects can now exist on master slides in Captivate 2017
