In this article I show you how to upload an e-learning module to your website. I’m using my recently completed module on discus throwing as an example.
The process is not as complicated as it might seem:
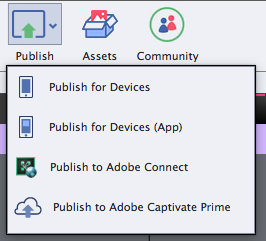
Once you have completed your project, you need to package up all the necessary files via the publishing process in your e-learning authoring tool. In Adobe Captivate go to Publish and select Publish for Devices.
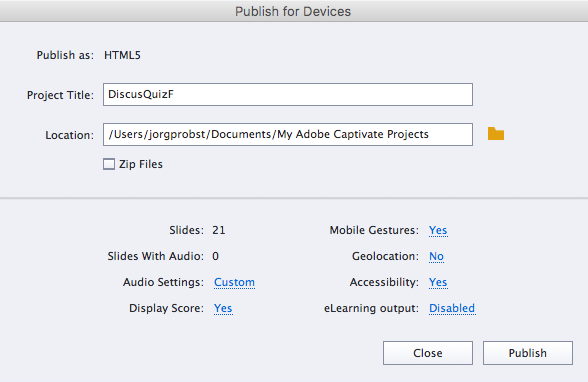
In the dialogue box Publish for Devices ensure that the option Zip Files in not ticked, and you should also set eLearning output to Disabled. You might have these options selected if you’ve published the content for an LMS already. If eLearning output is not disabled the user might be discouraged by an error message that essentially warns them that the SCORM files can’t connect with a Learning Management System.
So your dialogue box should looks something like this:
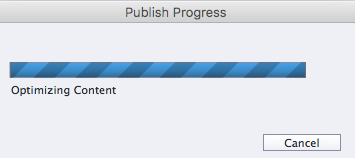
Click on Publish and wait for Captivate to do its magic.
You can select No when Captivate asks you whether you want to view the output:

All the files you later need to upload to your web server are now saved in the nominated folder.
Next, you will upload these files via FTP (file transfer protocol) to a folder within your public_html folder on your web server.
In my case, I first logged into my Bluehost account (the process would be similar with other hosting services) and I created a special subdomain called elearning. I will place all my e-learning modules under that subdomain.
I can find the relevant subdomain folder within the public_html folder. Within that subdomain folder I created another folder descriptively named discusquiz into which I will place the necessary files Captivate generated for me previously.
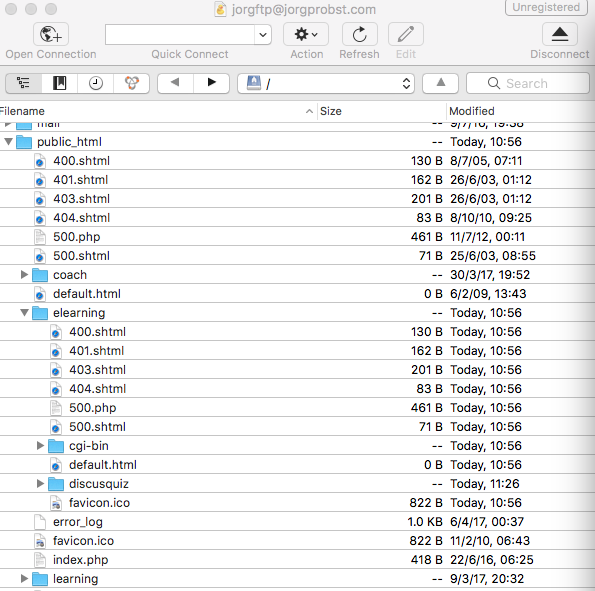
Being a Mac user I used the FTP software Cyberduck to manage the file transfer. Windows users might use an FTP client like Filezilla. If you need help setting up your FTP file transfer capability and you happen to be a Bluehost customer, refer to these instructions.
Now simply select all files Captivate packaged up for you and drag and drop them to the target folder. So in this example all the files highlighted in blue (the files located on my Mac) are dragged and dropped in the discusquiz folder in the Cyberduck window.

Now it’s time for Cyberduck to do its magic:

Of course you also need a link for users to access and play your newly uploaded e-learning module.
In Cyberduck, select the index.html file, click on Action and select Copy URL > HTTP URL
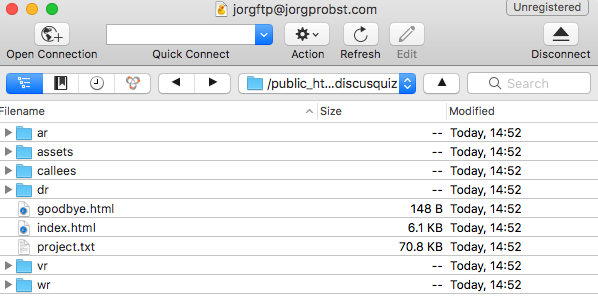
You can now paste that link in your web browser address bar – but hang on, you’re not quite done yet.
Finally, get rid of the ftp and the public_html bits of the address. In my example the copied address http://ftp.jorgprobst.com/public_html/elearning/discusquiz/index.html
becomes this:
http://jorgprobst.com/elearning/discusquiz/index.html
And that’s it! Users can now use that link to access and play your e-learning module:

In this article I show you how to upload an e-learning module to your website. I’m using my recently completed module on discus throwing as an example.
The process is not as complicated as it might seem:
Once you have completed your project, you need to package up all the necessary files via the publishing process in your e-learning authoring tool. In Adobe Captivate go to Publish and select Publish for Devices.

In the dialogue box Publish for Devices ensure that the option Zip Files in not ticked, and you should also set eLearning output to Disabled. You might have these options selected if you’ve published the content for an LMS already. If eLearning output is not disabled the user might be discouraged by an error message that essentially warns them that the SCORM files can’t connect with a Learning Management System.
So your dialogue box should looks something like this:

Click on Publish and wait for Captivate to do its magic.

You can select No when Captivate asks you whether you want to view the output:

All the files you later need to upload to your web server are now saved in the nominated folder.
Next, you will upload these files via FTP (file transfer protocol) to a folder within your public_html folder on your web server.
In my case, I first logged into my Bluehost account (the process would be similar with other hosting services) and I created a special subdomain called elearning. I will place all my e-learning modules under that subdomain.
I can find the relevant subdomain folder within the public_html folder. Within that subdomain folder I created another folder descriptively named discusquiz into which I will place the necessary files Captivate generated for me previously.

Being a Mac user I used the FTP software Cyberduck to manage the file transfer. Windows users might use an FTP client like Filezilla. If you need help setting up your FTP file transfer capability and you happen to be a Bluehost customer, refer to these instructions.
Now simply select all files Captivate packaged up for you and drag and drop them to the target folder. So in this example all the files highlighted in blue (the files located on my Mac) are dragged and dropped in the discusquiz folder in the Cyberduck window.

Now it’s time for Cyberduck to do its magic:

Of course you also need a link for users to access and play your newly uploaded e-learning module.
In Cyberduck, select the index.html file, click on Action and select Copy URL > HTTP URL

You can now paste that link in your web browser address bar – but hang on, you’re not quite done yet.
Finally, get rid of the ftp and the public_html bits of the address. In my example the copied address http://ftp.jorgprobst.com/public_html/elearning/discusquiz/index.html
becomes this:
http://jorgprobst.com/elearning/discusquiz/index.html
And that’s it! Users can now use that link to access and play your e-learning module:

You must be logged in to post a comment.
- Most Recent
- Most Relevant


