 Newbie
20 posts
Newbie
20 posts
Launch the Mission: Mars Colony 01 Project: ![]()
Adobe Captivate 2019 incorporates a rich variety of accessible features and functions that allow developers to produce effective eLearning courses. However, whether the result of client requirements, or your own professional development goals, you may want to extend Captivate’s capabilities through the use of JavaScript or JQuery.
My interest in using JavaScript and JQuery was twofold. First, I wanted to brush up on my JavaScript skills, as I don’t specialize in JavaScript programming. I use JavaScript when a communication or training solution requires it, and sometimes its just not needed.
Second, I wanted to explore how JavaScript and JQuery worked within Captivate 2019. As I said, you may not need to use JavaScript, as Advanced Actions and Shared Actions within Captivate may get the job done quite nicely. However, there might be situations in the future when using JavaScript could work for me.
This showcase presents “Mission: Mars Colony 01”, a Captivate 2019 project created to explore using JavaScript to create simple Gamification functions. As my objectives were mainly professional development, I kept the style more on the “fun” side. Key feature highlights include a:
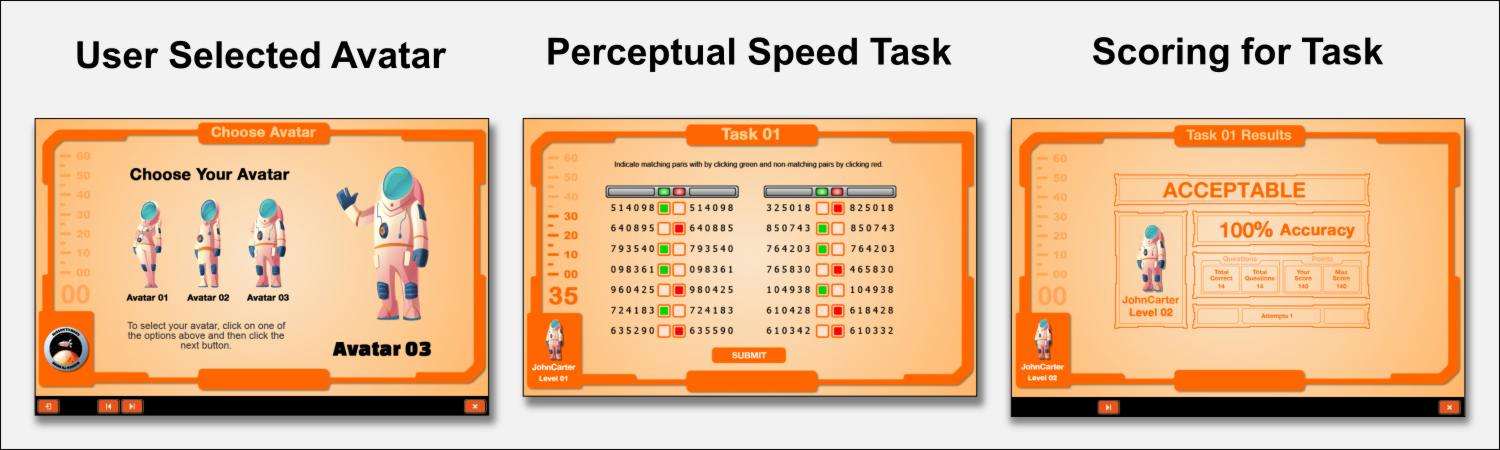
- Learner selected avatar and name
- System assigned performance “Level” based on quiz performance
- Timed perceptual speed task that includes automatic scoring
The main focus of the project was a perceptual speed task based on an ability test that measures how quickly a person can scan objects and detect similarities and differences. In this case, the user reads a pair of 6 digit numbers and must determine if they are the same or different. This section of the project required the most coding in order create the functions for the countdown timer, the toggle buttons used in the test and the calculation of test performance.
General Strategy
The general scripting strategy was, to the extent possible, to call all JavaScript and JQuery functions within an Advanced Action created for each slide. Back in the day, this was basically how we set up OpenScript within the Toolbook object hierarchy.
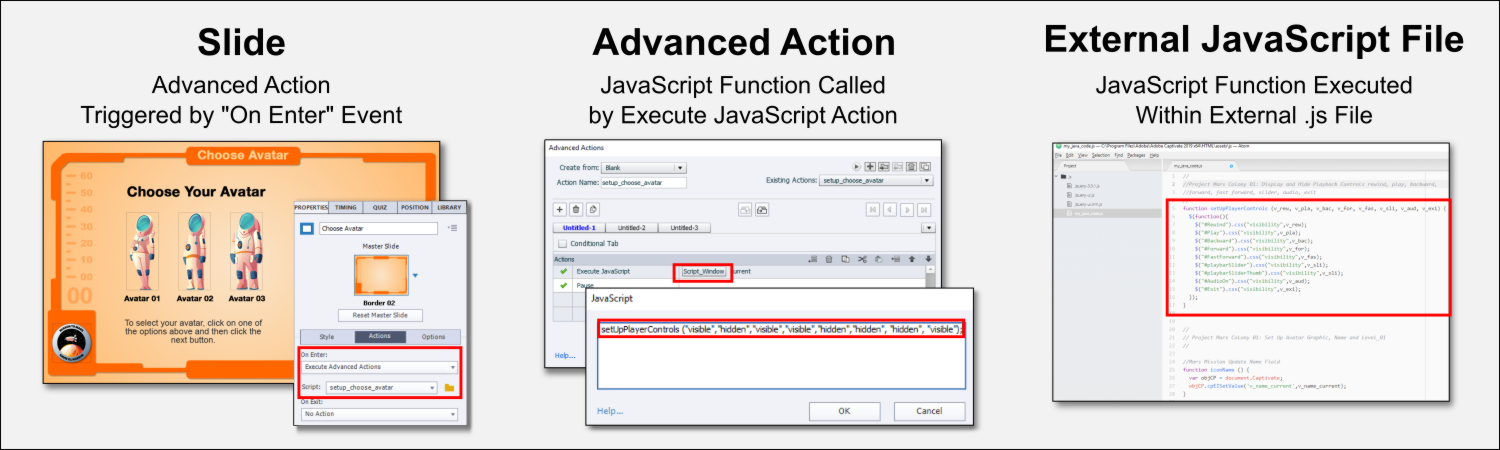
Once the Advanced Action is created and assigned to a slide for the “On Enter” event, the Advanced Action could be easily accessed, along with the JavaScript. This made updating and debugging the JavaScript code easier.
The bulk of the JavaScript was contained in the “my_java_code.js” file and linked to the Captivate “index.html” file via an include, as described by TLC Media Design. The .js file was written with Atom, with debugging accomplished with a combination of the Python Tutor and Developer Tools within Google. Note: I backed up my “index.html” file before altering it.
Avatars, Timers and Quizzes
It is worth noting that the coding for the project was based on the strategy or actual code for a number of Adobe Community contributors.
Selecting Avatars: To setup the avatars, avatar name and performance level, I used a method similar to that recommended by Paul Wilson that involved setting the state of a multi-state smart object based on a variable’s value. However, where Paul Wilson used advanced actions, I used a combination of advanced actions and JavaScript.
Countdown Timers: The script for the timers was based on Greg Stager’s 10-Second Timer 3000, with some modifications. First, since it was used to set a time limit for the perceptual speed task, some of the buttons weren’t needed. However, as I found out, the script for the “Cancel” task was essential for ensuring the timer was reset prior to continuing navigation. Second, in addition to the countdown clock, I included a countdown bar.
The Perceptual Speed Task: My original concept was to use radio buttons for the perceptual speed task, but I couldn’t find a solution. I did find a great article by Steven Warwick where he used JavaScript to create a custom true / false quiz using toggle buttons and this code did the trick. It is worth noting that Quiz slides contain very special objects that Captivate uses to communicate with the LMS. Its best to avoid deleting slides or objects, rather use the onboard options to hide objects or hide them within the screen using formatting or other objects.
Wrapping it Up
All in all I enjoyed creating the Mars Colony 01 project. I certainly brushed up on my JavaScript tools and learned a thing or two about JQuery in the process.
Files for Download
Captivate 2019 .cptx document: Mars Colony 01
JavaScript Code: my_java_code
References
TLCMediaDesign | Using External JavaScript libraries in Adobe Captivate
JavaScript.Info | Debugging in Chrome
Paul Wilson | Adobe Captivate – Allow Learners To Select Their Own Avatar
Steven Warwick – Health Decisions | Building a fully custom quiz in Adobe Captivate using JavaScript
Graphics
BiZkettE1 – Freepik | Arabic Night Landscape
Vectorpocket – Freepik | Set of Cartoon Spaceman Kid
Vectorpocket – Freepik | Set with Cartoon Astronaut Girl
Vectorpocket – Freepik | Cartoon Spaceman
Vectorpocket – Freepik | Spaceman Family with Space Ship
Vectorpouch – Freepik | Cartoon Solar System
NASA- JPL Caltech – MSSS | Telephoto Vista from Ridge in Mars’ Gale Crater
Sound
Launch the Mission: Mars Colony 01 Project: ![]()
Adobe Captivate 2019 incorporates a rich variety of accessible features and functions that allow developers to produce effective eLearning courses. However, whether the result of client requirements, or your own professional development goals, you may want to extend Captivate’s capabilities through the use of JavaScript or JQuery.
My interest in using JavaScript and JQuery was twofold. First, I wanted to brush up on my JavaScript skills, as I don’t specialize in JavaScript programming. I use JavaScript when a communication or training solution requires it, and sometimes its just not needed.
Second, I wanted to explore how JavaScript and JQuery worked within Captivate 2019. As I said, you may not need to use JavaScript, as Advanced Actions and Shared Actions within Captivate may get the job done quite nicely. However, there might be situations in the future when using JavaScript could work for me.
This showcase presents “Mission: Mars Colony 01”, a Captivate 2019 project created to explore using JavaScript to create simple Gamification functions. As my objectives were mainly professional development, I kept the style more on the “fun” side. Key feature highlights include a:
- Learner selected avatar and name
- System assigned performance “Level” based on quiz performance
- Timed perceptual speed task that includes automatic scoring
The main focus of the project was a perceptual speed task based on an ability test that measures how quickly a person can scan objects and detect similarities and differences. In this case, the user reads a pair of 6 digit numbers and must determine if they are the same or different. This section of the project required the most coding in order create the functions for the countdown timer, the toggle buttons used in the test and the calculation of test performance.
General Strategy
The general scripting strategy was, to the extent possible, to call all JavaScript and JQuery functions within an Advanced Action created for each slide. Back in the day, this was basically how we set up OpenScript within the Toolbook object hierarchy.
Once the Advanced Action is created and assigned to a slide for the “On Enter” event, the Advanced Action could be easily accessed, along with the JavaScript. This made updating and debugging the JavaScript code easier.
The bulk of the JavaScript was contained in the “my_java_code.js” file and linked to the Captivate “index.html” file via an include, as described by TLC Media Design. The .js file was written with Atom, with debugging accomplished with a combination of the Python Tutor and Developer Tools within Google. Note: I backed up my “index.html” file before altering it.
Avatars, Timers and Quizzes
It is worth noting that the coding for the project was based on the strategy or actual code for a number of Adobe Community contributors.
Selecting Avatars: To setup the avatars, avatar name and performance level, I used a method similar to that recommended by Paul Wilson that involved setting the state of a multi-state smart object based on a variable’s value. However, where Paul Wilson used advanced actions, I used a combination of advanced actions and JavaScript.
Countdown Timers: The script for the timers was based on Greg Stager’s 10-Second Timer 3000, with some modifications. First, since it was used to set a time limit for the perceptual speed task, some of the buttons weren’t needed. However, as I found out, the script for the “Cancel” task was essential for ensuring the timer was reset prior to continuing navigation. Second, in addition to the countdown clock, I included a countdown bar.
The Perceptual Speed Task: My original concept was to use radio buttons for the perceptual speed task, but I couldn’t find a solution. I did find a great article by Steven Warwick where he used JavaScript to create a custom true / false quiz using toggle buttons and this code did the trick. It is worth noting that Quiz slides contain very special objects that Captivate uses to communicate with the LMS. Its best to avoid deleting slides or objects, rather use the onboard options to hide objects or hide them within the screen using formatting or other objects.
Wrapping it Up
All in all I enjoyed creating the Mars Colony 01 project. I certainly brushed up on my JavaScript tools and learned a thing or two about JQuery in the process.
Files for Download
Captivate 2019 .cptx document: Mars Colony 01
JavaScript Code: my_java_code
References
TLCMediaDesign | Using External JavaScript libraries in Adobe Captivate
JavaScript.Info | Debugging in Chrome
Paul Wilson | Adobe Captivate – Allow Learners To Select Their Own Avatar
Steven Warwick – Health Decisions | Building a fully custom quiz in Adobe Captivate using JavaScript
Graphics
BiZkettE1 – Freepik | Arabic Night Landscape
Vectorpocket – Freepik | Set of Cartoon Spaceman Kid
Vectorpocket – Freepik | Set with Cartoon Astronaut Girl
Vectorpocket – Freepik | Cartoon Spaceman
Vectorpocket – Freepik | Spaceman Family with Space Ship
Vectorpouch – Freepik | Cartoon Solar System
NASA- JPL Caltech – MSSS | Telephoto Vista from Ridge in Mars’ Gale Crater
Sound


You must be logged in to post a comment.
- Most Recent
- Most Relevant
Hi Jim,
Thank you for sharing this with us! I always enjoy seeing how other people are using Captivate.
Great article, Jim.
Hey Jim. Great idea and execution.
Personally, I tend to use Javascript for interactivity in Captivate over advanced actions (although I’m sure Lieve and Paul would possibly argue the point) because I find it faster and more flexible.
The game changer for me was the ability to trigger an advanced action from JS and change object states.
I’m also excited about Captivate 2019’s new ability to use state changes on MSO’s to create a ‘must complete all elements’ scenario, and the new automatic branching setup.
Your use of adobe’s undocumented features, particularly the ability to trigger change on a multistate object is invaluable.
I have a couple of posts on my blog about using Javascript with Captivate which some of your readers may find useful:
How to use Javascript in Captivate
Captivate : Importing JSON data using Javascript
Captivate 2019 Branching Navigation
Keep up the good work!
All depends on the situation and use case. I doubt that JS is always faster. If I was working in a company, would certainly use JS a lot more, setting up functions in an external JS file. But as consultant, that is not possible. Moroever explaining advanced actions to a client is a lot easier than explaining a script, and I often use shared actions because the client only has to learn to enter parameters (like arguments in a JS function).
I think the difference in what we do, Lieve, is that I’m usually providing and end solution to a client – they don’t get Captivate source files to edit – I just upload SCORM to an LMS.
That way I can use a library of JS files which I store on my GIT repo.
Makes for fast and efficient development.
But don’t shoot me – I’m just a geek!
very well done. I love the added suspense of seeing the timing count down. Nice graphics as well. I really want to play with introducing more gamification into the e Learning of my organization.
Superb!. No words to describe your hard & beautiful work. A complete Demo.
Nice work, Jim. Bet I could have done it with advanced actions! One extra suggestion (something I had to realize couple of times in consultancy jobs): showing the timer progress, by changing the background depending on the elapsed time. More gamification in this game. BTW, did that with shared actions as well….
Hi Lieve,thanks for the feedback. I was also able to get the icon behavior done with Shared Actions, but chose to focus on JavaScript. Shared Actions seem very similar in concept to JavaScript functions.I’ll have to try to idea of changing background graphics with the timer. Seems like it would work well with the “final countdown” sequence.Jim
That is what I meant. It would be very easy in your use case. However I had to deal with random questions, which made it a bit more complicated.
Yes, you could think of Shared actions like being similar to functions but they have a lot more side effects which make them especially useful when needed in multiple projects. I don’t know if you read this blog post:
thanks for the link, I’ll check it out. Quick question: is there a way to edit the Shared Action once its been stored in the Library?
No, that is one of the feature requests that is still not solved. However, when using the shared action as a template to create a new shared action is a workaround. Contrary to advanced action, you can even use the same name for this shared action.
thx.
Lieve, I guess this is why I use JS 😉
That was pretty cool, Jim. Glad that you found a practical use for the timer as well.
I admit that I have been debating with myself on the use of gamification in my own work. I like games, as do many of my co-workers, and I am sure – the company at large – but I think I would need to be a bit more subtle in my approach in order to have it accepted for mainstream deployment.
In your experience, what have you found the perception to be among adults, or perhaps senior stakeholders, about the use of “games” for training?
Hi Greg,thanks for your code and feedback. Your timer really did the trick.Most of my experience in training has involved systems work like SAP and extreme deadlines. The end result is a lot of rather dry training without many bells and whistles, so I haven’t really used it in the corporate world.I’ve done a couple of projects within the academic and education world, and they seemed more open to gamification.I think it will depend on budgets and the culture. Sales organizations, especially those that do direct sales, may like it a lot better. Some sales groups actually have leader boards and such.Jim
Thanks for sharing your hard work and referencing all your sources.
