 Legend
245 posts
Legend
245 posts
Third blog in series about ‘using’ (not creating) shared actions. Fpcussed on: reuse of existing shared actions and variables in new projects.
Intro
Recently I published two blogs and a video in this community about ‘Use of Shared Actions’. . Focus is not on the creation of Shared actions, but only on the use of existing actions. This is a perfect scenario for starting users, who want to insert interactions without any scripting or creation of variables. Here are the links to the published:
Use of Shared Actions: explaining the goal, and showing a Demo project with 4 typical interactions. All of them can be realized with the workflows explained in the following blogs and videos.
Parameters (back to basics): this blog explains the role of ‘parameters’ and has a detailed step-by-step workflow how to use existing shared actions. One of the 4 interactions (slideshow) of the demo project is replicated. I offer a start project which has shared actions (in the Library) to allow you to practice.
Crash course – Lesson 1: video as alternative for the previous blog. The video shows the most intuitive workflow to use the shared actions, using the same free start project. You will be amazed how simple this can be.
This article will explain step-by-step workflow to use the same actions in your project. Again very simple workflow. For the video fans: lesson 2 of the Crash course will also be a video, to be published soon.
Workflow: reuse shared actions in your projects
Step 1: Preparation
To follow this workflow, you need a project with at least two slides:
- Content on the first slide is not important, it is meant to allow you to test the project.
- Second slide needs to have these objects:
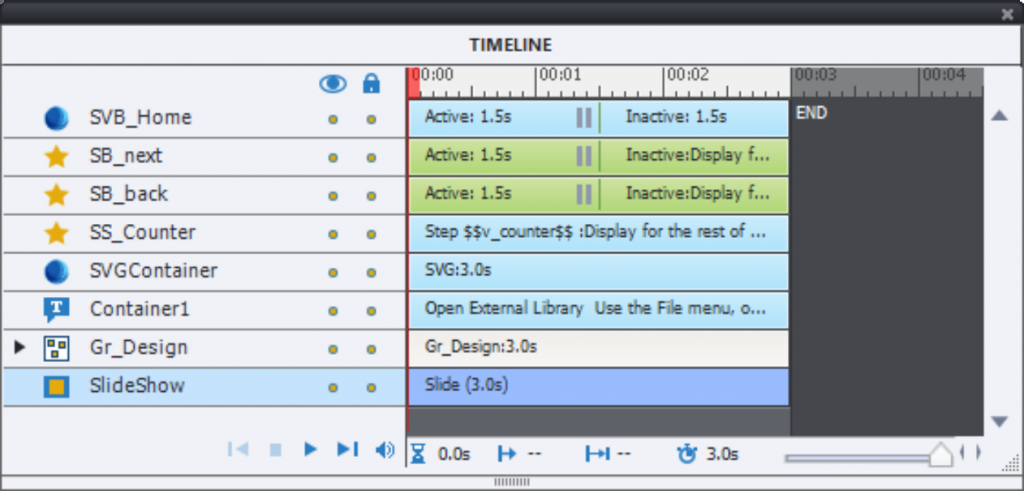
- Two multistate objects. Content is not important: audio, video, graphics, text or combinations in the states. Only requirement: same number of states in both objects. They are labeled Container1/SVGContainer in the Timeline below.
- A shape or caption which will be used to insert the variable v_counter. You will insert the variable later on. Labeled SS_Counter in the Timeline.
- Two navigation buttons: Next and Back. They are labeled SB_Back and SB_Next in my project (shape buttons)
- A button to jump back to slide 1, with the action ‘Jump to slide 1’ or ‘Go to Previous Slide’. I used a SVG as button, labeled SVB_Home.
Here is an example of the Timeline of the project I use, the names are mentioned above::
Step 2: Variables
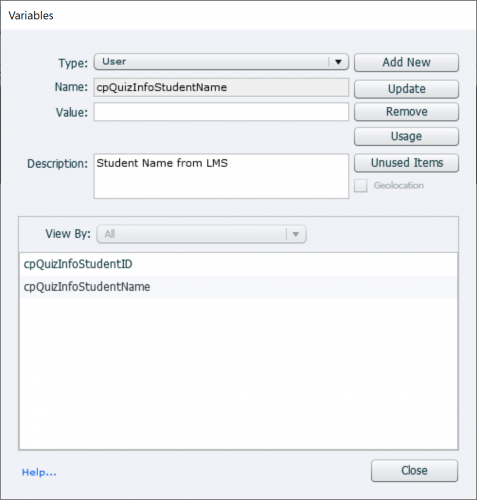
Have a look at the variables, using menu Project, Variables. The default view will show you the two user variables which are added to each project:
Step 3: Open External Library
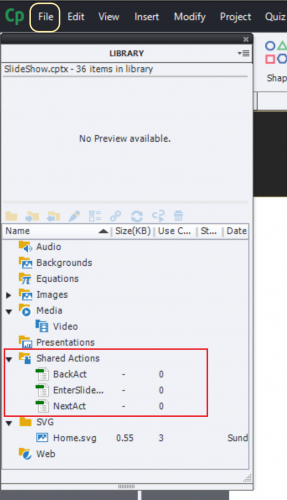
Use the File menu, option Import, External Library. You have to point to the original project which has the shared actions on board. In this case that will be the start project which you used in the previous practice; “SlideShow”.
The project will not open, but its library appears as a floating window in the left top corner of your screen. You will probably need to increase its height, and collapse the Images folder to see the Shared Actions folder clearly.
You can use any object directly from this external Library in your project. I used the Home button (SVG). However for the Shared Actions, it is better to not use this method. It can be done if there is only one independent shared action, but in this example the three actions are somehow linked due to the used variables.
Step 4: Drag shared actions to project Library
Select the three shared actions in the external Library, and drag them to the project library. They will appear in that library with the Usage set to 0.
Step 5: Check variables
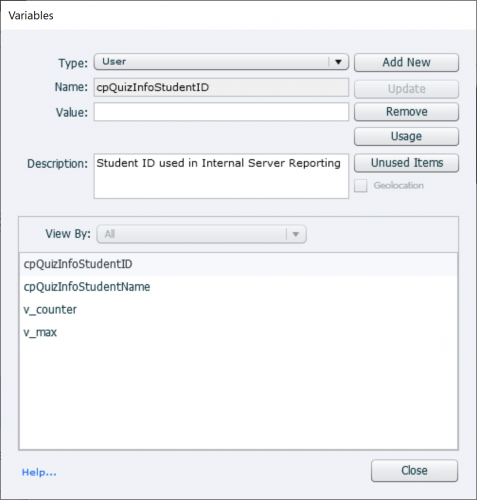
Use Project, Variables and… surprise! The variables used in the shared actions have appeared, including their default value and description
You can now insert the variable v_counter in the text (see Timeline) SS_Counter, using the X button in the Properties panel, Character part.
The text will look like this:
…. $$v_counter$$
Beware: if you see more than one instance of a variable, it means that you didn’t drag ALL the shared actions at once. In that case, please delete the shared actions, delete the variables and retry Step 4.
Step….
You can now rehearse what you learned in the previous post: drag the shared actions to the slide and to the navigation buttons, and choose a ‘value’ for the parameters.
Do not forget to test if everything is working as expected. Use F11, Preview HTML I Browser for the best preview.
More?
The step-by-step workflows described in this and the previous blog (or in the video and the next video to be published soon)) can be used for all the interactions in the Demo project, provide you have the shared actions. Not only for those rather simple interactions! It is also possible for more complicated projects like the Matchstick game, which I published recently, and for many more use cases.
I sincerely hope that at least some Captivate users will realize possibilities. Ask an expert to design shared actions which can be used by any Captivate developer, without having to dive into advanced actions, variables etc. .
Intro
Recently I published two blogs and a video in this community about ‘Use of Shared Actions’. . Focus is not on the creation of Shared actions, but only on the use of existing actions. This is a perfect scenario for starting users, who want to insert interactions without any scripting or creation of variables. Here are the links to the published:
Use of Shared Actions: explaining the goal, and showing a Demo project with 4 typical interactions. All of them can be realized with the workflows explained in the following blogs and videos.
Parameters (back to basics): this blog explains the role of ‘parameters’ and has a detailed step-by-step workflow how to use existing shared actions. One of the 4 interactions (slideshow) of the demo project is replicated. I offer a start project which has shared actions (in the Library) to allow you to practice.
Crash course – Lesson 1: video as alternative for the previous blog. The video shows the most intuitive workflow to use the shared actions, using the same free start project. You will be amazed how simple this can be.
This article will explain step-by-step workflow to use the same actions in your project. Again very simple workflow. For the video fans: lesson 2 of the Crash course will also be a video, to be published soon.
Workflow: reuse shared actions in your projects
Step 1: Preparation
To follow this workflow, you need a project with at least two slides:
- Content on the first slide is not important, it is meant to allow you to test the project.
- Second slide needs to have these objects:
- Two multistate objects. Content is not important: audio, video, graphics, text or combinations in the states. Only requirement: same number of states in both objects. They are labeled Container1/SVGContainer in the Timeline below.
- A shape or caption which will be used to insert the variable v_counter. You will insert the variable later on. Labeled SS_Counter in the Timeline.
- Two navigation buttons: Next and Back. They are labeled SB_Back and SB_Next in my project (shape buttons)
- A button to jump back to slide 1, with the action ‘Jump to slide 1’ or ‘Go to Previous Slide’. I used a SVG as button, labeled SVB_Home.
Here is an example of the Timeline of the project I use, the names are mentioned above::
Step 2: Variables
Have a look at the variables, using menu Project, Variables. The default view will show you the two user variables which are added to each project:
Step 3: Open External Library
Use the File menu, option Import, External Library. You have to point to the original project which has the shared actions on board. In this case that will be the start project which you used in the previous practice; “SlideShow”.
The project will not open, but its library appears as a floating window in the left top corner of your screen. You will probably need to increase its height, and collapse the Images folder to see the Shared Actions folder clearly.
You can use any object directly from this external Library in your project. I used the Home button (SVG). However for the Shared Actions, it is better to not use this method. It can be done if there is only one independent shared action, but in this example the three actions are somehow linked due to the used variables.
Step 4: Drag shared actions to project Library
Select the three shared actions in the external Library, and drag them to the project library. They will appear in that library with the Usage set to 0.
Step 5: Check variables
Use Project, Variables and… surprise! The variables used in the shared actions have appeared, including their default value and description
You can now insert the variable v_counter in the text (see Timeline) SS_Counter, using the X button in the Properties panel, Character part.
The text will look like this:
…. $$v_counter$$
Beware: if you see more than one instance of a variable, it means that you didn’t drag ALL the shared actions at once. In that case, please delete the shared actions, delete the variables and retry Step 4.
Step….
You can now rehearse what you learned in the previous post: drag the shared actions to the slide and to the navigation buttons, and choose a ‘value’ for the parameters.
Do not forget to test if everything is working as expected. Use F11, Preview HTML I Browser for the best preview.
More?
The step-by-step workflows described in this and the previous blog (or in the video and the next video to be published soon)) can be used for all the interactions in the Demo project, provide you have the shared actions. Not only for those rather simple interactions! It is also possible for more complicated projects like the Matchstick game, which I published recently, and for many more use cases.
I sincerely hope that at least some Captivate users will realize possibilities. Ask an expert to design shared actions which can be used by any Captivate developer, without having to dive into advanced actions, variables etc. .


You must be logged in to post a comment.
- Most Recent
- Most Relevant
